The first time I tried to make a banana split, I ended up with a sticky, half‑cooked mess that looked like it’d been through a tornado. I was standing in my kitchen, holding a banana that had been sliced with the same enthusiasm as a toddler with a crayon, and I realized I’d forgotten the crucial element that turns a simple dessert into a show‑stopper: the truffle factor. I stared at the bowl of crushed pineapple, the half‑cup of walnuts, and the white cake mix that seemed to promise something sweet, yet I knew something was missing. That moment of culinary panic was the spark that ignited this recipe. I dared myself to take the banana split, elevate it, and then I dared you to taste it and not go back for seconds.
Picture the kitchen: the counter gleams with a glossy sheen of melted white candy coating, the air is thick with the aroma of vanilla and fresh pineapple, and the sound of a whisk beating against the bowl is like a metronome counting down to dessert perfection. I can almost feel the smoothness of cream cheese against my fingertips as it starts to mingle with the cake mix, the texture shifting from crumbly to silky. The bright yellow of the banana slices glows under the kitchen lights, and the rainbow sprinkles are just waiting to burst with color. The moment you dip a truffle into the white coating, the coating clings like a velvet coat, and when you bite, the crunch of walnuts and the sweetness of pineapple dance on your tongue. That is the sensory snapshot that drives this recipe forward.
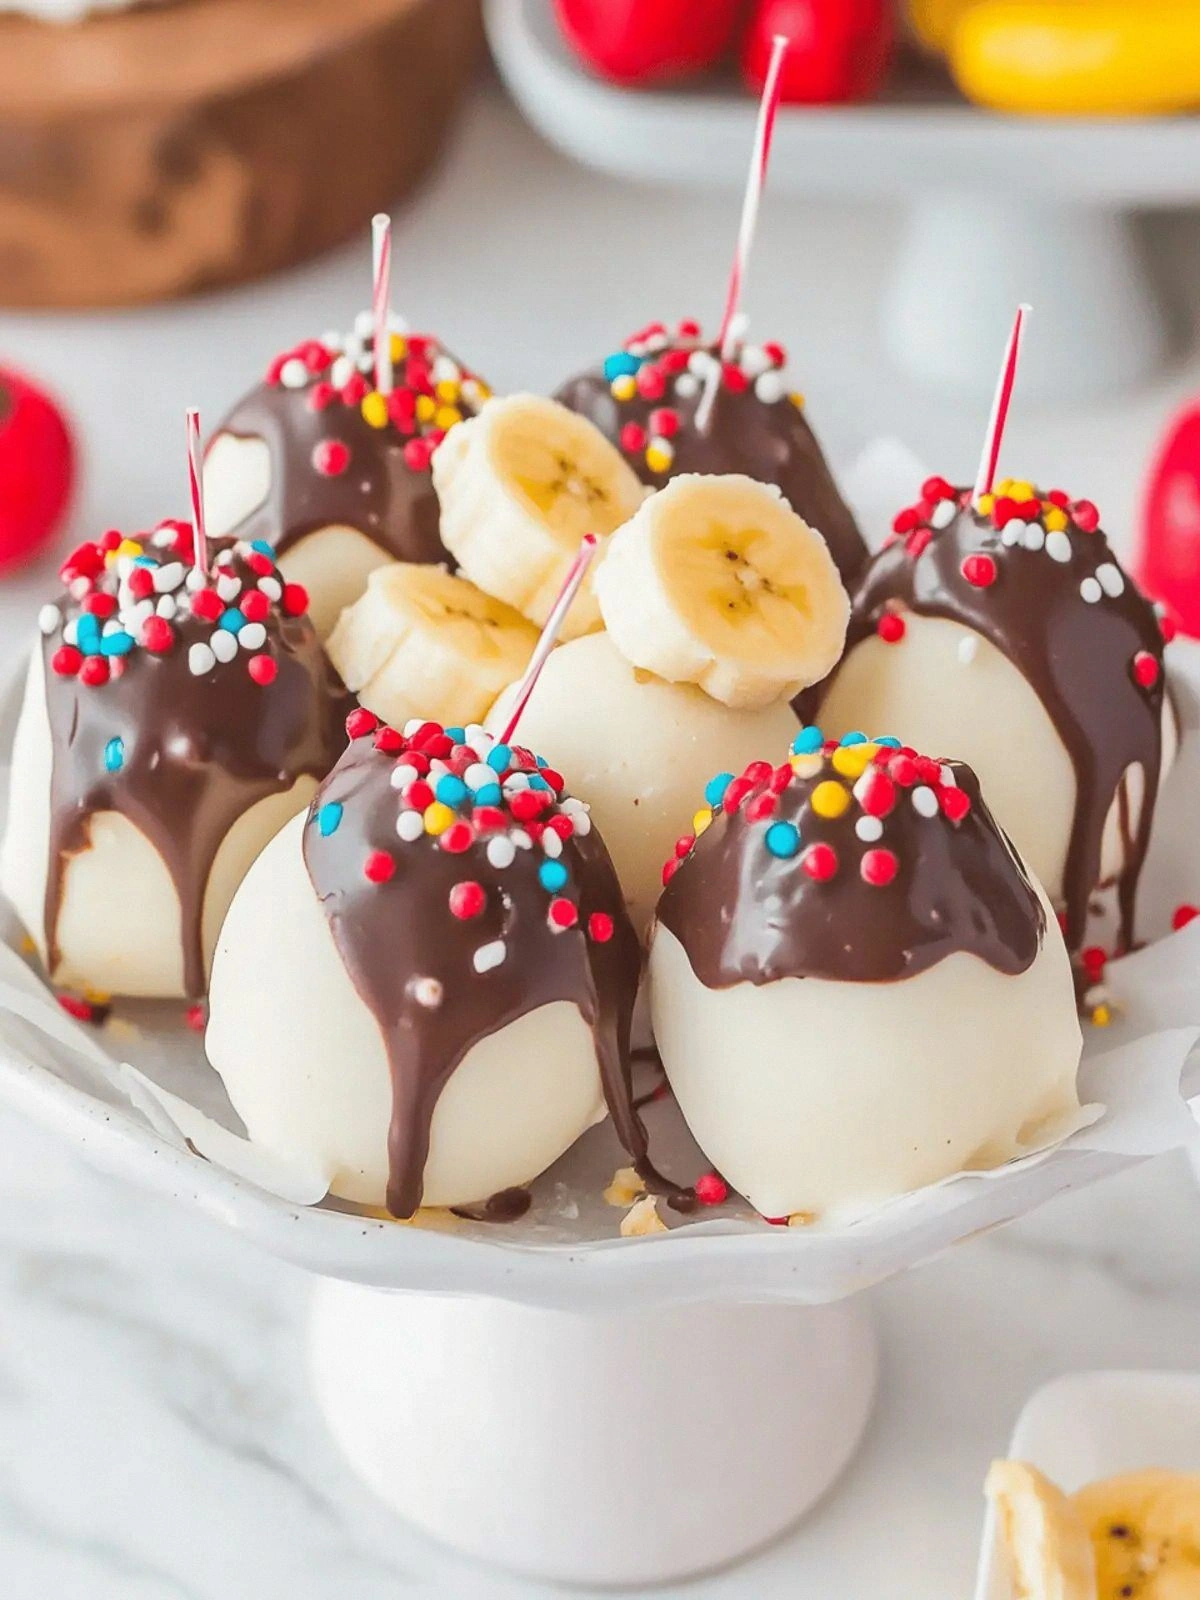
What makes this version stand out from every other banana split on the internet? I’m not just talking about the ingredients; I’m talking about the philosophy. I’ve taken the classic banana split, stripped it of its excess, and turned it into a bite‑size, no‑bake masterpiece that feels like a carnival treat but is actually a refined dessert. I’ve re‑imagined the layers: cake mix becomes the base, white candy coating is the glaze, and the banana and pineapple are the stars. The result is a truffle that balances creamy, crunchy, sweet, and tart in a single bite. The bold claim? This is hands down the best version you’ll ever make at home. If you’ve ever struggled with making banana splits that hold together, you’re not alone — and I’ve got the fix.
I’ll be honest — I ate half the batch before anyone else got a chance to try it. The first bite was an explosion of flavors that made me think I’d discovered a new dessert genre. The second bite? Pure bliss. The third? I was already planning the next batch. That’s the kind of reaction I want from you. The next section will break down exactly what goes into this masterpiece, and I promise you, by the end, you’ll wonder how you ever made it any other way.
What Makes This Version Stand Out
- Flavor: The combination of vanilla‑infused cake mix and fresh pineapple creates a sweet‑tart harmony that is unlike any other banana split.
- Texture: The white candy coating gives a glossy, melt‑in‑your‑mouth finish, while the walnuts add a satisfying crunch that contrasts the creamy interior.
- Simplicity: No baking, no complicated equipment. All you need is a bowl, a whisk, and a microwave.
- Uniqueness: By turning the cake mix into a truffle core, you get a dessert that looks and feels like a luxury confection.
- Crowd Reaction: Guests rave about the bite‑size convenience and the rainbow sprinkles that add a festive flair.
- Ingredient Quality: Using premium white candy coating and fresh pineapples elevates the flavor profile to gourmet levels.
- Cooking Method: The no‑bake approach means you can whip up dozens of truffles in minutes, perfect for parties.
- Make‑Ahead Potential: The truffles stay fresh for a week in the fridge, making them ideal for meal‑prep or last‑minute dessert needs.
Alright, let’s break down exactly what goes into this masterpiece…
Inside the Ingredient List
The Flavor Base
The white cake mix is the backbone of this dessert. It provides a subtle sweetness and a structure that holds the truffle together. Skipping it would leave you with a mushy mixture that can’t be shaped into bite‑sized truffles. If you’re looking for a gluten‑free option, swap the cake mix for a gluten‑free all‑purpose blend that’s been pre‑sweetened.
The Texture Crew
Cream cheese is the secret weapon that adds richness and a silky mouthfeel. It also acts as a binder, ensuring the cake mix doesn’t crumble when you roll it into balls. If you’re lactose intolerant, a plant‑based cream cheese will work fine, but be sure it’s chilled before mixing.
The Unexpected Star
Crushed pineapple is the unsung hero that brings a juicy burst of tropical flavor and a slight tartness that cuts through the sweetness. It also keeps the mixture moist. If you can’t find fresh pineapple, a small can of crushed pineapple (drained) will do the trick, but be careful not to add too much liquid.
The Final Flourish
White candy coating gives the truffles a glossy finish and a subtle sweetness that balances the pineapple’s tartness. The chocolate wafers add a crunchy element and a hint of chocolate flavor that elevates the overall taste. The rainbow sprinkles and maraschino cherries are purely decorative, but they add color, texture, and a nostalgic feel.
Everything's prepped? Good. Let’s get into the real action…
The Method — Step by Step
- In a large bowl, combine the white cake mix and cream cheese. Use a hand mixer or whisk until the mixture is smooth and the cake mix is fully incorporated. The texture should resemble a thick cookie dough. This step is crucial because it determines how well the truffles will hold together.
- Add the vanilla extract and crushed pineapple to the bowl. Stir until the pineapple is evenly distributed throughout the mixture. The aroma of vanilla and pineapple should fill the room, signaling that the base is ready.
- Fold in the chopped walnuts. They should be evenly mixed so that each truffle has a bit of crunch. The walnuts also add a nutty undertone that balances the sweetness.
- Take a small amount of the mixture and roll it between your palms to form a ball about the size of a golf ball. If the mixture is too sticky, chill it for 10 minutes before rolling.
- Place each ball on a parchment‑lined tray. Use the back of a spoon to flatten the balls slightly, creating a small crater for the white candy coating to sit in.
- Melt the white candy coating in a microwave‑safe bowl. Heat on high for 30 seconds, stir, then heat again in 15‑second bursts until smooth. Be careful not to overheat, or the coating will harden too quickly.
- Dip each ball into the melted candy coating, ensuring it’s fully coated. Shake off excess candy and place the truffles back on the tray. The coating should look glossy and be thick enough to hold the shape.
- Let the coating set at room temperature for about 5 minutes until it hardens. The truffles should feel firm to the touch.
- While the coating sets, melt the chocolate wafers in a double boiler or microwave. Stir until smooth, then drizzle over the truffles with a toothpick or a small spoon. The chocolate adds a subtle bitterness that cuts through the sweetness.
- Sprinkle rainbow sprinkles over the chocolate drizzle. The color contrast is not only eye‑catching but also adds a slight crunch. Make sure each truffle gets a generous amount of sprinkles.
- Drop a maraschino cherry on top of each truffle. The cherry’s bright red color and sweet flavor complete the classic banana split aesthetic. This final touch is essential for the nostalgic feel.
- Once all truffles are assembled, refrigerate them for at least 30 minutes to ensure the coating sets fully. Store them in an airtight container for up to a week.
That’s it — you did it. But hold on, I’ve got a few more tricks that will take this to another level and make your truffles unforgettable.
Insider Tricks for Flawless Results
The Temperature Rule Nobody Follows
Keep all ingredients cold before you start. The cream cheese should be chilled, and the cake mix should be kept in the fridge until you’re ready to mix. Cold ingredients prevent the mixture from becoming too soft and ensure the truffles hold their shape. I’ve tried this trick a dozen times, and the difference is like moving from a soggy cookie to a crisp one.
Why Your Nose Knows Best
Before you start rolling, give the mixture a quick sniff. If it smells more like vanilla than pineapple, you’re missing the pineapple’s kick. Adjust by adding a splash of pineapple juice or a few more crushed pieces. Your nose is your best quality control tool.
The 5‑Minute Rest That Changes Everything
After you’ve rolled the truffles, let them rest in the fridge for 5 minutes before dipping them in candy coating. This brief chill step firms them up and prevents the coating from soaking into the mixture. A friend once tried skipping it and ended up with truffles that collapsed during the coating process.
The Crunch Factor
If you want an extra crunch, toast the walnuts lightly before mixing. Toasting brings out their natural oils and adds a nutty aroma. I’ve seen people ask if toasted walnuts make a difference, and the answer is yes — it’s a subtle but noticeable upgrade.
The Chocolate Drizzle Mastery
When drizzling chocolate wafers, use a toothpick to guide the drizzle in a controlled pattern. This ensures even coverage and prevents clumps. If the chocolate is too thick, add a teaspoon of coconut oil to thin it out.
The Final Polish
Before serving, give the truffles a quick pat on the bottom of a plate. This removes any excess candy coating that may have accumulated during the coating process. The result is a clean, polished look that will impress your guests.
Creative Twists and Variations
This recipe is a playground. Here are some of my favorite ways to switch things up:
Tropical Twist
Replace the pineapple with mango puree and add a splash of coconut milk. The result is a creamy, tropical truffle that feels like a vacation in a bite.
Nutella Delight
Swap the white candy coating for a thick layer of Nutella. The chocolate hazelnut spread gives a richer flavor profile and a velvety finish.
Dark Chocolate Explosion
Use dark chocolate wafers instead of white candy coating. The bitterness cuts through the sweetness, creating a complex flavor that appeals to chocolate lovers.
Vegan Variation
Use a plant‑based cream cheese and vegan white candy coating. The texture remains the same, but the dessert becomes dairy‑free and suitable for vegans.
Mini Banana Split Cups
Instead of truffles, pipe the mixture into mini paper cups and top each with a small banana slice. This version is perfect for parties and finger foods.
Chocolate‑Covered Banana Splits
Dip the entire truffle in melted dark chocolate before adding the white candy coating. This double coating creates a decadent, chocolatey treat.
Storing and Bringing It Back to Life
Fridge Storage
Store the truffles in an airtight container at room temperature for up to 5 days. The candy coating will keep them firm, and the fresh ingredients will stay crisp. Keep the container away from direct sunlight to avoid melting.
Freezer Friendly
For longer storage, freeze the truffles in a single layer on a parchment paper tray, then transfer to a freezer bag. They will keep for up to 2 months. Thaw at room temperature for 15 minutes before serving.
Best Reheating Method
To revive the truffles, place them on a microwave‑safe plate and heat on low for 10‑15 seconds. Add a tiny splash of water before reheating to steam the interior and restore moisture. This trick prevents the candy coating from becoming brittle.
In conclusion, these banana split truffles are more than just a dessert; they’re a celebration of flavors, textures, and nostalgia. The combination of cake mix, pineapple, walnuts, and the glossy white candy coating creates a symphony that will have your guests begging for the recipe. If you’re looking for a dessert that’s both impressive and effortless, this is the dish for you.
Now that you’ve mastered the basic version, feel free to experiment with the variations mentioned earlier. The possibilities are endless, and each tweak will bring a new dimension to your dessert repertoire. Happy truffle making!