Introduction
Picture this: you’re in your kitchen, the oven timer blares, and you’re staring at a mound of cookie dough that smells like butter, sugar, and vanilla. The moment the first cookie starts to brown, the scent curls around the room, turning a simple afternoon into a culinary adventure. I’ve been chasing that perfect bite for years, and every time I’ve tried a Boston Cream Pie cookie, something felt off—maybe the filling was too runny or the chocolate coating was clumpy. That was until I discovered the secret ingredient that transforms an ordinary cookie into a show‑stopper: a silky pastry cream that’s thick enough to hold its shape but light enough to melt in your mouth. I’m about to walk you through the exact method that turns ordinary ingredients into a masterpiece that will make your friends ask, “Where did you get that?”
When you first open the bag of chocolate chips, the sound of them clinking against the counter is like a tiny drumbeat of anticipation. The butter, soft and gleaming, feels like a warm hug, while the sugar grains glint like tiny stars. As you whisk the eggs, the rhythm of the beat creates a subtle music that tells you everything is going right. The vanilla’s aroma, sweet and floral, drifts through the kitchen, promising depth and comfort. The moment you drop the first spoonful into the pan, the sizzle is a cue that the cookie is about to become a piece of edible art.
Most recipes for Boston Cream Pie cookies are riddled with over‑baked edges, under‑filled centers, or a glaze that dries like a brittle shell. I’ve seen countless batches that come out looking like a sad, soggy biscuit. The truth is, the key to a flawless cookie is in the balance of moisture and structure—achieved by the precise ratio of butter to flour, the timing of the baking powder’s release, and the careful crafting of the pastry cream. By the end of this post, you’ll have a step‑by‑step guide that guarantees a cookie that’s tender inside, crisp on the outside, and filled with a luscious cream that won’t spill. I dare you to taste this and not go back for seconds.
What sets this version apart is not just the ingredients; it’s the process. The dough is rolled into a perfect log, then sliced into uniform rounds that bake evenly, the filling is made with a gentle reduction that creates the ideal thickness, and the chocolate glaze is tempered to a glossy finish that resists cracking. The result is a cookie that feels like a bite of a classic Boston Cream Pie, but with a crunch that satisfies the cookie lover in all of us. If you’ve ever struggled with achieving that perfect balance, you’re not alone—and I’ve got the fix. Picture yourself pulling this out of the oven, the whole kitchen smelling incredible, and sharing a bite that says, “This is hands down the best version you’ll ever make at home.”
And now, let’s dive in. I’ll walk you through every single step, from the first whisk to the final drizzle, so that by the end of this article, you’ll be able to create Boston Cream Pie Cookies that are as impressive on the plate as they are in your taste buds. Okay, ready for the game‑changer? Let’s get started.
What Makes This Version Stand Out
Texture: The dough is engineered to be thick yet pliable, so each cookie holds its shape without becoming too dense. The result is a tender crumb that’s pleasantly chewy, with a crisp edge that snaps like thin ice. This delicate balance is achieved by mixing the butter and sugar until fluffy before incorporating the flour.
Flavor: By using pure vanilla extract instead of imitation, the cookies gain a warm, aromatic depth that lingers. The heavy cream in the pastry cream is whipped to a velvety consistency that carries the vanilla’s nuances, creating a harmonious flavor profile that’s more sophisticated than a standard cookie.
Finish: The chocolate glaze is tempered with vegetable oil, which prevents the chocolate from seizing and gives it a silky sheen that’s impossible to resist. A quick glaze after the cookies cool locks in moisture, keeping the interior soft while the exterior remains glossy.
Make‑ahead: The dough can be frozen for up to a month, and the filling can be prepped a day ahead, allowing you to assemble the cookies on the spot. This flexibility is perfect for last‑minute gatherings or when you need a quick dessert that still feels special.
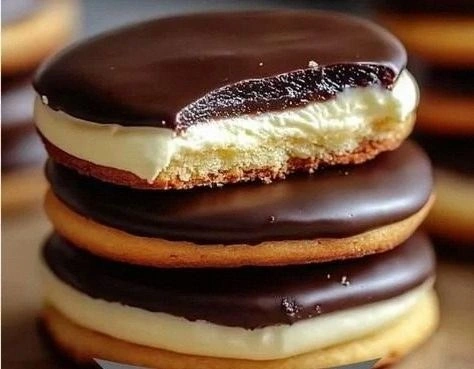
Visual Appeal: Each cookie is a miniature masterpiece, with a golden-brown crust, a bright white filling, and a glossy chocolate rim that catches the light. The contrast of colors and textures makes these cookies a feast for both the palate and the eye.
Ease of Assembly: The assembly process is streamlined—just a few simple steps, and you’re done. The filling doesn’t require a piping bag; a small spoon does the trick. The glaze is poured from a jar, eliminating the need for a separate pot.
Alright, let’s break down exactly what goes into this masterpiece…
Inside the Ingredient List
The Flavor Base
Butter is the backbone of any cookie, providing richness and a tender crumb. Unsalted butter allows you to control the salt level precisely, preventing the cookie from becoming overly salty. When butter is at room temperature, it incorporates air into the dough, creating a lighter texture. If you skip butter, the cookie will be dry and crumbly, lacking that buttery mouthfeel that makes every bite memorable.
Swap Suggestion: For a dairy‑free version, use a high‑fat plant‑based butter that’s specifically labeled “baking butter.” This ensures the cookie maintains its structure and flavor.
Buying Tip: Choose a butter that’s at least 80% fat. Lower‑fat butter will result in a flatter cookie with a less rich flavor.
The Sweetener Crew
Granulated sugar is the primary sweetener, and it’s essential for proper caramelization during baking. The sugar crystals dissolve into the butter, creating a smooth base that caramelizes just enough to give the cookies a golden crust. If you replace it with brown sugar, you’ll get a deeper molasses flavor, but the cookies will be denser and less crisp.
Powdered sugar is reserved for the pastry cream, where it dissolves instantly to create a silky texture. A small amount of powdered sugar keeps the cream sweet without making it overly thick. If you prefer a lower‑carb version, consider using a sugar substitute that dissolves well, such as erythritol.
The Unexpected Star
Heavy cream is the star of the filling, providing the smooth, luscious interior that defines a Boston Cream Pie. When whipped, the cream thickens to a consistency that can be piped or spooned between cookie layers. If you use a lower‑fat milk instead of heavy cream, the filling will be too runny and will leak during baking.
Adding vanilla extract to the cream amplifies the flavor, creating a subtle floral undertone that complements the chocolate glaze. The vanilla’s aroma also enhances the overall sensory experience, making each bite feel indulgent.
The Final Flourish
Chocolate chips give the cookies a decadent finish. Semi‑sweet chips strike the perfect balance between sweet and bitter, allowing the butter and cream flavors to shine through. If you prefer a richer chocolate experience, swap for dark chocolate chips or even white chocolate chips for a sweeter, creamier twist.
Vegetable oil is added to the chocolate when melting, preventing the chocolate from seizing and creating a glossy, smooth glaze. Without the oil, the chocolate might become gritty or develop a dull sheen. You can also use coconut oil for a subtle tropical flavor, but it will alter the finish slightly.
Everything's prepped? Good. Let's get into the real action…
The Method — Step by Step
- First, bring the butter to room temperature until it’s soft enough to leave a faint indentation when pressed. This step is crucial because it ensures the butter will incorporate air properly, giving the cookie a light, airy crumb. I’ve found that microwaving butter in 5‑second bursts works wonders if you’re in a rush. Once softened, beat the butter with the granulated sugar in a stand mixer on medium speed until the mixture turns pale and fluffy—about 3 minutes. This creates a silky base that will hold the flavor of the vanilla and the chocolate.
- Add the eggs one at a time, mixing thoroughly after each addition. The first egg should be fully incorporated before adding the second. The eggs provide moisture and structure, but too much can make the dough too wet. As you mix, the dough will start to look more cohesive, and the mixture will become slightly thicker. This is the moment where you can see the dough forming a smooth, cohesive ball.
- Stir in the vanilla extract, which adds a warm, floral note that elevates the entire cookie. The vanilla also helps to mellow the sweetness of the sugar, creating a balanced flavor profile. After mixing, the dough should have a slightly sticky texture, but not so wet that it sticks to your hands. At this point, you can start preparing the dry ingredients.
- In a separate bowl, whisk together the all‑purpose flour, baking powder, and salt. The baking powder ensures the cookies rise slightly, giving them a light texture, while the salt balances the sweetness. It’s essential to sift the flour to avoid lumps and to evenly distribute the leavening agent. Once the dry mix is ready, fold it into the wet dough using a spatula, turning the mixture until no dry flour remains.
- Roll the dough into a log about 2 inches in diameter and wrap it in plastic wrap. Chill the log for at least 1 hour; this firming step is essential for even slicing. A chilled dough slices cleanly and maintains its shape when baked, preventing the cookies from becoming misshapen. After chilling, unwrap the dough and cut it into 1‑inch thick rounds using a cookie cutter or a sharp knife.
- Place the dough rounds on a parchment‑lined baking sheet, spacing them about 2 inches apart. This spacing allows the cookies to expand without touching each other. Preheat the oven to 350°F (175°C) while the dough rests. The oven should be fully preheated to ensure even baking.
- Bake the cookies for 12–15 minutes, or until the edges are golden brown and the tops have a slight sheen. The center should still look slightly pale, indicating that they’re not overbaked. Once baked, let them cool on the sheet for 5 minutes before transferring them to a wire rack to cool completely. This brief cooling period allows the cookies to firm up, making them easier to handle for the filling stage.
- While the cookies cool, prepare the pastry cream. In a small saucepan, heat the heavy cream over medium heat until it just starts to simmer. Remove from heat and whisk in the powdered sugar until completely dissolved. Stir in the vanilla extract, then let the mixture cool to room temperature. Once cooled, pour the cream into a piping bag or a small spoon for filling.
- Spoon or pipe a generous amount of pastry cream onto the center of half of the cookies. Press the filled cookies gently onto the remaining unfilled cookies, creating a sandwich. The filling should be thick enough to stay between the layers but not so thick that it leaks during baking. This step is the moment of truth—your patience and precision will determine the final texture.
- Melt the chocolate chips and vegetable oil together in a heat‑proof bowl over a pot of simmering water. Stir continuously until the chocolate is completely smooth and glossy. Pour the melted chocolate over the assembled cookies, allowing it to coat the top and sides. Let the glaze set for 5 minutes before serving. This final touch gives the cookie a glossy finish and a rich chocolate flavor that complements the creamy filling.
That's it — you did it. But hold on, I've got a few more tricks that'll take this to another level…
Insider Tricks for Flawless Results
The Temperature Rule Nobody Follows
Many bakers bake at 375°F, assuming a higher temperature yields a crispier cookie. However, a lower temperature of 350°F allows the cookies to rise evenly and develop a tender crumb. The heat is gentle enough to caramelize the sugars without burning them. This subtle difference can mean the difference between a cookie that’s slightly burnt on the edges and one that’s perfectly golden.
Why Your Nose Knows Best
The aroma of the cookie dough is your best indicator of readiness. When the scent of vanilla and butter mingle with the faint hint of chocolate, the cookies are ready to go into the oven. If you notice a sharp, metallic smell, it’s a sign the butter is overheating, which can lead to a greasy texture. Trust your nose, and you’ll avoid common pitfalls.
The 5‑Minute Rest That Changes Everything
After baking, let the cookies rest on the sheet for 5 minutes before moving them to a wire rack. This short pause allows the cookies to set, preventing them from breaking when you handle them. A quick rest also lets the steam escape, which keeps the cookie surface crisp. Skipping this step can result in fragile cookies that crumble.
Keep the Filling Cool Until Assembly
Pastry cream is best kept chilled until you’re ready to fill the cookies. A warm filling can melt the chocolate glaze, causing it to become thin and runny. Keep the cream in the fridge, and only take it out when you’re ready to assemble. This ensures a firm filling that holds its shape.
Use a Sharp Knife for Slicing
When slicing the dough log into rounds, a sharp knife or a dough scraper produces clean cuts. A dull blade can tear the dough, causing uneven layers that affect the cookie’s appearance and texture. A clean slice also ensures that each cookie has a consistent thickness.
Let the Chocolate Set at Room Temperature
After pouring the glaze, let the cookies sit at room temperature for about 10 minutes. This allows the chocolate to set without forming a white film (bloom). If you’re in a hurry, placing the cookies in the fridge for 5 minutes will also set the glaze quickly.
Creative Twists and Variations
This recipe is a playground. Here are some of my favorite ways to switch things up:
Almond Joy Twist
Swap the chocolate chips for a mixture of dark chocolate and shredded coconut, and add chopped almonds between the cookie layers. The coconut gives a tropical aroma, while the almonds add crunch. This variation is perfect for summer gatherings.
Salted Caramel Dream
Use caramel sauce instead of pastry cream, and drizzle a pinch of sea salt on top before glazing. The caramel adds a buttery sweetness, and the salt elevates the flavor. Serve with a dollop of whipped cream for an indulgent treat.
Espresso Infusion
Add a teaspoon of espresso powder to the dough and a splash of coffee to the pastry cream. The coffee intensifies the chocolate flavor and gives the cookie a subtle caffeine kick. This is a great option for coffee lovers.
Minty Fresh
Replace the vanilla extract with peppermint extract and add a few drops of green food coloring to the chocolate glaze. The mint provides a refreshing contrast to the rich chocolate, making it a holiday favorite.
Vegan Version
Use a dairy‑free butter and replace heavy cream with coconut cream. Swap the eggs with aquafaba, and use a plant‑based chocolate. The result is a cookie that’s just as indulgent but free of animal products.
Nutella Swirl
Spread a thin layer of Nutella between the cookie layers before filling. The hazelnut chocolate gives a nutty flavor that pairs wonderfully with the pastry cream. This is a crowd‑pleaser for both kids and adults.
Storing and Bringing It Back to Life
Fridge Storage
Store the cookies in an airtight container in the refrigerator for up to 5 days. The cool environment keeps the chocolate glaze firm and the filling from becoming too soft. When you’re ready to serve, let them sit at room temperature for 10 minutes to restore the cookies’ original texture.
Freezer Friendly
For longer storage, place the cookies in a freezer‑safe bag, separating layers with parchment paper to prevent sticking. They will stay fresh for up to 3 months. Thaw them in the fridge overnight before serving. The cookies may be slightly softer, but the glaze remains glossy.
Best Reheating Method
To revive frozen cookies, place them on a baking sheet and bake at 300°F for 8–10 minutes, or until warm. Add a tiny splash of water to the center of each cookie before reheating; the steam will keep the filling from drying out. Once heated, let them cool for a couple of minutes before serving.