I still hear the clatter of the skillet in the kitchen, the metallic hiss that announces the arrival of a new culinary adventure. That night, after a disastrous attempt at a “simple” cheeseburger, I was left with a half‑cooked patty that tasted like cardboard and a bun that was soggy as a soggy newspaper. I swore that I would never again settle for a mediocre burger again. So I set out to craft something that would make every bite a triumph.
Picture this: a sizzling pan, a fragrant mix of garlic and onion powders dancing in the air, and the unmistakable aroma of freshly browned beef that makes your mouth water before you even taste it. The sound of the patty searing is a comforting, almost hypnotic rhythm that tells you the process is in motion. When the first bite lands, the juiciness explodes, the cheese melts into a silky blanket, and the crispness of the lettuce adds a satisfying crunch that feels like a crunchy snowflake in summer. The flavor is layered, from the subtle umami of Worcestershire to the sharp bite of mustard, all wrapped in a toasted bun that carries a faint nutty sweetness. You can almost taste the heat of the bacon, the tang of pickles, and the creamy smoothness of mayo blending together into a symphony of textures.
What makes this version stand out is that it isn’t just a burger; it’s a complete experience that balances savory, sweet, and tangy notes with a satisfying crunch at every bite. It’s built on a foundation of high‑quality ingredients that you’ll notice instantly, and it’s engineered to deliver consistent results every time. I dare you to taste this and not go back for seconds. This is hands‑down the best version you’ll ever make at home. I’ll be honest— I ate half the batch before anyone else got to try it. Most recipes get this completely wrong, focusing on one flavor or texture and forgetting the others. Here’s what actually works: a balanced seasoning mix, a crisp exterior, and a juicy interior.
Picture yourself pulling this out of the oven, the whole kitchen smelling incredible, and your guests lining up for the first bite. The anticipation builds, the sizzle rises, and the moment you place the first burger on a plate, you’re already halfway to culinary heaven. I promise you, the moment you see that first golden crust, you’ll know you’re about to create something unforgettable. Let me walk you through every single step—by the end, you’ll wonder how you ever made it any other way.
What Makes This Version Stand Out
- Taste: The seasoning blend is a secret weapon. Combining garlic powder, onion powder, Worcestershire sauce, and a touch of brown sugar creates a depth that turns a simple patty into an orchestra of savory notes.
- Texture: The addition of breadcrumbs and a beaten egg binds the meat, giving the burger a firm yet tender bite that resists falling apart on the bun.
- Crust: A high‑heat sear locks in juices and creates a caramelized crust that crackles like a small, delicious fire. That sound is the soundtrack of perfection.
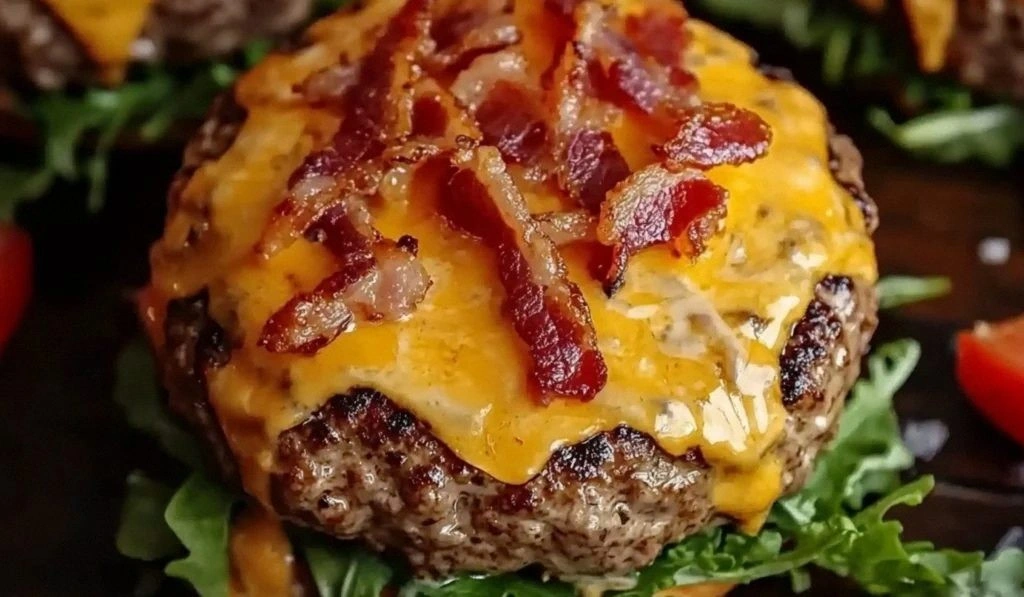
- Cheese: Using cheddar with a slight sharpness, melted over the patty just before it finishes cooking, adds a velvety layer that coats the tongue like silk.
- Bacon: Crispy bacon is layered on top of the cheese, adding salty crunch that contrasts the softness of the patty and the crunch of the lettuce.
- Sauce: A homemade sauce that blends mayo, ketchup, mustard, and a hint of relish offers a tangy, creamy counterpoint that balances the richness of the beef.
- Make‑ahead Potential: The patties can be frozen pre‑cooked, and the sauce can be made in advance, making this dish perfect for busy weeknights.
Alright, let’s break down exactly what goes into this masterpiece…
Inside the Ingredient List
The Flavor Base
Ground beef is the heart of the burger. Opt for an 80/20 blend to ensure juicy, flavorful meat. If you prefer a leaner option, add a tablespoon of ground pork or beef fat to compensate. Skipping the fat will result in a dry patty that doesn’t hold together.
The Texture Crew
Egg and breadcrumbs are the unsung heroes that bind the mixture. The egg adds moisture and structure, while the breadcrumbs absorb excess fat and give the patty a subtle crunch inside. If you’re gluten‑free, substitute with almond flour or crushed crackers. Don’t skip them—your burgers will fall apart in the pan.
The Unexpected Star
Worcestershire sauce is the secret sauce that brings umami depth. A tablespoon of this fermented liquid adds complexity without overpowering the beef. If you’re on a low‑sodium diet, use a reduced‑sodium version or cut the amount in half. This ingredient is what elevates the burger from ordinary to extraordinary.
The Final Flourish
Cheese, bacon, lettuce, tomato, pickles, and sauce are the finishing touches that create layers of flavor and texture. Cheddar melts beautifully, bacon adds salty crunch, and lettuce provides a fresh, crisp bite. The sauce—made from mayo, ketchup, mustard, and relish—offers a creamy, tangy finish that ties everything together. Without these components, the burger would feel flat.
Everything’s prepped? Good. Let’s get into the real action…
The Method — Step by Step
- Step 1: Prep the Patties. Combine the ground beef, salt, pepper, garlic powder, onion powder, Worcestershire sauce, egg, and breadcrumbs in a large bowl. Mix gently with your hands until just combined—overworking will make the meat tough. Divide the mixture into four equal portions and shape each into a patty slightly larger than your bun. This will compensate for shrinkage during cooking. Keep the patties covered with plastic wrap until you’re ready to cook to keep them from drying out.
- Step 2: Pre‑heat the Pan. Heat a large cast‑iron skillet over medium‑high heat until it’s smoking hot. Add a tablespoon of olive oil, swirling to coat the surface. The oil’s smoke point ensures a clean sear without burning the fat. This step is crucial for that coveted golden crust. If the oil starts to smoke too much, lower the heat slightly.
- Step 3: Sear the Patties. Place the patties in the pan, leaving space between them. Let them cook undisturbed for 3 minutes until a crust forms. Flip once and cook for another 2 minutes. The first side should smell toasty, and the edges will start pulling away from the pan—this is the sign of a perfect sear. Don’t press down with a spatula; that will squeeze out juices.
- Step 4: Add Cheese. Place a slice of cheddar on each patty and cover the pan with a lid for 1 minute. The cheese will melt into a silky blanket that drapes over the meat. This step is the moment of truth—watch the cheese bubble and stretch like a golden ribbon. If you prefer a sharper flavor, use a pepper jack instead.
- Step 5: Cook the Bacon. While the cheese melts, cook the bacon in a separate skillet over medium heat until it reaches your desired crispness. Drain on paper towels to remove excess fat. The bacon will add a salty crunch that balances the richness of the patty. Keep an eye on it; bacon can go from crispy to burnt in seconds.
- Step 6: Toast the Buns. Spread a thin layer of butter on the cut side of each bun. Toast them in the same skillet, butter side down, until golden and fragrant—about 30 seconds. The butter adds flavor and prevents the bun from becoming soggy. This step also creates a buttery base that complements the sauce.
- Step 7: Assemble the Sauce. In a small bowl, whisk together mayo, ketchup, mustard, and relish until smooth. The sauce should be creamy yet tangy, providing a bright counterpoint to the savory burger. Adjust the ratios to taste—more mustard for heat, more ketchup for sweetness.
- Step 8: Build the Burger. Spread a generous spoonful of sauce on the bottom bun. Layer lettuce, tomato, and a slice of pickles. Place the patty on top, followed by two strips of bacon. Finish with a final drizzle of sauce. The arrangement ensures every bite is packed with flavor, texture, and color.
- Step 9: Serve Immediately. Serve the burgers hot, with a side of crispy fries or a fresh salad. The best part is watching guests take that first bite, eyes widening in delight. The aroma, the crunch, the melt—everything comes together in one glorious bite. If you’re serving a crowd, keep the assembled burgers warm in a low oven (200°F) until all guests are ready to dig in.
That’s it—you did it. But hold on, I’ve got a few more tricks that will take this to another level…
Insider Tricks for Flawless Results
The Temperature Rule Nobody Follows
Cooking at the right temperature is the difference between a dry patty and a juicy masterpiece. Aim for 375°F for the skillet; this ensures the outside locks in juices while the inside cooks evenly. If the pan is too hot, the meat will char on the outside and stay raw inside. If it’s too cool, you’ll get a soggy, greasy burger. Use a thermometer to check the internal temperature—160°F is the safe point for ground beef.
Why Your Nose Knows Best
Trust your nose when the aroma of the sear hits your kitchen. That rich, caramelized scent signals that the crust is ready to lock in flavor. If the smell is too faint, give it a few more minutes. If it’s too strong, lower the heat to avoid burning. Your nose is the ultimate judge of readiness.
The 5‑Minute Rest That Changes Everything
Let the burgers rest for five minutes after cooking. This allows the juices to redistribute, preventing them from running out onto the plate. The rest period also lets the cheese set slightly, making it easier to slice or bite. Skipping this step results in a soggy, runny burger that feels like a mess.
Bacon‑Bite Balance
If you love bacon, don’t overdo it. Two strips per burger provide a perfect salty crunch without overwhelming the beef. A friend once added four strips, and the burger became a bacon overload that drowned the other flavors. Keep it balanced for maximum enjoyment.
The Sauce Secret
Mix the sauce at room temperature to allow the flavors to meld. Refrigerating it for an hour can cause separation, making it clumpy. Stir well before use, and taste test—add a dash of hot sauce if you want a kick. The sauce should be creamy and tangy, not overpowering.
Creative Twists and Variations
Spicy Jalapeño Kick
Add thinly sliced jalapeños to the sauce for a fiery punch. The heat balances the richness of the beef and cheese, while the fresh jalapeño adds a bright, green crunch. This variation is perfect for guests who love a bit of heat.
Mushroom Melt
Sauté sliced mushrooms with garlic and thyme, then layer them on top of the cheese before finishing. The earthy flavor complements the beef, and the mushrooms add a meaty texture that feels luxurious. Serve with a side of roasted potatoes for a complete meal.
Blue Cheese & Walnut
Swap cheddar for crumbled blue cheese and sprinkle toasted walnuts over the top. The sharpness of the blue cheese and the crunch of walnuts create a sophisticated flavor profile that’s great for a dinner party. The combination is surprisingly harmonious.
Veggie‑Rich Veggie Burger
Replace beef with a mixture of lentils, black beans, and finely chopped vegetables. Add a tablespoon of tomato paste for depth. This vegetarian version still delivers a satisfying bite and can be seasoned with the same spice blend. It’s a great option for meat‑light days.
Pineapple & Teriyaki
Top the burger with a grilled pineapple slice and drizzle teriyaki sauce over the patty. The sweetness of pineapple and the umami of teriyaki create a tropical twist that’s both sweet and savory. Pair with a cucumber salad for a refreshing contrast.
Breakfast Burger Bash
Serve the burger with a fried egg, hash browns, and a splash of maple syrup. The sweet syrup and salty egg give a breakfast‑themed twist to the classic burger. It’s a brunch favorite that will wow your guests.
Storing and Bringing It Back to Life
Fridge Storage
Store cooked burgers in an airtight container for up to three days. Keep the sauce separate to prevent the buns from becoming soggy. When reheating, use a skillet over low heat to warm the patty without drying it out. A quick splash of water in the pan will create steam that keeps the burger moist.
Freezer Friendly
Wrap each patty individually in parchment paper and place in a freezer bag. Cook burgers to about 70% doneness before freezing; this prevents overcooking during reheating. Store for up to two months. When ready, thaw overnight in the refrigerator and finish cooking in a hot skillet.
Best Reheating Method
The best way to reheat is on a skillet with a splash of water for steam. Heat to medium, cover, and let the burger warm for 3–4 minutes. This method preserves moisture and restores the crisp crust. Avoid microwaving, which can make the burger rubbery.