It started with a kitchen catastrophe that would have made me question every culinary decision I’d ever made. I was halfway through a batch of tteokbokki, the chewy rice cakes clinging to the pot like stubborn friends, when I accidentally dropped the whole pot onto the stove and the sauce exploded into a sticky, aromatic mess. I stared at the chaos, then laughed because, honestly, it was the most delicious disaster I’d ever tasted. That moment, the sizzle, the heat, the way the sauce clung to the rice cakes, that’s what sparked this recipe.
Picture the scene: a golden‑brown pan, the faint hiss of oil, the scent of toasted peanuts rising like incense, a splash of chili oil that crackles and sends a warm perfume into the air. The sound is a soft pop, the heat a gentle embrace, the texture of the rice cakes shifting from chewy to crisp as the edges caramelize. Your eyes are drawn to the glossy sheen, the way the sauce clings like velvet, the way the rice cakes look almost too perfect to eat. And the taste—spicy, nutty, sweet, savory—blends into a single, unforgettable bite.
What makes this version stand out from every other version? It’s the bold, unapologetic flavor profile that turns a simple snack into a party starter, the technique that turns ordinary rice cakes into crispy, caramelized nuggets, and the secret ingredient that elevates the sauce from good to addictive. I dare you to taste this and not go back for seconds. I’ll be honest—when I first made it, I ate half the batch before anyone else got a chance. That’s the kind of craving you can’t shake.
Most recipes get this completely wrong: they either overcook the rice cakes until they’re mushy or underseason the sauce until it’s bland. Here’s what actually works. Picture yourself pulling this out of the pan, the whole kitchen smelling incredible, the sound of a crisp edge shattering like thin ice. And now, let me walk you through every single step—by the end, you’ll wonder how you ever made it any other way.
What Makes This Version Stand Out
- Flavor: The sauce marries sweet, spicy, and nutty notes into a single, harmonious glaze that coats each rice cake like a silky coat of armor.
- Texture: The rice cakes transform from chewy to golden‑brown, caramelized edges that crackle when you bite, while the interior remains soft and tender.
- Ease: All steps can be completed in under an hour, no fancy equipment, no time‑consuming prep—just a handful of pantry staples.
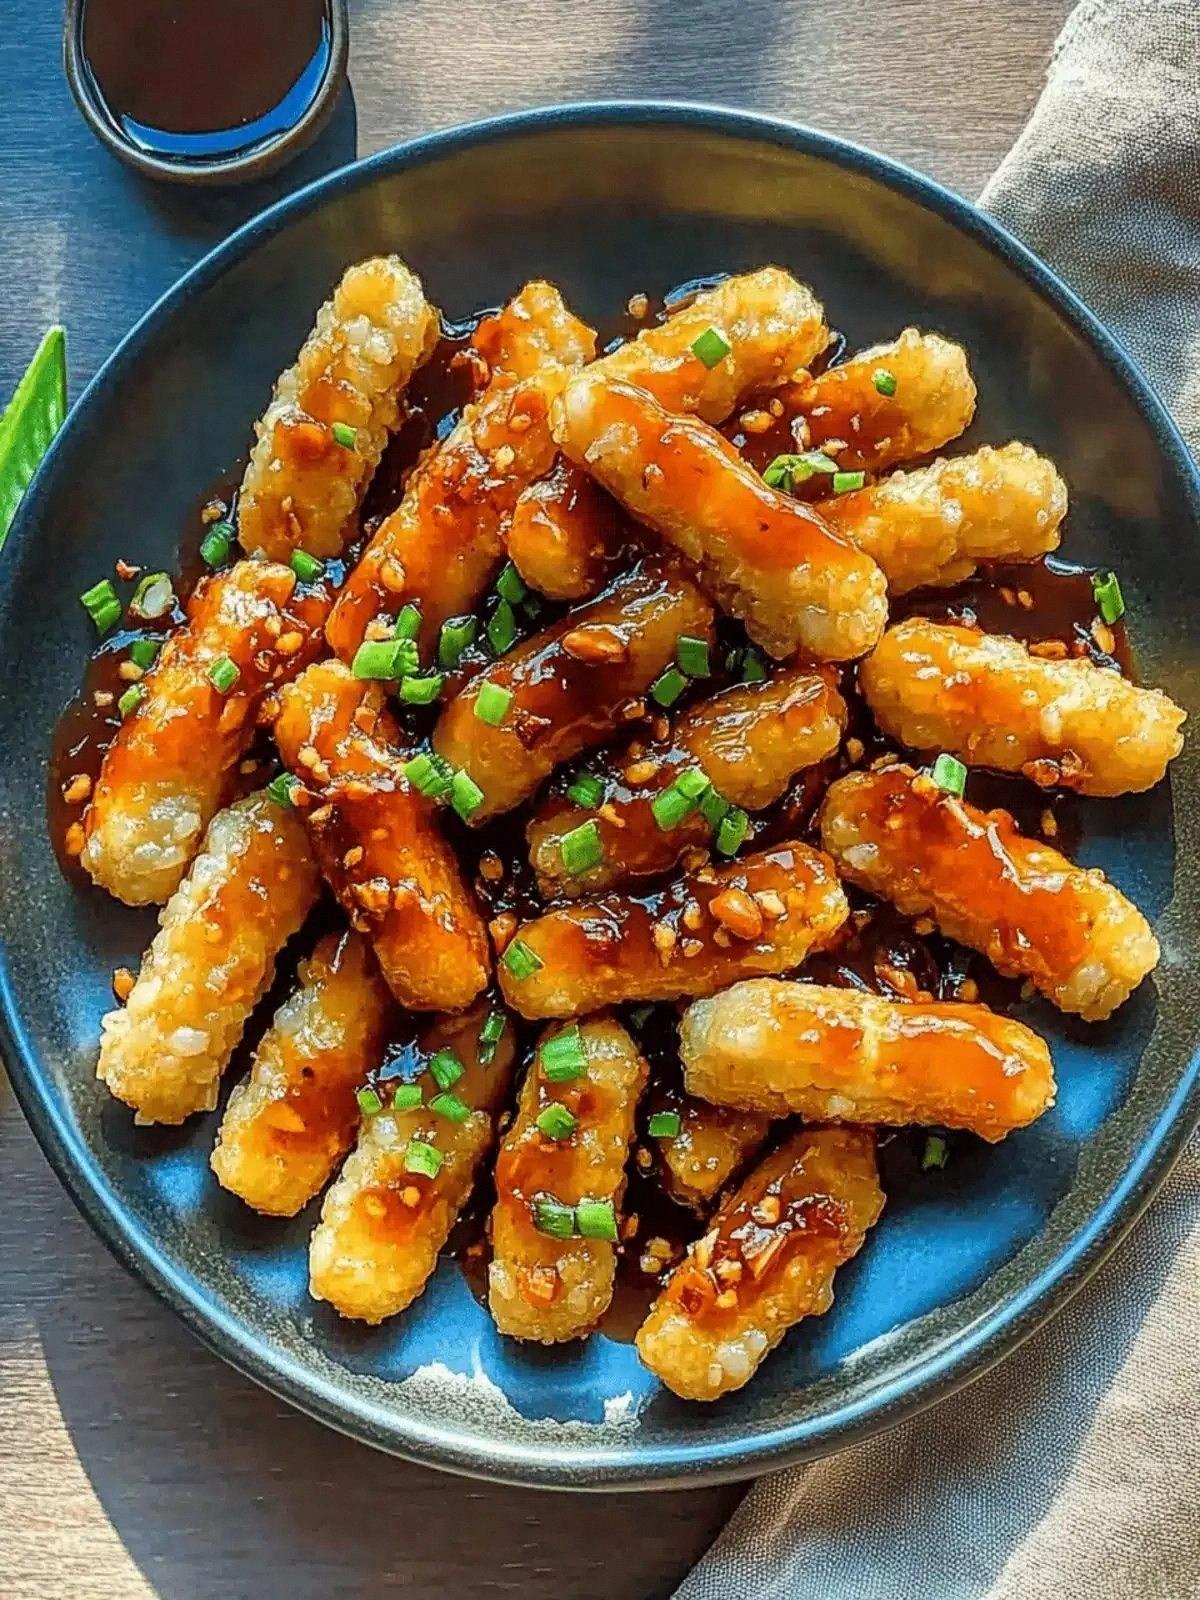
- Visual Appeal: The glossy sauce, the contrast of dark rice cakes and bright green onions, and the pop of sesame seeds make for Instagram‑ready plating.
- Versatility: Serve as an appetizer, a side, or a snack. Pair with kimchi for a Korean twist or with a light salad for a balanced meal.
- Make‑ahead Friendly: The dish can be prepared in advance, reheated, and still retains its crispness with a quick pan‑toss.
Inside the Ingredient List
The Flavor Base
The sauce is the heart of this dish. Peanut butter provides a creamy, slightly sweet foundation that balances the heat of the chili oil. Light soy sauce adds a salty, umami depth, while the rice vinegar gives a bright, acidic lift that cuts through the richness. Sugar, though simple, caramelizes to create a glossy sheen, and hot water loosens the mixture into a pourable glaze. If you skip the vinegar, the sauce will taste flat; if you omit the sugar, it will be too sharp and not as glossy.
The Texture Crew
Tteokbokki, or Korean rice cakes, are the star. Their chewy, starchy interior becomes a crunchy exterior when pan‑fried, giving a satisfying contrast. Cooking oil is the medium that allows the rice cakes to brown without burning. The oil also helps the sauce adhere, creating that glossy, clinging finish. If you use too little oil, the rice cakes will stick and develop a soggy texture; too much oil will make them greasy.
The Unexpected Star
Chili oil is the secret weapon that delivers heat without overwhelming the dish. Its smoky undertones complement the nutty peanut base and add a subtle depth. A pinch of sesame seeds at the finish adds a nutty crunch and a visual pop. If you prefer a milder version, reduce the chili oil or replace it with a milder pepper paste.
The Final Flourish
Green onions provide a fresh, crisp bite that cuts through the richness of the sauce. They also add a burst of color, making the dish more appetizing. A splash of water before reheating restores moisture, preventing the rice cakes from drying out. If you’re preparing ahead, consider lightly steaming the rice cakes before frying to lock in moisture.
Everything’s prepped? Good. Let’s get into the real action.
The Method — Step by Step
- Heat a large non‑stick skillet over medium heat and add enough cooking oil to coat the bottom—about 1–2 tablespoons. Let the oil heat until it shimmers but isn’t smoking. The oil’s temperature is crucial: too hot and the rice cakes will burn; too cool and they’ll absorb oil and stay soggy. This is the moment of truth: if the oil sizzles when you drop a piece of rice cake, you’re ready.
- Add the rice cakes in a single layer, making sure they’re not overlapping. Let them sear for 2–3 minutes on each side until they develop a golden‑brown crust. Flip them carefully to preserve the crisp edges. If you notice steam bubbling, that’s a sign the interior is still moist; let them cook a bit longer.
- While the rice cakes are browning, whisk together the peanut butter, chili oil, sugar, light soy sauce, rice vinegar, and hot water in a small bowl until smooth. The mixture should be silky, with no lumps. The hot water loosens the peanut butter, making the sauce pourable and preventing it from clumping on the rice cakes.
- Once the rice cakes are crispy on the outside, pour the sauce over them, making sure each piece is fully coated. Reduce the heat to low and let the sauce simmer for 2–3 minutes, stirring occasionally. This step allows the sauce to thicken and cling to the rice cakes like a glossy armor.
- Watch out for this critical moment: if you keep the heat too high, the sugar will burn, turning the sauce bitter. Keep the flame low, and keep an eye on the sauce’s color—when it turns amber, it’s ready.
- Add the green onions, tossing them gently to coat them with sauce. The green onions provide a fresh, bright contrast to the rich sauce. They also add a subtle crunch that complements the rice cakes’ crispness.
- Sprinkle sesame seeds over the top for a nutty finish and a pop of color. The sesame seeds add a subtle crunch and a fragrant aroma that elevates the dish from simple to gourmet.
- Transfer the rice cakes to a serving platter and drizzle any remaining sauce over the top. The final splash of sauce should be glossy and slightly thick, like a glaze. This last touch ensures every bite is coated with that signature sauce.
- Serve immediately while the rice cakes are still hot and crisp. If you’re plating for a crowd, keep them warm in a low‑heat oven (around 200°F) while you finish cooking the rest. The dish is best enjoyed fresh, but it can be reheated with a splash of water to restore moisture.
That’s it—you did it. But hold on, I’ve got a few more tricks that will take this to another level.
Insider Tricks for Flawless Results
The Temperature Rule Nobody Follows
Many people think higher heat is better, but the secret is a moderate, steady flame. If the oil is too hot, the rice cakes will char on the outside and stay raw inside. Keep the heat at medium, and use a thermometer if you’re feeling fancy—around 350°F (175°C) is ideal. This ensures even cooking and a perfect caramelized crust.
Why Your Nose Knows Best
Trust the aroma. When the sauce starts to bubble and you smell toasted peanuts with a hint of chili, that’s your cue to reduce the heat. Your nose can detect when sugar begins to caramelize, signaling that the sauce is ready to thicken. If you wait too long, the sauce will burn and become bitter.
The 5‑Minute Rest That Changes Everything
After cooking, let the rice cakes rest on a paper towel for 2 minutes before serving. This removes excess oil and lets the surface dry, which preserves the crispness. I’ve seen people skip this step and end up with soggy rice cakes. The rest is short but vital.
The Secret of Even Coating
If you find the sauce pooling in the pan, toss the rice cakes gently after pouring the sauce. A quick flip ensures each piece gets a uniform glaze. A friend once skipped this step, and the sauce clung only to a few pieces—resulting in uneven flavor.
The Quick Toss for Extra Crunch
Right before serving, toss the rice cakes in a dry skillet for 30 seconds. This final touch crisps the surface even more, giving a satisfying crunch with every bite. It’s a simple trick that transforms the dish from good to unforgettable.
Creative Twists and Variations
This recipe is a playground. Here are some of my favorite ways to switch things up:
Coconut Crunch
Swap half the peanut butter for coconut milk and add shredded coconut to the sauce. This gives a tropical twist, with a creamy, slightly sweet flavor that pairs beautifully with the spicy rice cakes.
Garlic Explosion
Add minced garlic to the sauce and sauté it in the oil before adding the rice cakes. The garlic infuses the oil, giving each bite a deeper, aromatic layer that complements the peanuts.
Herbal Infusion
Stir in a handful of chopped cilantro or basil at the end of cooking. The fresh herbs add a bright, herbal note that cuts through the richness and gives the dish a fresh finish.
Miso Magic
Replace the light soy sauce with miso paste for a deeper umami flavor. The miso adds depth and a slightly salty sweetness that pairs wonderfully with the peanut base.
Smoky Chipotle
Use chipotle chili oil instead of regular chili oil for a smoky heat. This variation adds a subtle smokiness that lingers on the palate and pairs nicely with the nutty sauce.
Sweet & Tangy Twist
Add a splash of orange juice and a pinch of orange zest to the sauce. The citrus brightens the dish, giving it a sweet‑tangy zing that balances the heat.
Storing and Bringing It Back to Life
Fridge Storage
Store the cooled rice cakes in an airtight container in the refrigerator for up to 3 days. The crispness will soften slightly, so reheat before serving. Keep the sauce separate if possible, as it can become thick when chilled.
Freezer Friendly
Freeze the rice cakes in a single layer on a parchment‑lined tray before transferring to a freezer bag. They can be stored for up to 2 months. Reheat in a skillet over medium heat, adding a splash of water to keep them from drying out.
Best Reheating Method
To bring back the crispness, heat the rice cakes in a dry skillet over medium heat for 2–3 minutes on each side. Add a splash of water just before the end of heating to create steam, which rehydrates the interior while the exterior stays crispy.