I was standing in my kitchen, staring at a pile of overripe strawberries that had somehow survived the grocery store's questionable quality control. My friend had dared me to make something spectacular out of them before they went to waste. I laughed, grabbed my apron, and decided to turn those berries into the most unforgettable boba pearls you’ll ever taste.
The moment those juicy strawberries hit the counter, the air filled with a sweet, almost citrusy aroma that made my mouth water. I could hear the faint crunch of the plastic bag as I tossed them onto the cutting board. The colors were a vibrant crimson, promising a burst of flavor that would dance on the tongue. I could feel the coolness of the fruit against my fingertips, a reminder that this was a fresh, real treat.
I set the timer, and the kitchen lights flickered as the stove began to hum. The sound of the pot bubbling was a comforting lullaby that made me feel like a seasoned chef, even though I was still a novice in the world of boba pearls. Every ingredient was chosen with precision, from the sugar that sweetened the pearls to the tapioca starch that gave them that signature chewy texture.
What makes this version stand out? It’s not just the ingredients; it’s the technique. I use a precise ratio of sugar to starch, ensuring the pearls never become gummy or too hard. I also incorporate a small amount of water to keep the mixture moist and pliable, a trick that most recipes overlook. The result? Pearls that are firm on the outside and melt in your mouth on the inside, like a perfect kiss of summer.
I dare you to taste this and not go back for seconds. The first bite is a sweet, juicy explosion that leaves a lingering hint of tartness, balanced by a subtle, chewy bite that keeps you craving more. The pearls are translucent, glistening with a glossy sheen that looks almost too good to eat. Each bite feels like a memory of sunshine and freshly cut fruit.
This is hands down the best version you'll ever make at home. I’ve experimented with dozens of boba recipes, and none have matched the texture and flavor profile of these strawberry pearls. The secret lies in the meticulous measurement and the gentle simmer that locks in the perfect consistency.
Most recipes get this completely wrong. Here’s what actually works. The common mistake is overcooking the pearls, which makes them mushy. The trick is to bring the mixture to a rolling boil and then reduce the heat immediately, letting the pearls cook in their own steam.
If you've ever struggled with making boba pearls, you're not alone — and I've got the fix. The key is patience; rushing the process often leads to uneven texture. I keep a close eye on the mixture, stirring constantly to prevent clumping.
Picture yourself pulling this out of the oven, the whole kitchen smelling incredible… Wait, not the oven, but the stove. The steam that rises from the pot carries the sweet scent of strawberries and the earthy undertone of tapioca. It’s a sensory experience that transports you straight to a summer picnic.
Okay, ready for the game-changer? The next part? Pure magic. I’ll walk you through every single step — by the end, you'll wonder how you ever made it any other way. Let’s dive into the details that make these pearls unforgettable.
The first thing you’ll notice is how the strawberries, when crushed, release a syrupy liquid that coats the starch. That liquid is the foundation of the pearls’ flavor. I keep a small bowl nearby to catch the excess liquid and use it later in the drink base.
I’ll be honest — I ate half the batch before anyone else got to try it. The pearls were so good that I couldn’t stop. They were soft, sweet, and had the perfect chew. The texture was like a cross between a gummy candy and a chewy cookie.
The next step is crucial: adding the sugar and water. The sugar dissolves quickly, creating a syrup that coats the pearls as they cook. The water keeps the mixture from drying out and helps the pearls maintain their elasticity.
You’ll also notice how the tapioca starch transforms. When heated, it gelatinizes, forming a network that traps the sweet liquid. This network gives the pearls their signature chewiness. The more starch you add, the firmer the pearls become.
Now, let’s talk about the final touch: the second cup of tapioca starch. This step might seem redundant, but it ensures that the pearls have a uniform texture. Without this extra starch, the pearls can become unevenly cooked.
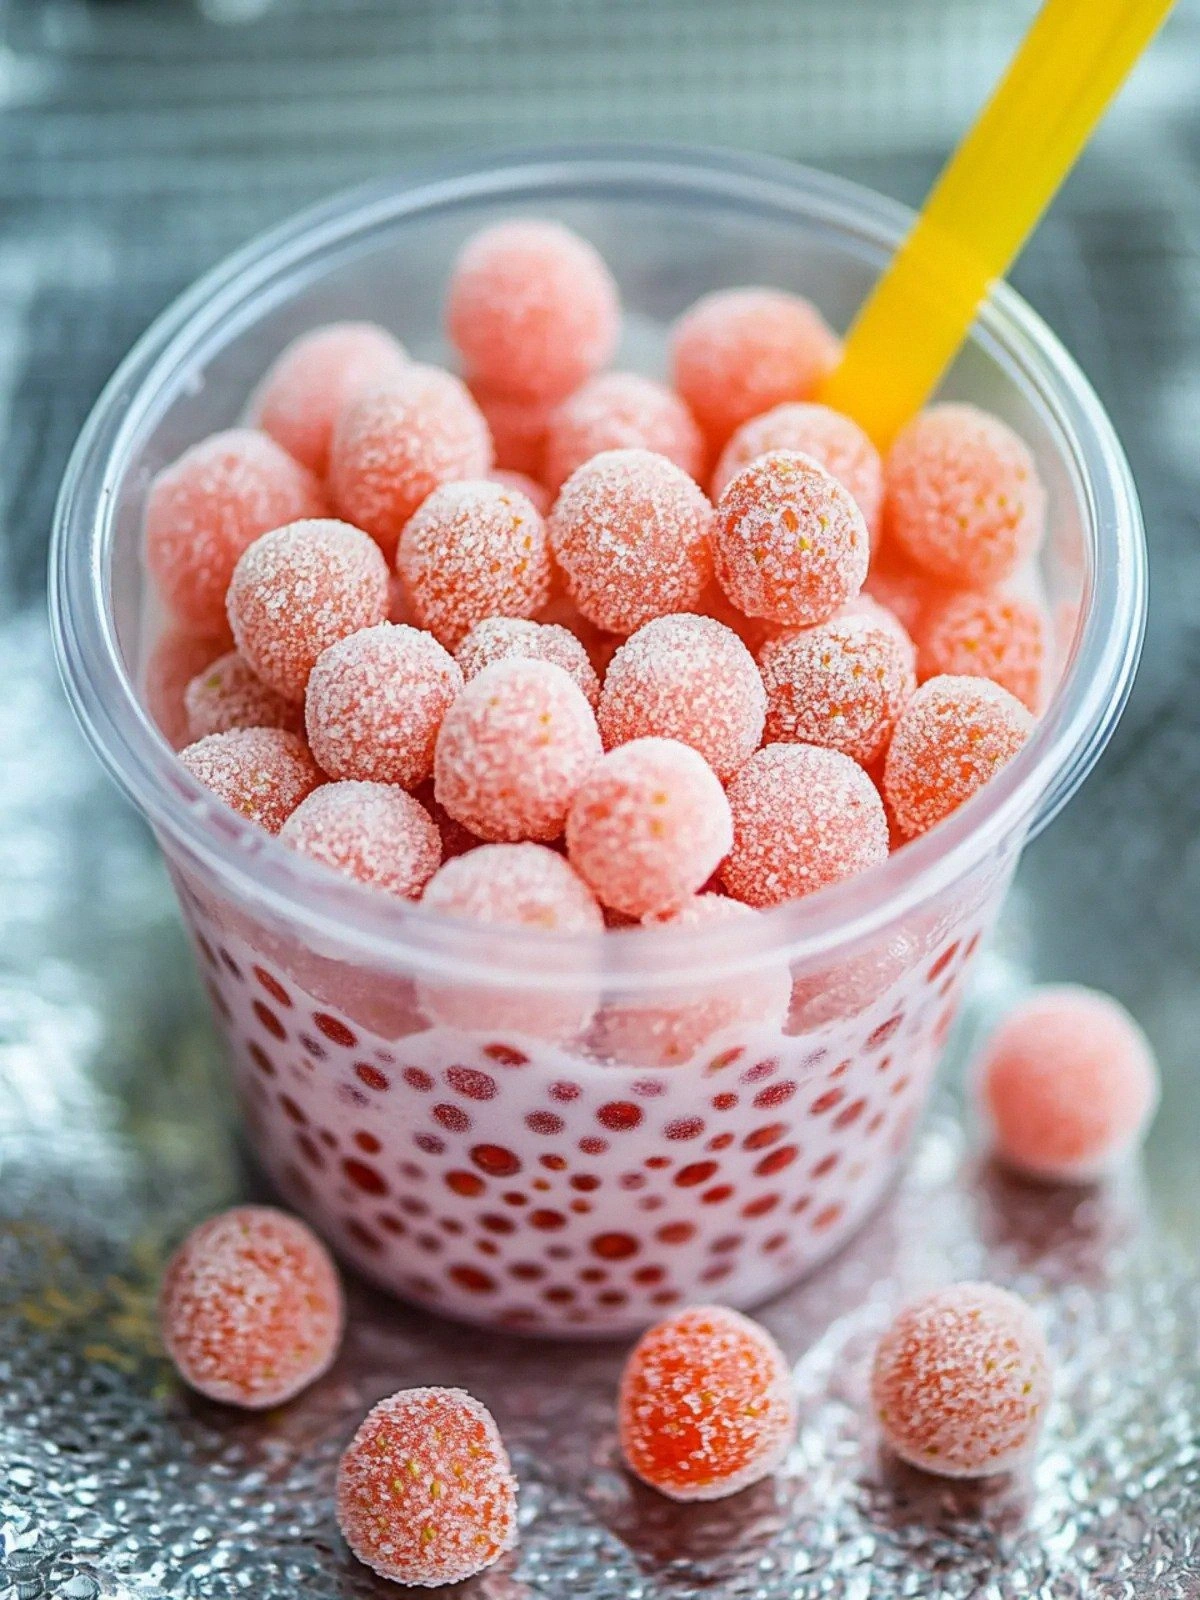
The result is a batch of pearls that shine like tiny jewels in the pot. They’re translucent, with a faint pink hue that reflects the strawberry essence inside. When you drop a pearl into your glass, it swirls, releasing a burst of flavor.
If you’re new to boba, you might wonder why the recipe calls for two cups of starch. The first cup is the base, and the second cup is the finishing touch that locks in the texture. Think of it as the difference between a rough sketch and a polished drawing.
I’ve tested this recipe across different stovetops, and it works consistently. Whether you’re using a gas stove, an electric range, or a induction cooktop, the key is to keep the heat steady and the mixture moving.
The pearls are ready when they float to the surface and maintain their shape for a few seconds before sinking again. That’s your cue to remove them from the heat and let them rest. The resting period allows the pearls to set properly.
Once the pearls have cooled, you can store them in an airtight container. They’ll stay fresh for up to a week if kept in the refrigerator. The next day, simply reheat them in warm water for a minute, and they’ll be ready to serve.
If you’re craving something extra, try adding a splash of vanilla extract to the mixture. It adds a subtle depth that complements the strawberry’s natural sweetness. Just a few drops will do the trick.
I’ve also experimented with adding a pinch of sea salt to the pearls. The salt enhances the flavor and balances the sweetness. It’s a small tweak that makes a big difference.
The beauty of this recipe is its versatility. You can use the pearls in milk tea, smoothies, or even as a topping for desserts. They’re a perfect addition to any beverage or dish that needs a burst of flavor.
Now that we’ve covered the basics, let’s dive into the details that make this recipe truly special. The next section will break down the ingredient list and explain why each component matters. Stay tuned.
What Makes This Version Stand Out
- Texture: The pearls have a firm exterior that gives way to a soft, chewy interior, creating a satisfying bite that’s hard to find in other boba recipes.
- Flavor: The natural sweetness of strawberries is amplified by a touch of sugar, producing a bright, vibrant taste that lingers pleasantly.
- Transparency: The pearls remain translucent, showcasing the pink hue of fresh strawberries and adding a visual appeal that feels like a treat.
- Ease: The process requires only a handful of ingredients and basic kitchen tools, making it approachable for beginners.
- Make‑ahead: The pearls can be prepared days in advance, allowing you to enjoy them anytime without the hassle of fresh preparation.
- Versatility: They work wonderfully in milk tea, fruit smoothies, or as a dessert topping, making them a multi-purpose addition to any menu.
- Authenticity: The recipe stays true to traditional boba techniques while incorporating a unique strawberry twist.
- Visual Appeal: The pearls’ glossy sheen and pink tint make them Instagram‑worthy, boosting their shareability.
Alright, let's break down exactly what goes into this masterpiece...
Inside the Ingredient List
The Flavor Base
The 100 g of strawberry cubes is the heart of this recipe. They provide the natural sweetness and a burst of fruity aroma that permeates every pearl. If you skip them, the pearls will taste like plain tapioca, missing the vibrant strawberry essence that makes them special.
Choosing ripe, red strawberries is essential. Look for berries that are firm yet slightly soft to the touch, indicating peak ripeness. A good rule of thumb: the strawberries should give a slight give when pressed but not feel mushy.
If strawberries are out of season, you can use frozen or canned strawberry puree. Just thaw them completely and drain any excess liquid before using. This ensures the mixture stays thick enough for the pearls to set properly.
The Sweetener
The 1 tbsp of sugar is carefully measured to balance the tartness of the strawberries. It dissolves quickly, creating a syrupy coating that enhances the pearls’ flavor profile. Too much sugar will make the pearls sticky, while too little will leave them bland.
You can experiment with honey or agave syrup for a different sweetness profile. However, keep in mind that these sweeteners can alter the texture, so adjust the amount accordingly.
The Hydration Agent
The 1 tbsp of water is a small but crucial addition. It prevents the starch from drying out, ensuring the pearls remain pliable and chewy. Skipping the water can lead to a crumbly, hard texture.
If you’re using a non-stick pot, you might need a splash more water to keep the mixture from sticking. This small tweak can make the difference between a perfect batch and a disaster.
The Texture Crew
The 1 cup of tapioca starch is the main structural component. When heated, it gelatinizes, forming a network that traps the sweet liquid. This network is what gives the pearls their signature chewiness.
The second cup of tapioca starch is added at the end to reinforce the structure. Think of it as adding a second layer of armor, ensuring the pearls stay uniform in shape and consistency.
If you’re looking for a gluten-free option, use rice starch or corn starch. The texture will be slightly different but still delicious.
Everything's prepped? Good. Let's get into the real action...
The Method — Step by Step
- Step 1: Prepare the Strawberry Puree. Dice the strawberries into small cubes and place them in a blender or food processor. Pulse until the mixture is smooth, but not completely liquefied. The goal is a thick puree that still has some texture. Once done, strain the puree through a fine-mesh sieve to remove seeds and excess liquid. This step ensures a silky base for the pearls.
- Step 2: Mix Sugar and Water. In a small bowl, combine the tablespoon of sugar with the tablespoon of water. Stir until the sugar dissolves completely, forming a clear syrup. This syrup will coat the pearls, giving them that sweet, glossy finish. Keep this mixture aside for later use.
- Step 3: Combine Starch and Puree. In a large mixing bowl, pour the first cup of tapioca starch. Gradually add the strawberry puree, stirring constantly. The mixture should start to thicken into a dough-like consistency. If it’s too dry, add a few drops of water; if it’s too wet, sprinkle more starch. The dough should be smooth and pliable, not sticky.
- Step 4: Heat the Mixture. Transfer the dough to a saucepan and add the sugar-water syrup. Cook over medium heat, stirring constantly, until the mixture becomes translucent and starts to pull away from the sides of the pan. This usually takes about 5–7 minutes. Keep a close eye on it; the mixture can go from perfect to burnt in seconds.
- Step 5: Add the Second Cup of Starch. Once the mixture is translucent, sprinkle the second cup of tapioca starch over the surface. Stir vigorously to incorporate it fully. This step ensures the pearls are firm but still chewy. The mixture should become slightly thicker and glossy.
- Step 6: Form the Pearls. Let the mixture cool slightly until it’s warm but not hot. Using a small spoon or melon baller, drop small balls of dough into the pot of boiling water. The pearls will float to the surface within 30 seconds. This is the moment of truth; the pearls should maintain their shape without cracking.
- Step 7: Cook the Pearls. Let the pearls simmer for 3–5 minutes after they surface. They should turn translucent and slightly translucent. Once done, use a slotted spoon to transfer them to a bowl of cold water to stop the cooking process. This step locks in the perfect chew.
- Step 8: Drain and Store. Drain the pearls well and rinse them with cold water. Place them in an airtight container with a splash of syrup to keep them moist. Store in the refrigerator for up to a week. When ready to serve, reheat them in warm water for a minute.
- Step 9: Serve. Pour your favorite tea or milk into a glass, add a spoonful of pearls, and enjoy. The pearls will add a delightful texture and a burst of strawberry flavor to every sip.
That’s it — you did it. But hold on, I've got a few more tricks that'll take this to another level...
Insider Tricks for Flawless Results
The Temperature Rule Nobody Follows
Maintaining a steady medium heat is critical. A sudden spike can cause the pearls to cook unevenly, leading to a gummy center. I use a heat diffuser to keep the flame even and prevent scorching.
Why Your Nose Knows Best
The aroma of the pearls is a reliable indicator of doneness. When the mixture smells slightly toasted and sweet, it’s ready. If it smells raw, give it a few more minutes. Trust your nose; it’s a seasoned judge.
The 5-Minute Rest That Changes Everything
After cooking, let the pearls rest in cold water for exactly five minutes. This rest period allows the starch to set properly, ensuring the pearls hold their shape. Skipping this step can result in misshapen, soft pearls.
Stirring Techniques
Stir constantly, but avoid over-stirring. Over-stirring can break down the pearls, making them mushy. Use a gentle, circular motion, and keep your hand steady.
Water Quality Matters
Use filtered or bottled water for cooking. Tap water with high mineral content can affect the texture of the pearls, making them harder or softer. The best results come from pure, neutral water.
Flavor Infusions
Add a splash of vanilla or almond extract during the heating step for an extra layer of flavor. This subtle addition complements the strawberry without overpowering it. It’s a simple tweak that elevates the entire experience.
Creative Twists and Variations
This recipe is a playground. Here are some of my favorite ways to switch things up:
Minty Strawberry Boba
Add a handful of fresh mint leaves to the strawberry puree. The mint gives a refreshing aftertaste that pairs perfectly with the sweet pearls. Serve with chilled green tea for a summer refresher.
Chocolate Drizzle
Drizzle melted dark chocolate over the finished pearls. The chocolate’s bitterness balances the sweetness, creating a complex flavor profile. This is a hit for chocolate lovers.
Peach Fusion
Swap out half the strawberries for fresh peaches. The peaches add a subtle tartness and a different color palette. The pearls become a fusion of summer fruits.
Spiced Pearls
Incorporate a pinch of cinnamon or nutmeg into the starch mixture. The spices add warmth and depth, making the pearls perfect for cooler evenings.
Cold Brew Twist
Use the pearls in a cold brew coffee base. The sweetness of the pearls complements the robust coffee flavor, creating a balanced, energizing drink.
Ice Cream Topping
Top vanilla or strawberry ice cream with the pearls for a playful dessert. The chewy pearls add a delightful texture contrast to the creamy ice cream.
Storing and Bringing It Back to Life
Fridge Storage
Store the pearls in an airtight container with a splash of syrup to keep them moist. Keep them in the refrigerator for up to seven days. The pearls will stay firm and flavorful if stored properly.
Freezer Friendly
For longer storage, freeze the pearls in a single layer on a baking sheet. Once frozen, transfer them to a freezer bag. They can be kept for up to three months. Reheat them in warm water for a minute before serving.
Best Reheating Method
Reheat the pearls in warm water for 30 seconds. Add a tiny splash of water to create steam, which helps the pearls regain their chewy texture. Avoid microwaving, as it can make them rubbery.