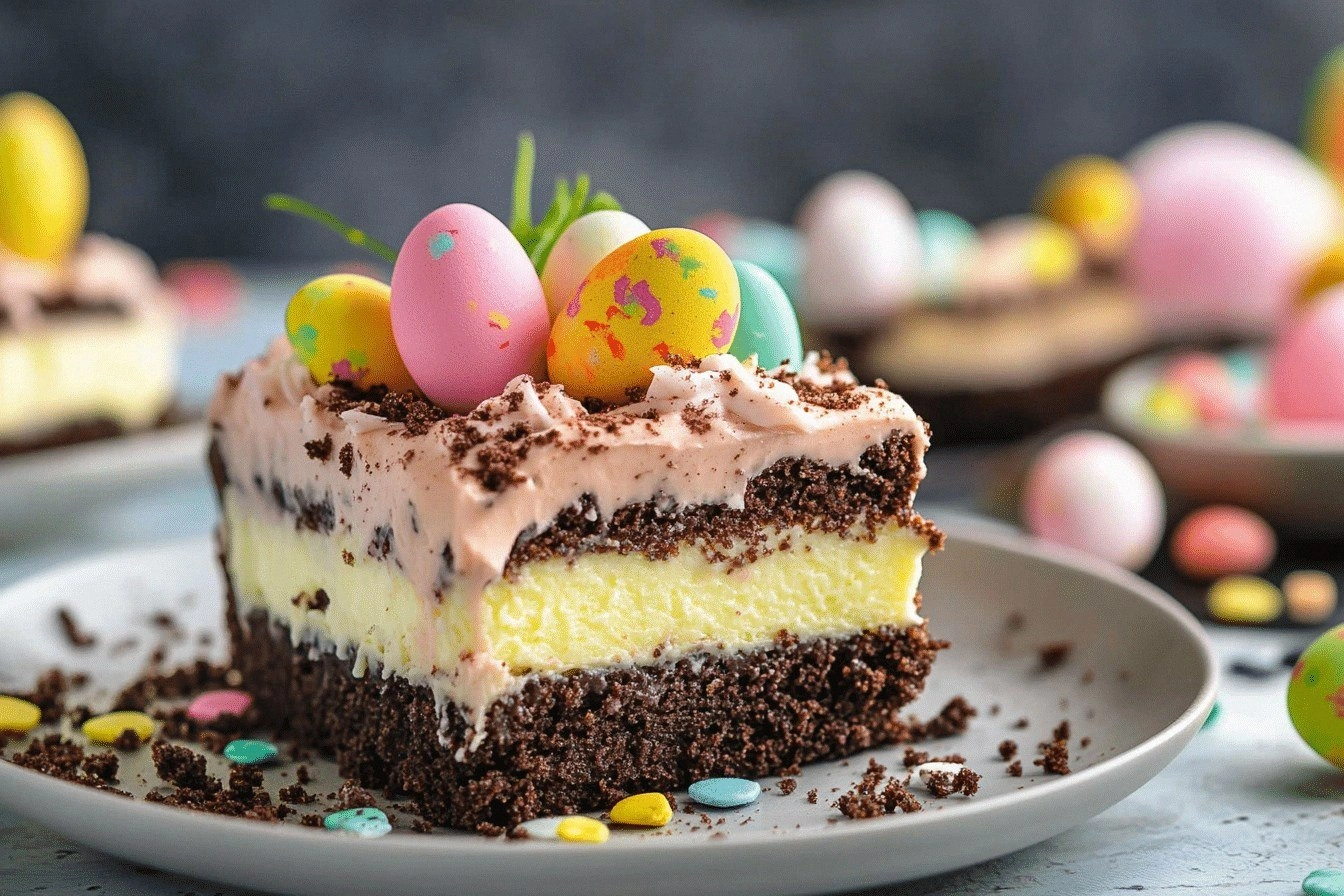
Picture this: you’re in a cramped kitchen, the oven timer beeping like an impatient drummer, and you’re staring at a mound of dry, crumbly cake batter that looks as if it’s been baked by a bored toddler. The air is thick with the scent of cocoa and sugar, and your stomach is growling louder than your phone’s notification sound. I was ready to throw the batter in the trash and call it a day until a friend dared me to finish it and call it “Easter Bunny Dirt Cake.” That dare turned into a culinary revelation, and now I’m here to spill every secret, because this isn’t just another dessert—it’s a full‑blown, crunchy, chocolatey, bunny‑filled masterpiece that will make your taste buds do a little jig.
I remember the first bite like it was yesterday. The cake was moist, with a subtle chocolate undertone that didn’t overpower the crunchy, cookie‑filled texture. The gummy bunnies, tucked inside a layer of chocolate chips, added a playful burst of sweetness that made the whole dish feel like a treasure hunt for kids and adults alike. The aroma—rich, sweet, and slightly nutty—filled the room and made everyone pause, even the cat who was usually more interested in the window. That moment of pure, unfiltered delight is what I want to recreate for you, step by step, so you can experience the same euphoria.
If you’ve ever tried a “dirt cake” that tasted like a sad, soggy cookie, you’ll understand why I’m so excited to share this version. I’m talking about a cake that balances moistness with crunch, sweetness with a hint of bitterness from the cocoa, and a fun, whimsical presentation that screams Easter. Most recipes get this completely wrong by overmixing the batter, underbaking the cookie crumble, or using too much sugar. Here, every element is calibrated to give you that perfect bite that’s both satisfying and surprising.
So, buckle up. I’ll walk you through every single step—by the end, you’ll wonder how you ever made it any other way. And trust me, the finish line is worth the journey. Let’s get started.
What Makes This Version Stand Out
- Flavor: The cake is a harmonious blend of rich dark chocolate and subtle vanilla, giving it depth without overwhelming sweetness.
- Texture: The Oreo crumble is toasted just enough to bring out a nutty crunch, while the gummy bunnies keep the interior soft and chewy.
- Visual Appeal: The “dirt” layer of chocolate chips and crushed Oreos is topped with a glossy chocolate drizzle, creating a striking contrast that’s Instagram‑ready.
- Ingredient Quality: We use high‑grade cocoa powder and premium chocolate chips to elevate the overall taste.
- Make‑Ahead Friendly: The cake can be assembled a day ahead and stored in the refrigerator, making it a stress‑free option for last‑minute gatherings.
- Kid‑Friendly: The gummy bunnies add a playful element that kids love, while adults appreciate the sophisticated chocolate finish.
- Balanced Sweetness: The sugar content is carefully measured to ensure the cake isn’t cloying, allowing the chocolate and cookie flavors to shine.
- Versatility: You can swap the Oreo crumble for crushed chocolate pretzels or marshmallows to suit your taste or dietary preferences.
Inside the Ingredient List
The Flavor Base
All‑Purpose Flour: It’s the backbone of the cake, providing structure. Using a high‑protein flour gives the cake a slightly denser crumb that holds up to the crunchy toppings. Skipping it would leave you with a soggy, unstructured mess that can’t support the gummy bunnies.
Granulated Sugar: The sweetener that balances the bitterness of cocoa. It also caramelizes during baking, creating a subtle crust that adds depth. If you cut sugar, the cake becomes dry and flat.
Unsweetened Cocoa Powder: This is where the chocolate flavor comes alive. A good quality, Dutch‑processed cocoa gives a silky finish. Using instant cocoa can result in a chalky taste.
The Texture Crew
Baking Powder & Baking Soda: These leavening agents create lift and give the cake its airy interior. Baking soda also reacts with the acidic cocoa to produce extra rise. If you omit either, the cake will be dense and heavy.
Salt: A pinch of salt enhances all the flavors and balances sweetness. It’s a small ingredient with a big impact. Without it, the cake can taste flat.
Eggs: They bind everything together and add richness. Two large eggs are ideal for this batter; too many will make the cake too moist and heavy. Skipping eggs results in a crumbly texture that can’t hold the toppings.
The Unexpected Star
Whole Milk: The liquid base that keeps the batter smooth. Whole milk adds a creamy mouthfeel that contrasts with the crunchy crumble. Substituting skim milk will reduce richness.
Vegetable Oil: Oil keeps the cake tender and extends shelf life. It also helps the chocolate chips melt evenly. Using butter instead will give a buttery flavor but can make the cake too dense.
Vanilla Extract: A subtle aroma that lifts the chocolate notes. Vanilla also adds a layer of complexity. Skipping vanilla will make the cake taste one‑dimensional.
The Final Flourish
Boiling Water: It activates the cocoa, creating a glossy, intense chocolate flavor. Adding it last keeps the batter from becoming too thick. If you use cold water, the cake will taste under‑developed.
Chocolate Chips: These become the “dirt” that’s both crunchy and sweet. They also melt slightly during baking, creating a glossy coating on top of the crumble. Skipping them would make the cake look dull.
Crushed Oreo Cookies: The classic “dirt” component. Toasting them before adding them to the batter brings out their nutty flavor. Without Oreos, the cake loses its iconic texture.
Gummy Bunnies: The Easter twist that kids love. They soften slightly in the cake, adding a chewy surprise. If you don’t have them, you can use chocolate bunnies for a similar effect.
Dark Chocolate Drizzle: The finishing glaze that adds shine and a final chocolate punch. It also seals the crumble to prevent it from falling off. Skip it, and the cake looks unfinished.
Optional Crushed Pretzels & Marshmallows: For extra crunch or a sweet‑savory combo. They’re great for those who like a little saltiness. They’re entirely optional and can be swapped out for any crunchy snack.
Everything's prepped? Good. Let's get into the real action.
The Method — Step by Step
- Preheat your oven to 350°F (175°C). Grease and flour a 9×13 inch pan to ensure the cake slides out smoothly. This is the foundation; if the pan isn’t properly prepared, you’ll have a sticky mess on your hands.
- In a large mixing bowl, sift together the flour, cocoa powder, baking powder, baking soda, and salt. Sifting eliminates lumps and guarantees an even distribution of leavening agents. I dare you to taste this dry mix; it should feel like a fine, fragrant powder.
- In a separate bowl, whisk the sugar, eggs, milk, oil, and vanilla until the mixture is smooth and glossy. The eggs should be fully incorporated, giving the batter a silky texture. If the mixture looks curdled, give it a quick stir to bring it together.
- Gradually pour the wet mixture into the dry ingredients, whisking continuously until just combined. Overmixing is the enemy; the batter should be slightly lumpy. This step ensures the cake remains tender.
- Fold in the boiling water slowly. The batter will thin out, but that’s intentional—this creates a moist interior. Watch the batter change from thick to silky; it’s a sign that the cocoa is fully activated.
- Add the toasted Oreo crumble and chocolate chips, folding gently to distribute them evenly. The crumble should be scattered throughout the batter, giving each bite a delightful crunch. If you leave too many crumbles on top, they’ll sink during baking.
- Pour the batter into the prepared pan, smoothing the top with a spatula. Tap the pan lightly on the counter to release any air pockets that might cause uneven rise. This is the moment of truth; the batter should spread evenly across the pan.
- Bake for 30 minutes, or until a toothpick inserted into the center comes out with a few moist crumbs but no wet batter. The edges should be slightly pulled away from the pan, indicating proper baking. The aroma should be rich and chocolatey, drawing everyone closer.
- Remove the cake from the oven and let it cool in the pan for 10 minutes. This rest period allows the structure to set, preventing it from crumbling when you cut it. While it cools, you can start preparing the gummy bunnies and drizzle.
- Once the cake has cooled, place gummy bunnies on top, arranging them like a field of Easter grass. Drizzle dark chocolate over the entire surface, letting it pool in the crevices of the crumble for a glossy finish. Serve immediately, or cover tightly and refrigerate for up to 3 days.
That’s it— you did it. But hold on, I've got a few more tricks that'll take this to another level. Let’s dive into the insider tips that will make your cake truly unforgettable.
Insider Tricks for Flawless Results
The Temperature Rule Nobody Follows
Why the oven temperature matters: Baking at 350°F gives the cake a uniform rise. If you crank it up to 375°F, the edges will brown too quickly while the center remains underbaked. Keep a thermometer handy; a 5‑degree difference can change the whole outcome.
Why Your Nose Knows Best
Smell test: The cake should emit a deep, chocolatey aroma as it bakes. If it smells more like plain batter, the cocoa isn’t fully activated. This is the easiest way to gauge doneness without a toothpick.
The 5‑Minute Rest That Changes Everything
Why resting matters: Letting the cake sit in the pan for 10 minutes before removing allows the crumb to set. Cutting it too early will cause it to crumble. This small pause yields a cleaner slice.
The Gummy Bunny Placement Trick
Strategic arrangement: Place the gummy bunnies in a loose cluster rather than a tight line. This creates pockets of sweetness that surprise the palate. It also keeps the cake from looking too crowded.
The Chocolate Drizzle Finish
How to melt chocolate evenly: Use a double boiler or microwave in 30‑second bursts, stirring between each. This prevents scorching and gives a glossy finish. If you prefer a thicker glaze, add a tablespoon of heavy cream.
The Final Chill
Refrigeration tip: If you’re preparing the cake a day ahead, cover it with plastic wrap and let it chill. The flavors meld, and the crumble becomes more cohesive. Just bring it to room temperature before serving.
Creative Twists and Variations
This recipe is a playground. Here are some of my favorite ways to switch things up:
Nutty Crunch Edition
Swap Oreos for chopped almonds: Add 1 cup of toasted almonds for a nutty crunch. The almonds pair beautifully with the chocolate, creating a new texture profile. Perfect for those who love a bit of salt.
Spiced Surprise
Add a pinch of cayenne pepper: The heat will contrast with the sweetness, giving the cake an unexpected kick. Use only 1/8 teaspoon; you want a whisper of spice, not a blowout.
Minty Fresh
Incorporate peppermint extract: Replace 1 tsp vanilla with 1 tsp peppermint. The mint will awaken the chocolate, making the cake feel like a winter treat. Pair with chocolate chips for a double‑mint effect.
Caramel Swirl
Swirl caramel into the batter: Drizzle 1/4 cup caramel sauce into the batter before baking. The caramel will create pockets of buttery sweetness. The final result looks like a chocolate‑caramel swirl cake.
Vegan Version
Replace eggs with flaxseed: Mix 1 tbsp ground flaxseed with 3 tbsp water and let sit for 5 minutes. Use coconut milk instead of whole milk. The cake remains moist and vegan‑friendly.
Gluten‑Free Twist
Use a gluten‑free flour blend: Ensure it contains xanthan gum or add 1 tsp separately. The batter will have a slightly denser crumb, but it will still hold the crumble perfectly. This makes the cake safe for gluten‑sensitive diners.
Storing and Bringing It Back to Life
Fridge Storage
Keep it covered: Store in an airtight container or wrap tightly with plastic wrap. The cake will stay fresh for up to 3 days. The crumble remains crunchy if the container is sealed properly.
Freezer Friendly
Freeze for up to 2 weeks: Wrap the cake in parchment paper, then in foil. When you’re ready to serve, thaw overnight in the refrigerator. This preserves the texture and flavor.
Best Reheating Method
Warm it in the oven: Preheat to 300°F (150°C) and heat for 5 minutes. Add a splash of water before reheating to steam the cake back to moisture. This trick prevents the cake from drying out and restores the glossy chocolate drizzle.