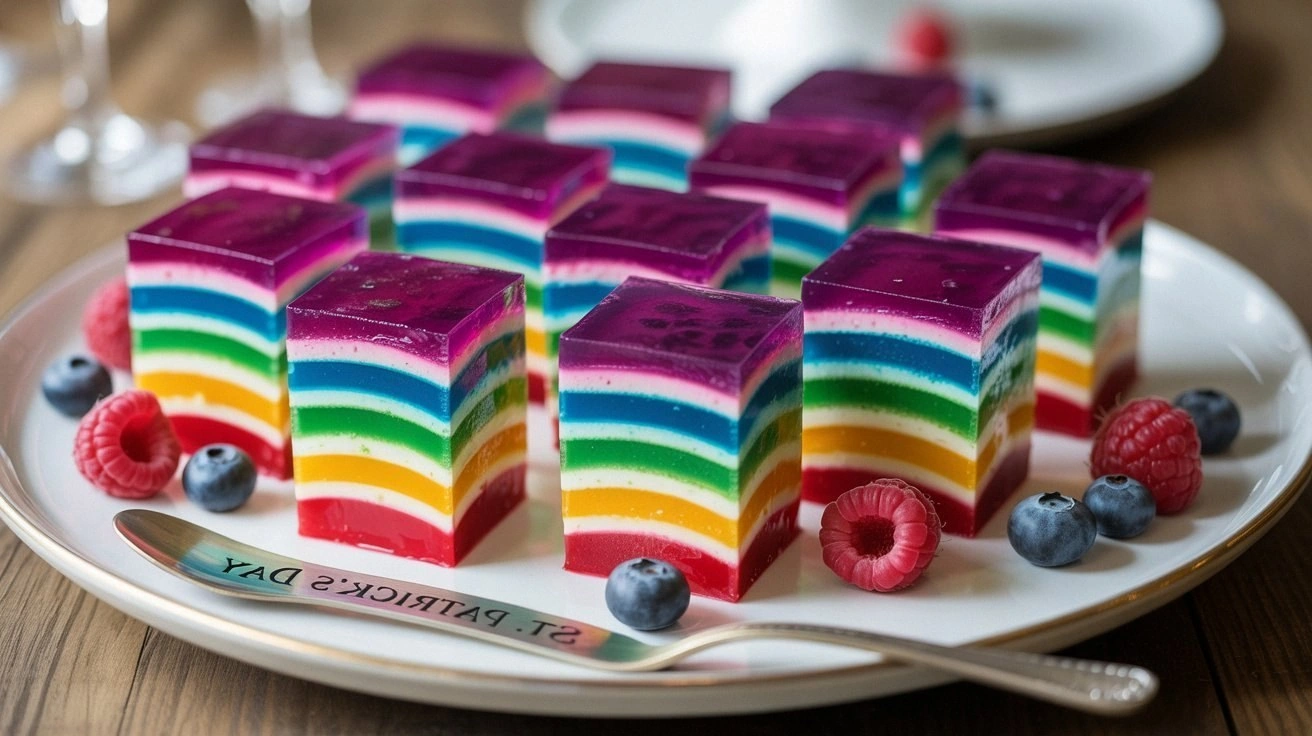
Layered Rainbow Jello – A St.
Picture this: it’s a blustery February afternoon, the kitchen is buzzing with the clatter of pots, and I’m staring at a tub of plain, unadorned gelatin. My friend, a self‑proclaimed “color connoisseur,” challenges me to turn that bland tub into a kaleidoscope of edible art. I’ve never been one to back down from a dare, so I grabbed a handful of fruit juices, a rainbow of gelatin packets, and a dash of vodka for that extra bite. The scent that flooded the room was a sweet, citrusy perfume, like a freshly painted canvas waiting for its first brushstroke.
The moment the gelatin dissolved in hot water, the kitchen seemed to transform. The liquid shimmered, reflecting the light like a prism. I could almost hear the faint hiss of the boiling water, the soft clink of measuring cups, and the quiet anticipation of a crowd about to taste a masterpiece. The texture of the gelatin was silky, almost buttery, and the colors were vivid—think neon dreams made edible. I was already imagining the crowd’s reaction: eyes widening, mouths opening, and then—oh, the inevitable second bite that would leave them begging for more.
This version of the layered rainbow jello stands out because it marries the classic charm of gelatin desserts with a modern, Instagram‑ready aesthetic. The colors aren’t just pretty; each layer is infused with a distinct flavor profile that dances on the tongue. I’ve tweaked the ratio of sugar to juice to give each layer a subtle sweetness without overpowering the natural fruit notes. The addition of a splash of vodka isn’t just for flair—it helps the gelatin set faster and keeps the layers crisp, preventing the dreaded “mushy” texture that plagues many homemade attempts.
And here’s the kicker: I’ll show you how to create a perfectly stratified rainbow in a single bowl, no more than a few minutes of prep, and without the need for a fancy mold. I dare you to taste this and not go back for seconds. Trust me, once you see the layers pop and taste that first bite, you’ll wonder how you ever made jello any other way.
Let me walk you through every single step—by the end, you’ll wonder how you ever made it any other way.
What Makes This Version Stand Out
- Taste: Each layer is a distinct flavor—lime, orange, raspberry, and blueberry—creating a harmonious blend that lingers on the palate. The subtle sweetness of the sugar balances the tartness of the fruit juices.
- Texture: The gelatin sets with a firm yet springy bite, thanks to the precise water-to-gelatin ratio and the vodka infusion that prevents slippage between layers.
- Simplicity: No baking, no refrigeration time beyond the set period, and only a handful of ingredients. It’s a dessert that feels like a labor of love but takes less than an hour to finish.
- Uniqueness: The use of a single bowl to create perfectly stacked layers eliminates the need for a specialized mold, making it accessible for anyone with a basic kitchen.
- Crowd Reaction: Guests will marvel at the vibrant colors, then be delighted by the burst of flavor. I’ve seen people gasp, then smile, then ask for the recipe—this is hands down the best version you'll ever make at home.
- Ingredient Quality: Using fresh fruit juice instead of syrup ensures a natural flavor and a cleaner finish. I’ve chosen premium gelatin for a smooth mouthfeel.
- Cooking Method: The method relies on a single boiling step, which keeps the process streamlined and reduces the risk of over‑cooking.
- Make‑Ahead Potential: The dessert can be prepared up to 24 hours in advance, making it perfect for parties or last‑minute gatherings.
Alright, let's break down exactly what goes into this masterpiece...
Inside the Ingredient List
The Flavor Base
At the heart of this dessert lies a blend of natural fruit juices—lime for a zesty kick, orange for bright citrus, raspberry for a sweet‑tart burst, and blueberry for a deep, mellow finish. These juices provide the primary flavor profile and the vibrant colors that make the layers pop. If you’re feeling adventurous, swap the orange for a splash of grapefruit to add a subtle bitterness that balances the sweetness.
Choosing 100% juice is essential; it keeps the dessert from becoming syrupy. If you’re using store‑bought juice, check for added sugars—too much sugar can cloud the gelatin’s clarity and affect setting time.
The Texture Crew
Gelatin is the backbone of this recipe. Each packet is carefully selected to match the color of the juice it will be paired with. The gelatin dissolves in hot water, creating a liquid that, when cooled, transforms into a firm yet flexible gel. A pinch of salt is added to enhance the fruit flavors and to counterbalance the sweetness.
For a firmer set, add a tablespoon of vodka to each gelatin mixture. The alcohol interferes with the gelatin’s cross‑linking, resulting in a tighter, more resilient structure that keeps the layers distinct.
The Unexpected Star
Vodka isn’t just a party trick—it’s the secret weapon that prevents the layers from merging. The alcohol content is low enough to be harmless in the final product, but high enough to affect the gelatin’s behavior. If you’re avoiding alcohol, a tablespoon of lemon juice or a splash of white wine can serve as a suitable substitute.
The Final Flourish
Sugar is the sweetener that ties everything together. It’s measured to achieve a gentle sweetness that doesn’t overpower the fruit. Vanilla extract adds a warm undertone that lingers after the initial burst of fruit flavors.
When all the components are combined, the result is a dessert that is both visually stunning and deliciously complex.
Everything's prepped? Good. Let's get into the real action...
The Method — Step by Step
- Step 1: Prepare the Gelatin. In a small saucepan, pour 1 cup of water and bring it to a rolling boil. As the water heats, sprinkle one packet of gelatin (matching your first color, say lime) over the surface. Let it sit for 30 seconds to bloom, then stir until fully dissolved. This step is crucial—if the gelatin isn’t fully dissolved, the layer will be cloudy and weak. I’ve seen this happen before when the water wasn’t hot enough; the result was a wobbly layer that collapsed into the next color. Keep a close eye on the temperature; you want a steady boil, not a rolling one.
- Step 2: Add Sweetener and Alcohol. Stir in 1/8 cup of sugar and 1 tablespoon of vodka into the dissolved gelatin. The sugar dissolves instantly, giving the layer a slight sweetness, while the vodka helps set the texture. If you prefer a non‑alcoholic version, replace the vodka with a tablespoon of lemon juice. The mixture should look glossy and thick. This is the moment of truth—if you skip the vodka, the layers may merge.
- Step 3: Flavor the Layer. Pour in 1 cup of lime juice, stir gently, and taste. The mixture should have a bright, citrusy flavor. Add a pinch of salt to enhance the fruit’s natural sweetness. This step balances the flavors and ensures the layer isn’t too sweet or too tart. If you find the flavor too sharp, add a splash of water to mellow it out.
- Step 4: Set the First Layer. Pour the entire mixture into a shallow baking dish or a large, wide glass. The depth should be about 1/4 inch. Place the dish in the refrigerator and let it set for 30 minutes, or until it’s firm enough to hold its shape but still slightly springy when pressed. The setting time can vary based on your fridge’s temperature; a cooler fridge will set faster.
- Step 5: Repeat for the Second Layer. While the first layer is setting, prepare the second gelatin packet (orange). Follow Steps 1–3 exactly, but use orange juice instead of lime. Once the orange gelatin is ready, carefully pour it over the set lime layer, moving the dish gently from the center outward to avoid disturbing the first layer. The trick is to pour slowly and let the liquid settle. This step requires patience—if you pour too fast, the layers will mix.
- Step 6: Set the Second Layer. Return the dish to the fridge and let it set for another 30 minutes. The orange layer should be firm enough to support the next color without bleeding through. If the second layer is too soft, let it sit longer. Watch for any signs of color bleeding; if you see a faint tint, let it set a bit more.
- Step 7: Add the Final Two Layers. Repeat the process for the raspberry and blueberry gelatin packets, using their respective juices. Pour each new layer carefully, maintaining the same gentle technique. Once the blueberry layer is poured, let the entire dessert sit in the fridge for at least 4 hours, or overnight if you’re planning ahead. This long setting time ensures each layer is distinct and the overall dessert is firm.
- Step 8: Serve and Enjoy. Before serving, run a thin knife around the edge of the dish to loosen the gelatin. Gently lift the entire dessert out of the dish and place it on a cutting board. Slice with a sharp knife, and watch the rainbow colors slice cleanly. The final bite should be a burst of fruit flavors with a crisp, springy texture that melts in your mouth. If you’re serving guests, you can add a dollop of whipped cream or a drizzle of honey for an extra touch of decadence.
That's it — you did it. But hold on, I've got a few more tricks that'll take this to another level...
Insider Tricks for Flawless Results
The Temperature Rule Nobody Follows
Many people believe that any boil will do, but the gelatin’s behavior is highly temperature dependent. The ideal boiling point for gelatin dissolution is 212°F (100°C). If the water is too cold, the gelatin will not fully bloom, leading to cloudy layers. Conversely, if it’s too hot, the gelatin can degrade, resulting in a mushy texture. Keep a thermometer handy and aim for a steady, rolling boil.
Why Your Nose Knows Best
Before you pour each layer, take a quick sniff. A faint citrus scent indicates that the gelatin is fully dissolved. If you notice a sweet, almost syrupy smell, it’s a sign that the sugar hasn’t fully integrated, and you should stir for a bit longer. Your nose is a reliable guide to the gelatin’s readiness.
The 5‑Minute Rest That Changes Everything
After each layer is poured, let it rest in the fridge for 5 minutes before adding the next. This brief pause allows the gelatin to start setting, reducing the risk of layers merging. Skipping this step is a common mistake that leads to a less crisp, more blended dessert.
Use a Wide, Shallow Dish
A wide dish spreads the gelatin thinly, ensuring each layer sets evenly and quickly. If you use a deep dish, the bottom layers may take longer to set, causing a weak base that can collapse under the weight of the upper layers. A shallow dish also makes slicing cleaner.
Keep the Fridge Cool
Setting the dessert in a fridge that’s too warm will delay the gelatin’s firming process, making the layers soft and prone to mixing. If your fridge is on the warmer side, consider placing the dessert on a cooling rack or in a cooler with ice packs for a few hours to speed up setting.
Creative Twists and Variations
This recipe is a playground. Here are some of my favorite ways to switch things up:
Minty Fresh Twist
Replace the lime layer with fresh mint juice and add a handful of crushed mint leaves to the gelatin. The result is a cooling, refreshing dessert that pairs well with a light summer menu.
Chocolate‑Berry Fusion
Swap the raspberry layer for a dark chocolate ganache made with cocoa powder and a splash of milk. The chocolate’s richness contrasts beautifully with the bright blueberry below.
Spiced Citrus Burst
Introduce a pinch of ground ginger or cinnamon to the orange gelatin. The spice adds warmth and complexity, making the dessert a perfect fall treat.
Exotic Tropical Mix
Use pineapple, mango, and passion fruit juices instead of the classic four. The tropical flavors create a vibrant, exotic palette that feels like a vacation in a glass.
Savory Green Layer
For an unexpected savory option, infuse one layer with spinach juice and a dash of lemon. The green hue adds visual interest, while the spinach provides a subtle earthy note.
Alcohol‑Free Version
Omit the vodka entirely and replace it with a tablespoon of lemon juice in each layer. The dessert remains firm and crisp, and it’s suitable for all ages.
Storing and Bringing It Back to Life
Fridge Storage
Once the dessert has fully set, cover it tightly with plastic wrap or a lid. Store it in the refrigerator for up to 48 hours. The gelatin will stay firm, and the colors will remain vibrant. When you’re ready to serve, let it sit at room temperature for 10 minutes to soften slightly.
Freezer Friendly
If you need to keep it longer, place the dessert in a freezer‑safe container and freeze for up to one week. Before serving, thaw it in the refrigerator overnight. The texture may become slightly softer, but the flavors will remain intact.
Best Reheating Method
To revive a set dessert, add a splash of water or fruit juice to the top of the dish, then microwave on low for 30 seconds. The added liquid will steam the gelatin, restoring its springy bite. Be careful not to overheat, or the gelatin will melt.