I was standing in my kitchen, staring at a pile of pumpkin puree, a half‑filled tub of cream cheese, and a broken promise to myself that I would make something delicious for the upcoming holiday. The air smelled faintly of cinnamon from the jar on the counter, and the orange glow from the oven light painted everything in amber. I remember the last time I tried a pumpkin cheesecake; it came out dense, too sweet, and the crust was soggy. That night I made a mental note: this time I’d keep it cool, keep it creamy, and keep the flavor bright. I’m about to share the version that has become my secret weapon for every gathering.
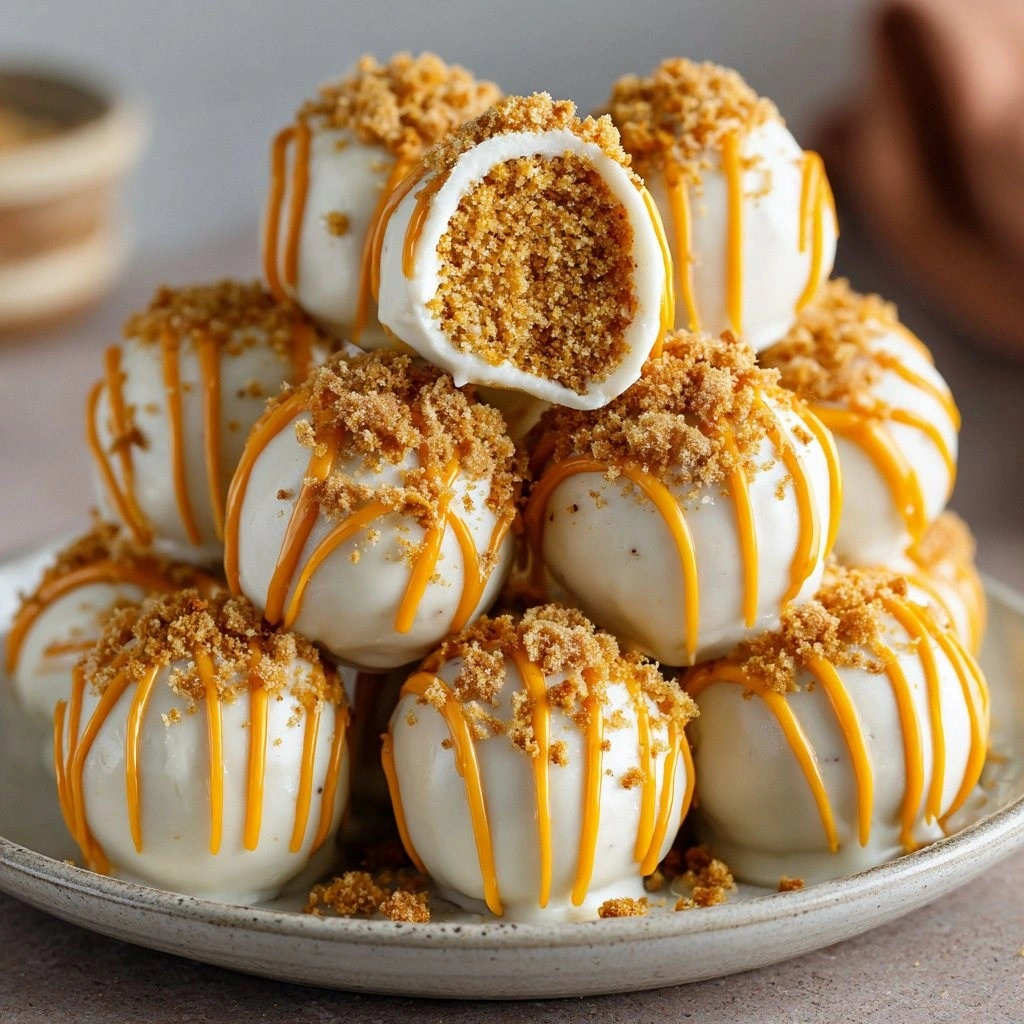
Imagine biting into a ball that feels like a warm hug in your mouth. The first thing you notice is the silky pumpkin‑cream cheese filling that swirls like a gentle tide. Then the crunch of the buttery graham cracker coating gives a satisfying snap that echoes the crispness of a fall breeze. The spices—cinnamon, nutmeg, ginger, and pumpkin pie spice—meld together like a well‑tuned orchestra, each note rising just enough to lift the sweetness. The result? A dessert that feels both indulgent and comforting, like a hug wrapped in a blanket.
What makes this recipe stand out is that it’s a no‑bake wonder, so you can whip it up in minutes and still deliver a showstopper. No oven, no waiting for a crust to set, no risk of burning the sugar. The texture is smooth yet slightly granular, the flavor is bright and aromatic, and the presentation is irresistibly playful. I dare you to taste this and not go back for seconds. The first bite will have you asking, “Why did I ever think a pumpkin cheesecake had to be baked?”
Most recipes get this completely wrong by over‑sweetening or under‑spicing. Here, the balance is precise: the pumpkin puree provides natural sweetness and a velvety base, the powdered sugar is just enough to sweeten without drowning the spices, and the maple syrup adds a subtle depth that pairs perfectly with the lemon juice. The result is a dessert that feels both familiar and fresh. Picture yourself pulling this out of the fridge, the whole kitchen smelling incredible, and handing out the first ball to your guests—watch their faces light up.
Let me walk you through every single step—by the end, you’ll wonder how you ever made it any other way. From the moment you gather the ingredients to the final swirl of spice, I’ll share the tricks that keep the flavor bright and the texture flawless. This is hands down the best version you’ll ever make at home, and I’m ready to show you why.
What Makes This Version Stand Out
- Taste: The blend of pumpkin puree and cream cheese delivers a rich, creamy base that is sweetened just enough to let the spices shine. The maple syrup and lemon juice add a subtle contrast that keeps each bite fresh.
- Texture: The graham cracker coating gives a satisfying crunch, while the filling remains silky and smooth—no clumps, no gritty sugar. It’s a texture harmony that’s hard to beat.
- Convenience: No oven, no timer, no waiting for the crust to set. This recipe can be assembled in about 15 minutes and chilled for 30 minutes—perfect for last‑minute dessert plans.
- Versatility: The base can be swapped for coconut milk or Greek yogurt for a lighter version, or you can add chocolate chips for a decadent twist.
- Make‑ahead Potential: Once assembled, the balls can be stored in the fridge for up to a week or frozen for months. They’re always ready to impress.
- Ingredient Quality: Using fresh, high‑quality pumpkin puree and real cream cheese ensures a depth of flavor that canned or low‑grade products can’t match.
- Presentation: These balls look elegant on a platter, each one a bite‑size piece of comfort that’s perfect for parties, potlucks, or a cozy night in.
- Audience Reaction: Guests often comment that it’s “the best pumpkin dessert they’ve ever had.” It’s the kind of dish that turns casual diners into enthusiastic fans.
Inside the Ingredient List
The Flavor Base
At the heart of this dessert is a creamy pumpkin‑cream cheese mixture. The pumpkin puree brings a natural sweetness and a silky texture that pairs perfectly with the tang of cream cheese. The powdered sugar is measured carefully to avoid overpowering the spices, while the maple syrup adds a subtle depth and a hint of caramel. Lemon juice balances the richness, cutting through the sweetness and brightening the overall flavor profile.
The Texture Crew
Graham cracker crumbs form the crunchy shell that surrounds each ball. They’re coated in melted butter to give them a buttery flavor and a firm bite that doesn’t crumble when you bite into it. A pinch of salt is added to enhance the flavors without making the dessert taste salty—just enough to bring everything together. The butter also helps the crumbs bind together, ensuring a smooth coating that sticks to the filling.
The Unexpected Star
Ground ginger and pumpkin pie spice might seem like small details, but they’re the secret weapons that elevate the flavor. Ginger adds a subtle warmth that cuts through the sweetness, while the pumpkin pie spice—a blend of cinnamon, nutmeg, cloves, and allspice—creates a familiar holiday aroma that instantly feels cozy. These spices are measured in teaspoons and fractions to keep the flavor balanced and not overpowering.
The Final Flourish
Once the mixture is ready, it’s rolled into balls and coated in the buttery graham cracker crumbs. The final step is chilling, which allows the flavors to meld and the coating to set perfectly. The result is a bite‑size dessert that is both indulgent and practical, ready to be served at any occasion.
Everything’s prepped? Good. Let’s get into the real action.
The Method — Step by Step
- Step 1: Combine the Pumpkin and Cream Cheese. In a medium bowl, mash the pumpkin puree with a fork until smooth. Add the softened cream cheese and beat with an electric mixer on medium speed until the mixture is creamy and free of lumps. The goal is a silky base that will coat the graham crackers evenly. This is the moment of truth—if it’s still chunky, you’ll notice it in the final texture.
- Step 2: Sweeten the Mixture. Gradually stir in the powdered sugar, maple syrup, and lemon juice. Keep the mixer running on low to ensure each ingredient is fully incorporated. The mixture should look glossy and have a slight sheen—like a creamy custard waiting to be molded. Don’t rush this step; a well‑sweetened base is essential for balanced flavor.
- Step 3: Add the Spices. Sprinkle in the cinnamon, nutmeg, ginger, and pumpkin pie spice. Mix gently until the spices are evenly distributed. The aroma that fills the kitchen should be comforting and slightly warm—think autumn leaves and a cozy fireplace. If you prefer a milder spice profile, reduce the ginger to a pinch.
- Step 4: Prepare the Graham Cracker Coating. In a shallow dish, combine the graham cracker crumbs with melted butter and a pinch of salt. Toss the crumbs until they’re coated and lightly toasted. The butter should coat the crumbs enough to bind them together without making them greasy. This coating will give each ball a crisp, buttery crunch.
- Step 5: Shape the Balls. Using a small cookie scoop or a tablespoon, scoop out portions of the pumpkin mixture and roll them into balls by hand. If the mixture is too sticky, chill it for 10 minutes to firm up. Aim for a diameter of about 1.5 inches—small enough to bite, large enough to hold the filling.
- Step 6: Coat with Graham Cracker Crumbs. Roll each ball in the graham cracker mixture, pressing gently to ensure the coating sticks. The coating should look like a fine dusting that clings to the surface. This step is crucial; a loose coating will fall off and ruin the presentation.
- Step 7: Chill the Balls. Place the coated balls on a parchment‑lined tray and refrigerate for at least 30 minutes, or until firm. The chilling process allows the flavors to meld and the coating to set perfectly. If you’re in a hurry, a 15‑minute chill will still work, but the texture will be slightly softer.
- Step 8: Serve or Store. Once chilled, transfer the balls to an airtight container. They can be served immediately or kept in the fridge for up to a week. For longer storage, freeze the balls in a single layer on a parchment‑lined tray, then transfer them to a freezer bag. When you’re ready to serve, let them thaw at room temperature for 15 minutes.
That’s it— you did it. But hold on, I’ve got a few more tricks that will take this to another level.
Insider Tricks for Flawless Results
The Temperature Rule Nobody Follows
Many people think that chilling the mixture is optional, but it’s actually the secret to a firm, bite‑size dessert. By letting the mixture chill for at least 30 minutes, the fats in the cream cheese set, making it easier to shape and preventing the balls from collapsing. If you’re in a rush, a 10‑minute chill still works, but the texture will be slightly softer.
Why Your Nose Knows Best
When the spices are added, trust your nose to tell you when the aroma is just right. The scent of cinnamon, nutmeg, and ginger should be noticeable but not overpowering. If the spices smell too strong, dilute them slightly—your taste buds will thank you later.
The 5-Minute Rest That Changes Everything
After rolling the balls, let them rest on a parchment sheet for 5 minutes before coating. This short pause lets the mixture set enough to hold its shape, but still keeps it pliable enough to roll in crumbs without cracking. It’s a small step that makes a big difference.
Use Fresh Pumpkin for the Best Flavor
Fresh pumpkin puree has a bright, natural sweetness that canned puree can’t match. If you’re in season, roast a small pumpkin, scoop out the flesh, and blend it into a puree. The result is a richer, more authentic pumpkin flavor that elevates the entire dessert.
Don’t Skimp on the Butter
The butter in the graham cracker coating is what gives the crust its golden, buttery crunch. Skipping it or using too little will result in a crumbly, dry coating that doesn’t stick. Use enough butter to coat the crumbs lightly—just enough to bind them together.
Keep the Filling Cool During Rolling
If the filling gets warm, it will be too soft and won’t hold its shape. Keep the balls in the fridge until you’re ready to roll them, and if needed, chill them again for 5 minutes before coating. This ensures a crisp finish and a firm texture.
Creative Twists and Variations
This recipe is a playground. Here are some of my favorite ways to switch things up:
Chocolate Swirl
Fold in a handful of dark chocolate chips into the pumpkin mixture before shaping. The chocolate adds a rich, bittersweet contrast that pairs beautifully with the spices. This version is perfect for chocolate lovers and adds a festive touch.
Almond Crunch
Replace half of the graham cracker crumbs with finely chopped toasted almonds. The almond flavor adds a nutty depth, and the crunchy texture offers a delightful contrast. Serve with a drizzle of honey for extra sweetness.
Maple Bacon
Add a tablespoon of maple syrup to the filling and sprinkle a pinch of smoked sea salt on top of the coated balls. The maple gives a caramel flavor, while the smoked salt adds a subtle smoky note that’s unexpected yet delicious.
Vegan Version
Swap the cream cheese for a plant‑based cream cheese alternative and use coconut milk instead of powdered sugar. The texture remains creamy, and the flavor profile stays true to the original. This version is dairy‑free and just as indulgent.
Minty Pumpkin
Add a teaspoon of fresh mint extract to the filling and sprinkle a few crushed mint leaves on top after coating. The mint gives a refreshing lift that balances the warm spices, making it a unique twist for summer parties.
Spiced Cookie Dough
Mix in a tablespoon of cookie dough mix into the filling, then roll and coat as usual. The cookie dough adds a chewy texture and a sweet, buttery flavor that complements the pumpkin base.
Storing and Bringing It Back to Life
Fridge Storage
Place the chilled balls in an airtight container and store them in the fridge for up to seven days. The flavors will continue to meld, and the coating will remain crisp. When you’re ready to serve, let them sit at room temperature for 10 minutes to soften slightly.
Freezer Friendly
For long‑term storage, arrange the balls on a parchment‑lined tray and freeze them until solid. Then transfer to a freezer bag, removing as much air as possible. They can be kept for up to three months. Thaw in the fridge overnight before serving.
Best Reheating Method
If you prefer a warm version, gently microwave the balls for 10–15 seconds or warm them in a 200°F oven for 5 minutes. Add a splash of water before reheating to create steam that keeps the filling moist and prevents it from drying out.