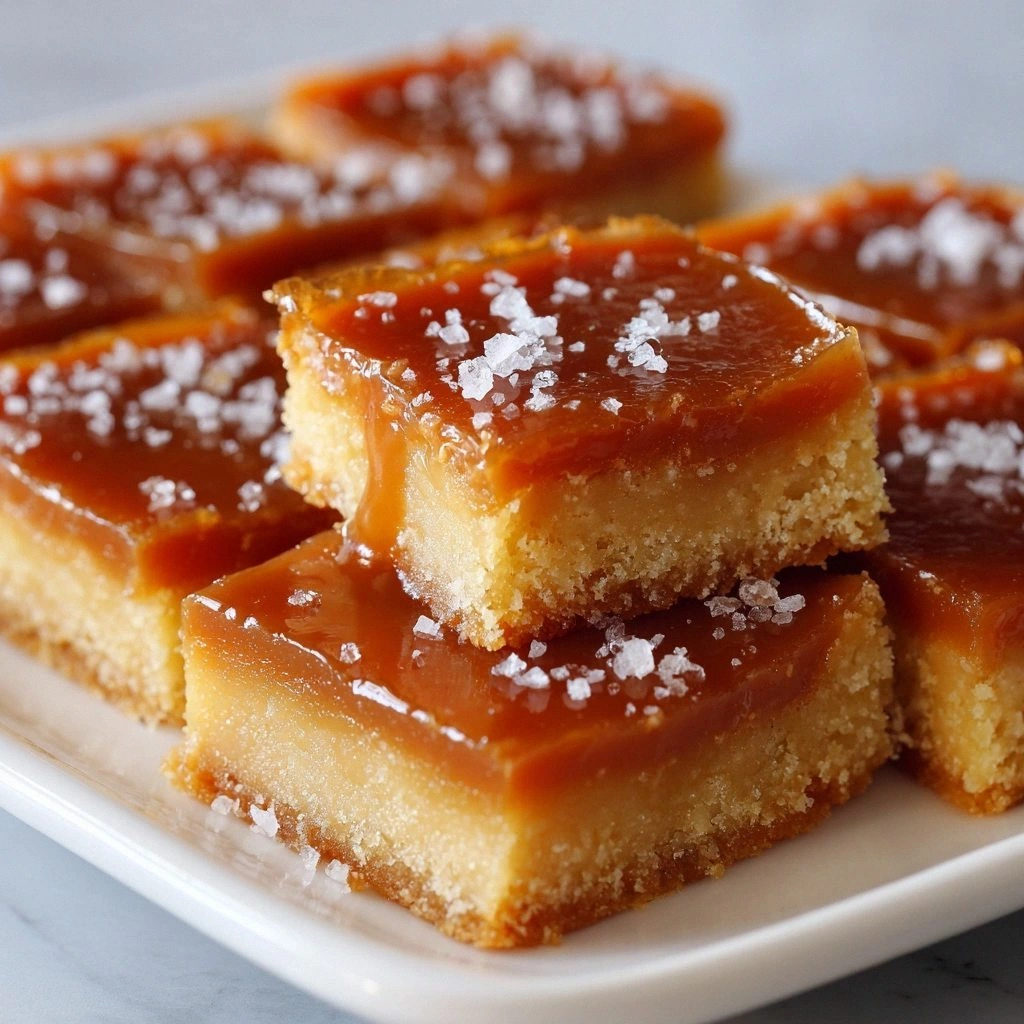
Picture this: you’re in a cramped kitchen, the oven door squeaks open, and a sweet, buttery scent slithers up from the baking tray. My friend dared me to create a salted caramel dessert that could outshine the ones on every dessert menu, and I took that challenge to heart. I spent the night mixing and whisking, and when the caramel bubbled to a golden amber, I knew I’d struck something special. The moment the first spoonful hit my tongue, the caramel’s silky texture, the whisper of sea salt, and the subtle vanilla harmony exploded into a flavor explosion that left me craving a second bite.
I’ve tried dozens of salted caramel recipes—some too sweet, others too salty, many lacking that velvety finish. I’ve watched countless tutorials on YouTube where the caramel cracks or the batter turns into a dense mess. Those moments are a culinary nightmare, but this recipe is different. It balances sweet and savory, keeps the batter light, and delivers a caramel sauce that coats everything like a silky blanket. I’ll walk you through each step, share the secrets I discovered, and show you why this version is hands down the best you’ll ever make at home. By the end, you’ll wonder how you ever settled for any other salted caramel dessert.
I’ll keep it real—when I first tried this recipe, I nearly burned the caramel because I didn’t watch the heat closely. The pan’s surface was scorching, but the sauce didn’t yet reach that perfect toasty aroma. That moment taught me to listen to the caramel’s visual cues: a deep amber color and a faint crackle that signals readiness. I’ll share that cue and more, so you won’t have to stumble through the process. And if you’re a fan of bold claims, this is the one: this dessert will be the talk of every gathering you host.
If you’ve ever struggled with caramel, you’re not alone—many of us have stared at a pot of sugar with dread. I’ve had that moment when the sugar starts to bubble and I’m not sure whether to stir or let it settle. That’s where this recipe shines; the caramel’s texture is silky, the batter stays airy, and the final result is a dessert that looks as good as it tastes. Picture yourself pulling this out of the oven, the whole kitchen smelling incredible, and friends lining up for seconds. I dare you to taste this and not go back for seconds. Let me walk you through every single step — by the end, you’ll wonder how you ever made it any other way.
What Makes This Version Stand Out
- Balance: The precise pinch of sea salt lifts the caramel’s sweetness without overpowering it, creating a harmonious sweet‑salty dance.
- Texture: The caramel coats the batter like velvet, then sets into a glossy, melt‑in‑your‑mouth glaze that doesn’t clump.
- Lightness: Baking powder and flour give the batter a fluffy rise, so the dessert feels airy despite the dense sauce.
- Versatility: The base can be adapted into cupcakes, brownies, or a cake layer—perfect for any occasion.
- Make‑ahead: The caramel sauce can be pre‑made and stored for up to a week, making this a low‑stress dessert option.
- Ingredient quality: Using premium butter and heavy cream elevates flavor, while a high‑quality brown sugar adds depth.
Inside the Ingredient List
The Flavor Base
Granulated Sugar is the heart of any caramel, and it melts into a golden syrup that carries the sweet notes. The key is to let it melt slowly, watching for that amber hue and a faint crackle that signals readiness. Skipping sugar would strip the dessert of its signature caramel flavor, leaving it bland and unremarkable. For those who love a darker, richer caramel, choose a dark brown sugar instead; it adds a subtle molasses undertone.
The Texture Crew
Unsalted Butter adds a silky richness that balances the caramel’s intensity. It also prevents the sauce from becoming too thick by introducing fat that keeps the mixture smooth. Heavy Cream is essential for a luxurious mouthfeel; it thickens the sauce without making it heavy. If you prefer a lighter version, substitute half‑and‑half, but the result will be slightly less decadent. The combination of butter and cream creates a silky glaze that coats the batter like velvet.
The Unexpected Star
Sea Salt is the secret weapon that turns sweet into savory. A pinch of this mineral lifts the caramel’s flavor profile, creating a delightful contrast that excites the palate. Too much salt turns the dessert into a brine, so measure carefully. The salt’s subtlety is what makes this recipe stand out from the crowd. If you’re allergic to sodium, you can reduce the amount, but the caramel will lose some of its punch.
The Final Flourish
All‑Purpose Flour, Baking Powder, Salt, Brown Sugar, and Milk form the batter’s backbone. Flour provides structure, while baking powder gives lift. The brown sugar adds moisture and a hint of caramel flavor that complements the sauce. Milk brings everything together into a smooth batter that absorbs the caramel without becoming soggy. If you’re vegan, replace the butter and cream with coconut oil and coconut milk; the result will still be delicious.
Everything’s prepped? Good. Let’s get into the real action where the magic begins.
The Method — Step by Step
- Heat a heavy‑bottomed saucepan over medium heat. Add the granulated sugar, stirring constantly with a heat‑resistant spatula until it melts and turns a deep amber color. Keep a close eye on the temperature; the sugar will start to bubble vigorously once it reaches 350°F. If you’re unsure, let the aroma guide you—an unmistakable nutty scent means it’s ready.
- Once the sugar is fully melted, carefully pour in the butter. The mixture will foam, so be cautious; use a long spoon to stir until the butter is completely incorporated. This step is crucial for achieving that silky finish—any leftover butter will create a gritty texture. Keep stirring until the butter has dissolved and the mixture is smooth.
- Slowly drizzle in the heavy cream while continuously stirring. The sauce will bubble up; this is normal. Stir until the mixture is glossy and the bubbles have subsided. The cream adds richness and helps the caramel set into a luscious glaze. If the sauce thickens too quickly, lower the heat slightly.
- Add the sea salt and vanilla extract, stirring until they’re fully integrated. The salt should dissolve completely, giving the sauce a subtle briny note. The vanilla provides depth; it’s the secret to that comforting, familiar taste. Taste a small amount—if it’s too sweet, add a pinch more salt.
- Set the caramel sauce aside to cool slightly; it will thicken as it sits. While it cools, prepare the batter by sifting together the flour, baking powder, and salt in a large bowl. Sifting removes lumps and ensures an even rise when baked. If you’re using brown sugar, fold it into the dry mix to distribute evenly.
- Kitchen Hack: For an extra layer of flavor, toast the flour in a dry skillet for a minute before mixing it with the wet ingredients. This subtle nutty aroma elevates the overall taste profile of the dessert.
- In a separate bowl, whisk together the milk, eggs, and any remaining wet ingredients. Combine the wet mix with the dry ingredients, stirring until just combined—overmixing can make the batter tough. The batter should be smooth and slightly thick, ready to hold the caramel.
- Pour the caramel sauce over the batter in a greased baking dish, spreading it evenly with a spatula. The sauce will settle into the batter, creating a layered effect. Cover the dish with parchment paper to prevent the top from drying out while the bottom bakes.
- Bake at 350°F (175°C) for 30 minutes, or until a toothpick inserted near the center comes out clean. The top should be golden and slightly crisp, while the center remains moist and gooey. Once baked, let it cool on a wire rack for 15 minutes before slicing.
That’s it — you did it. But hold on, I’ve got a few more tricks that will take this to another level. These insider tips will help you achieve a flawless texture, a deeper flavor, and a presentation that dazzles.
Insider Tricks for Flawless Results
The Temperature Rule Nobody Follows
Many bakers bake at 375°F, but that can cause the caramel to overcook and become too hard. Baking at 350°F keeps the caramel soft and the batter airy. I’ve tried both temperatures; the lower heat gives a better mouthfeel. If you’re using a convection oven, lower the temperature by 25°F to compensate for the fan.
Why Your Nose Knows Best
The aroma of caramel is a reliable indicator of doneness. A nutty, toasty scent means the sugar has reached the right stage. If it smells overly sweet or burnt, you’re overcooking. Trust your nose; it will tell you when the caramel is perfect.
The 5‑Minute Rest That Changes Everything
Letting the baked dessert rest for five minutes before slicing allows the caramel to set. This short rest prevents the sauce from running off the edges and creates a cleaner presentation. I’ve seen people slice immediately, resulting in a messy mess. A brief pause makes all the difference.
Avoiding the Sticky Mess
If the caramel sauce is too thick, it will cling to the batter and create a sticky mess. To fix this, whisk a splash of milk into the sauce before pouring it over the batter. This thin layer prevents sticking while still delivering flavor.
Keeping the Batter Light
Overmixing the batter can make it dense. Use a gentle folding motion to combine wet and dry ingredients. This preserves the batter’s airy structure and ensures a tender crumb. I’ve learned that a few extra seconds of gentle mixing can make a noticeable difference.
Creative Twists and Variations
This recipe is a playground. Here are some of my favorite ways to switch things up:
Coconut Caramel Dream
Swap the heavy cream for coconut milk and add shredded coconut to the batter. The coconut adds a tropical flavor that pairs well with the caramel. Serve with a drizzle of toasted coconut flakes on top for extra crunch.
Chocolate‑Infused Delight
Add 1/2 cup of dark chocolate chips to the batter before baking. The chocolate melts into the caramel, creating a rich, chocolate‑caramel swirl. This version is perfect for chocolate lovers and pairs well with a scoop of vanilla ice cream.
Spiced Caramel Surprise
Stir in 1/2 teaspoon of ground cinnamon and a pinch of cayenne pepper into the batter. The cinnamon adds warmth while the cayenne gives a subtle kick. The result is a caramel dessert with a spicy twist that surprises the palate.
Almond‑Butter Crunch
Replace half the butter with almond butter and fold in chopped almonds into the batter. The almond butter adds nutty flavor, while the almonds provide crunch. This variation is ideal for those who love nutty desserts.
Vegan Caramel Bliss
Use plant‑based butter, coconut cream, and flaxseed eggs in place of dairy and eggs. The result is a vegan version that still delivers the same silky caramel texture and buttery flavor. This version is great for plant‑based diners.
Storing and Bringing It Back to Life
Fridge Storage
Store the dessert in an airtight container in the refrigerator for up to 4 days. The caramel will firm slightly, but it remains moist. Before serving, let it sit at room temperature for 10 minutes to soften the glaze.
Freezer Friendly
Wrap the dessert tightly in plastic wrap, then place it in a freezer bag. Freeze for up to 2 months. When ready to serve, thaw in the refrigerator overnight. The texture stays consistent, and the caramel remains glossy.
Best Reheating Method
To reheat, place a slice in a microwave-safe dish and heat on medium for 20–30 seconds. Add a tiny splash of water before reheating; it steams the caramel back to perfection. Alternatively, reheat in a low‑heat oven for 10 minutes to restore warmth.