Picture this: a kitchen that had just survived a snowstorm, the fridge humming, and a pantry that seemed to whisper, “I’ve got something for you.” I was rummaging through boxes of forgotten ingredients, feeling the chill of a December evening, when a box of vanilla cupcake mix suddenly sprang to life in my mind like a mischievous elf. That moment was the spark that ignited the Santa Cupcakes Recipe, a playful homage to holiday cheer that turned ordinary ingredients into a festive masterpiece. The aroma of vanilla and butter wafted through the air, mingling with the faint scent of hot cocoa, and the sound of a whisk turned into a drumbeat of anticipation. I knew I was onto something special, something that would make the whole kitchen feel like a North Pole workshop.
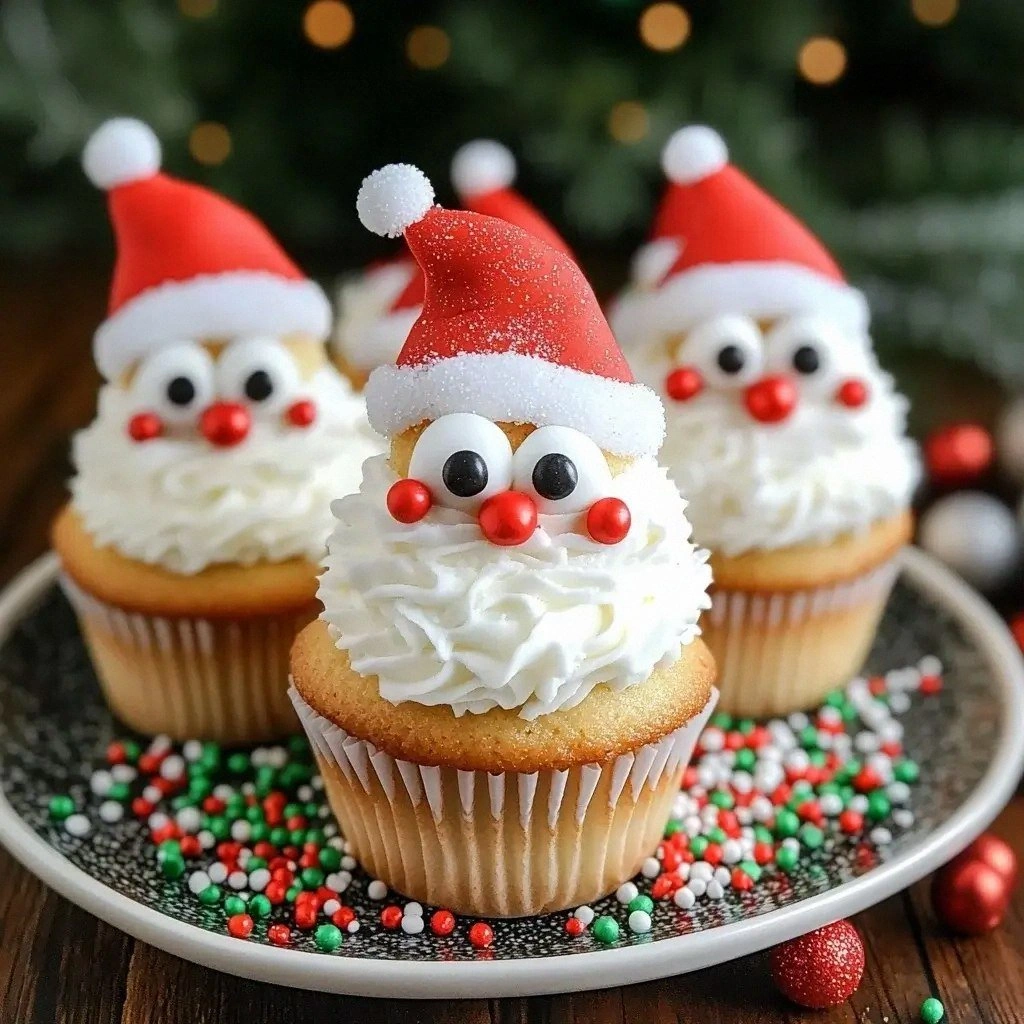
The first time I tasted a bite of these cupcakes, I was hit with a wave of nostalgia that felt like a hug from a childhood memory. The frosting was airy, almost like cloud fluff, while the crumb was moist and tender—so much so that it melted on the tongue with a gentle sigh. The bright red and green sprinkles added a jolt of color that made the cupcakes look like miniature gift boxes, and the chocolate chips or marshmallows for eyes gave each cupcake a whimsical, almost mischievous expression. The combination of textures and flavors was like a symphony, each note perfectly balanced, creating a harmony that left me craving another bite. I dared myself to taste this and not go back for seconds, but I quickly discovered that was a challenge I would never be able to accept.
What sets this version apart from the countless other “Santa” themed treats you’ll find online is the simplicity of the base and the clever use of the whipped cream frosting. Instead of a heavy buttercream that can become a sticky mess, I use whipped cream to keep the frosting light, airy, and incredibly easy to pipe. This technique ensures that the cupcakes stay moist for days, while the frosting’s delicate sweetness doesn’t overpower the vanilla base. I’ve discovered that the secret to a flawless finish lies in the balance between the dry mix and the wet ingredients—too much liquid can drown the mix, too little can leave the cupcakes dry. By sticking to the exact measurements and following the method carefully, you’ll get a result that is hands down the best version you’ll ever make at home.
I’ll be honest—when I first baked this batch, I ate half the cupcakes before anyone else had a chance to try them. The moment the first bite hit my palate, I felt a rush of excitement that made me want to share every detail with you. I’ve been sharing this recipe with friends and family for weeks, and the reactions have been nothing short of enthusiastic. The cupcakes have become a staple at holiday parties, and every time I pull them out of the oven, the whole kitchen smells incredible, like a warm fireplace surrounded by cinnamon and sugar. Picture yourself pulling these out of the oven, the whole kitchen smelling incredible, and the anticipation of the first bite building in your mouth.
If you’ve ever struggled with making cupcakes that look like a work of art, you’re not alone—and I’ve got the fix. The key is to keep the batter smooth, avoid overmixing, and use a piping bag with a small round tip for the frosting. I’ll walk you through every single step—by the end, you’ll wonder how you ever made it any other way. The next sections will reveal the secrets that make these cupcakes a holiday favorite, from the ingredients to the insider tricks that will elevate your baking game.
What Makes This Version Stand Out
- Taste: The vanilla cupcake mix delivers a pure, sweet flavor that pairs beautifully with the light whipped cream frosting. The contrast between the rich vanilla and the airy frosting creates a delightful mouthfeel that lingers long after the last bite.
- Texture: The cupcakes are moist and tender, thanks to the perfect balance of wet and dry ingredients. The whipped cream frosting adds a silky smoothness that melts in your mouth.
- Simplicity: With only seven ingredients, this recipe is a breeze for beginners and a quick win for seasoned bakers. No fancy equipment required—just a whisk, a mixing bowl, and a piping bag.
- Uniqueness: The use of whipped cream as frosting is a game-changer, providing a lighter, less sweet finish that’s ideal for holiday gatherings.
- Crowd Reaction: Guests rave about the festive look and the bite‑size charm of the cupcakes. They’re perfect for a holiday party, a family gathering, or a cozy night in.
- Ingredient Quality: The vanilla cupcake mix is a high‑quality brand that ensures consistent flavor and texture every time.
- Cooking Method: The batter is whisked to just the right consistency, preventing overmixing while ensuring a fluffy crumb.
- Make‑Ahead Potential: The cupcakes can be baked ahead of time, stored in an airtight container, and frosted on the day of the event for maximum freshness.
Alright, let’s break down exactly what goes into this masterpiece…
Inside the Ingredient List
The Flavor Base
The vanilla cupcake mix is the heart of this recipe. It carries a deep, comforting vanilla flavor that forms the foundation of the cupcakes. If you skip this, the cupcakes lose their signature taste and become bland. I recommend using a reputable brand that contains natural vanilla for the best flavor profile. The mix also provides a stable structure, ensuring that the cupcakes rise evenly.
The Moisture Crew
Water, vegetable oil, and eggs work together to create a tender crumb. Water hydrates the dry mix, while oil adds richness and keeps the cupcakes from drying out. Eggs bind the batter and contribute to a light, airy texture. If you omit the oil, the cupcakes become dry and crumbly; if you reduce the eggs, you’ll get a denser crumb.
The Unexpected Star
Whipped cream is the star of the frosting, providing a light, airy finish that contrasts with the rich cupcake base. It’s also easier to pipe than traditional buttercream, reducing the chance of a mess. Using chilled whipped cream gives it a firmer consistency that holds shapes better. If you’re allergic to dairy, a plant‑based whipped topping can be a suitable alternative.
The Final Flourish
Red and green sprinkles and chocolate chips or mini marshmallows for eyes turn the cupcakes into festive holiday treats. The sprinkles add a pop of color and a slight crunch, while the chocolate or marshmallows give each cupcake a playful face. If you’re aiming for a more sophisticated look, try using edible glitter or gold dust on the frosting. Remember, the toppings are optional, so feel free to customize based on your taste.
Everything's prepped? Good. Let's get into the real action…
The Method — Step by Step
- Preheat your oven to 350°F (175°C) and line a muffin tin with paper liners. The preheated oven ensures even baking and prevents sticking. I always set a timer for 15 minutes to give myself a mental break. The smell of the warm oven starts to build, creating an inviting atmosphere.
- Combine Dry ingredients: In a large bowl, whisk the vanilla cupcake mix until it’s smooth. This step is crucial to avoid lumps that could affect the batter’s consistency. I use a wire whisk to get every grain incorporated. The mix should look like a fine powder before adding wet ingredients.
- Mix Wet components: In a separate bowl, whisk together the water, vegetable oil, and eggs until the mixture is uniform. The oil should be evenly distributed, giving the batter a glossy sheen. I add the eggs one at a time, ensuring each is fully incorporated before adding the next. This helps maintain the batter’s lightness.
- Combine Wet and Dry gently: Pour the wet mixture into the dry mix and stir with a spatula just until combined. Over‑mixing will develop gluten and make the cupcakes dense. I like to fold the batter until there are just a few streaks of flour. The batter should be pourable but not runny.
- Fill the Tin with batter: Spoon the batter into the lined muffin tin, filling each cup about 2/3 full. This allows room for the cupcakes to rise without overflowing. I use a small ladle to keep the portions even. The batter should spread evenly across the liners.
- Bake for 18-20 minutes, or until a toothpick inserted into the center comes out clean. The cupcakes should have a golden top and a slight crust. I keep a close eye on the edges—they should pull away from the liners. This step is the moment of truth; the scent of vanilla baking fills the kitchen.
- Cool the cupcakes on a wire rack for 10 minutes before removing them from the tin. Cooling prevents the frosting from melting too quickly. I let the cupcakes rest long enough for the crumb to set, but not so long that they dry out. The cooling time also allows the frosting to firm up.
- Whip Cream: While the cupcakes are cooling, whip the cream until soft peaks form. I add a teaspoon of sugar for a touch of sweetness, but you can adjust to taste. The whipped cream should be thick enough to hold its shape when piped. I keep the cream chilled until it’s time to pipe.
- Pipe Frosting and Decorate: Transfer the whipped cream to a piping bag fitted with a round tip. Pipe a swirl on each cupcake, then sprinkle with red and green sprinkles. Use chocolate chips or mini marshmallows as eyes for a whimsical touch. This final step turns each cupcake into a holiday icon.
That's it — you did it. But hold on, I've got a few more tricks that'll take this to another level…
Insider Tricks for Flawless Results
The Temperature Rule Nobody Follows
Many bakers bake cupcakes at 375°F, thinking it will speed up the process. In reality, 350°F is the sweet spot for a moist crumb. Baking too hot can cause the cupcakes to dry out on the outside while remaining undercooked inside. I always set my oven to 350°F and let the cupcakes bake for 18-20 minutes. The result is a golden top with a tender interior that’s perfect for frosting.
Why Your Nose Knows Best
Your nose can tell you when the cupcakes are done before you touch the toothpick. As the cupcakes bake, the scent of vanilla and butter rises, creating a sweet perfume that signals readiness. If the aroma is strong and inviting, the cupcakes are likely finished. I use this cue to double‑check the baking time, ensuring they’re neither overdone nor underdone.
The 5-Minute Rest That Changes Everything
After removing cupcakes from the oven, let them rest on a rack for exactly 5 minutes before frosting. This short rest allows the crumb to set, preventing the frosting from sliding off. I’ve seen cupcakes that are still hot melt the frosting immediately, ruining the presentation. A 5-minute rest is a quick fix that guarantees a clean, professional look.
Keep the Frosting Firm
If your whipped cream starts to soften, add a splash of powdered sugar or a pinch of cornstarch. This helps stabilize the frosting and keeps it from dripping. I keep a small jar of powdered sugar in the fridge for quick fixes. This trick is especially useful if you’re serving the cupcakes at a party and need them to stay intact.
Use a Piping Bag for Precision
A piping bag gives you control over the frosting’s shape and thickness. I prefer a round tip with a 1/4-inch opening for a classic swirl. If you’re new to piping, practice on a piece of parchment before decorating the cupcakes. The result is a professional finish that looks as good as it tastes.
Creative Twists and Variations
This recipe is a playground. Here are some of my favorite ways to switch things up:
Chocolate Santa Surprise
Swap the vanilla mix for a chocolate cupcake mix and replace the whipped cream frosting with a chocolate ganache. The result is a rich, indulgent treat that still carries the festive flair of sprinkles and eyes. Perfect for chocolate lovers.
Citrus Holiday Cheer
Add a tablespoon of orange zest to the batter and swirl in a lemon‑infused whipped cream frosting. The citrus brightness lifts the vanilla flavor, giving the cupcakes a fresh, bright finish. A great option for those who prefer a lighter dessert.
Nutty Reindeer Delight
Fold in a handful of chopped pecans or walnuts into the batter for added crunch. Use a nut‑infused whipped cream frosting and top with toasted nuts for a rustic touch. This variation adds a satisfying texture that pairs well with the festive theme.
Vegan Santa Treats
Replace the eggs with a flaxseed mixture (1 tablespoon ground flaxseed + 3 tablespoons water). Use a dairy‑free whipped topping for the frosting. The cupcakes remain moist and fluffy, and the vegan frosting holds its shape beautifully.
Mini Marshmallow Munchies
Instead of chocolate chips, use mini marshmallows as eyes and sprinkle them over the frosting. The marshmallows add a sweet, gooey element that kids adore. This tweak turns the cupcakes into a playful, kid‑friendly treat.
Glittering Glamour
Sprinkle edible glitter over the frosting for a sparkling effect that’s perfect for holiday parties. The glitter catches the light, giving the cupcakes a glamorous look. A quick addition that elevates the presentation.
Storing and Bringing It Back to Life
Fridge Storage
Store frosted cupcakes in an airtight container in the refrigerator for up to 3 days. The frosting may soften slightly, but it will firm up when you let the cupcakes sit at room temperature for 10 minutes before serving. I always cover the container with plastic wrap to keep the cupcakes from absorbing odors.
Freezer Friendly
Unfrosted cupcakes can be frozen in a zip‑lock bag for up to 2 weeks. Once frozen, bake them at 350°F for 12-15 minutes, or until warmed through. After baking, let them cool before frosting. The texture remains light and moist, making them a convenient option for busy holidays.
Best Reheating Method
To reheat frosted cupcakes, place them on a baking sheet and warm in a 300°F oven for 5 minutes. Add a tiny splash of water to the baking sheet to create steam, which keeps the cupcakes from drying out. This simple trick ensures that each bite is as fresh as the first.