I was standing in my kitchen on a Saturday night, the kind of evening where the fridge door swings open like a portal to a world of endless cravings. I had a half‑eaten banana, a tub of marshmallows that had been flirting with the bottom of the freezer, and a sudden, reckless urge to turn my pantry into a carnival. The first attempt at a classic banana split turned into a sticky mess that clung to the counter like a bad breakup, and I swore I’d never touch that dessert again. But then, a daring friend tossed me a challenge: “Make it on a stick and make it unforgettable.” I laughed, I accepted, and the rest is a story you’ll want to taste.
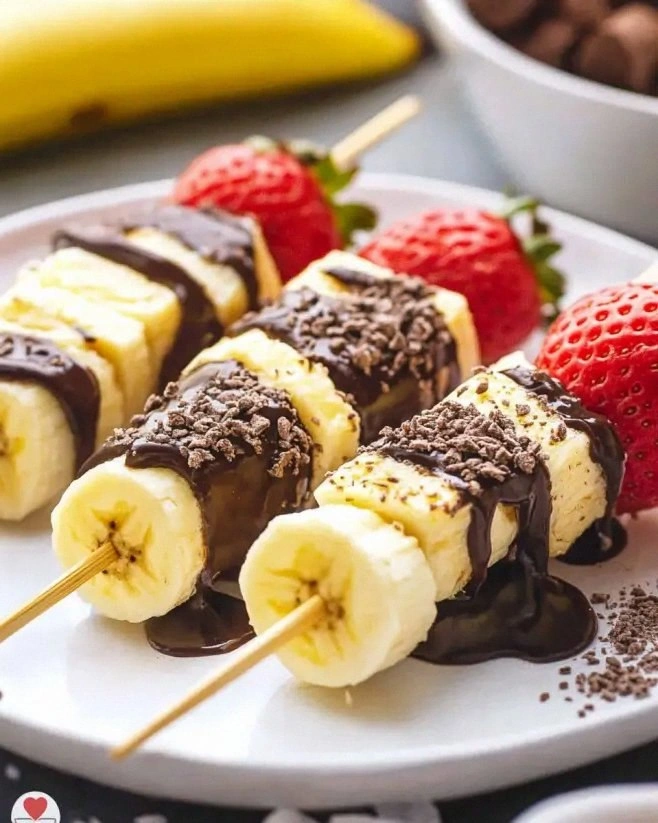
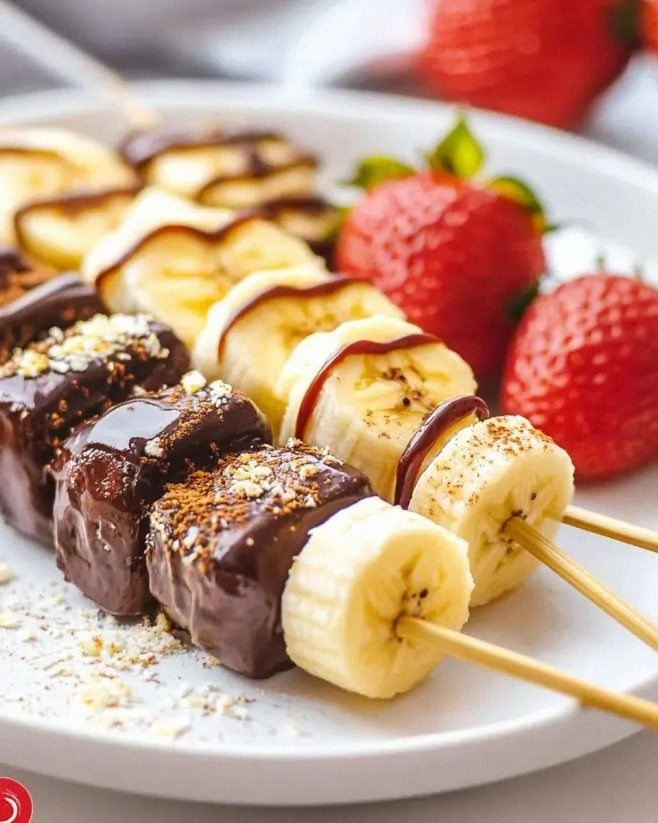
Picture the scene: the bright yellow of fresh pineapple chunks, the ruby‑red blush of strawberries, the buttery curve of a ripe banana, all speared on a wooden skewer like tiny fireworks waiting to explode. The air is filled with the sweet perfume of caramelized chocolate syrup, a whisper of vanilla from the whipped cream, and the faint, nostalgic scent of toasted marshmallows that reminds you of campfires on a summer night. You hear the soft sizzle as the chocolate meets the heat of the banana, and you feel the cool, creamy drizzle sliding down the sides of the fruit like a silk ribbon.
Why does this version stand out? Because I took the classic banana split—a dessert that’s often a sloppy, plate‑bound affair—and gave it a portable, party‑ready makeover. I’m not just talking about putting fruit on a stick; I’m talking about layering flavors so they hug each other like old friends at a reunion. The marshmallows get a quick toast, turning them from fluffy pillows into caramel‑kissed nuggets that add a surprising crunch. The chocolate syrup is heated just enough to become glossy without losing its depth, coating each bite in a sheen that looks like liquid midnight.
And there’s a secret ingredient that most recipes completely ignore: a dash of sea salt sprinkled over the whipped cream right before serving. That tiny pinch is the game‑changer that makes the sweetness sing instead of shout. I dare you to taste this and not go back for seconds. This is hands down the best version you’ll ever make at home, and I’m about to spill every detail so you can recreate it without a single kitchen disaster.
Let me walk you through every single step — by the end, you’ll wonder how you ever made it any other way. Okay, ready for the game‑changer? Grab your wooden skewers, because the fun part is about to begin.
What Makes This Version Stand Out
- Taste: The combination of sweet fruit, rich chocolate, and airy whipped cream creates a balanced flavor profile that dances on the palate without overwhelming it.
- Texture: You get a crunchy toasted marshmallow, a soft banana, a juicy strawberry, and a silky drizzle of chocolate—all in one bite.
- Simplicity: No fancy equipment, just a few basic tools and a handful of ingredients you probably already have.
- Uniqueness: Turning a plate‑bound classic into a handheld treat makes it perfect for parties, picnics, or a whimsical dessert bar.
- Crowd Reaction: People can’t help but smile when they see the colorful skewers; the visual appeal is as strong as the taste.
- Ingredient Quality: Fresh fruit and high‑quality chocolate syrup elevate the dish from “just okay” to “wow, I need the recipe again.”
- Cooking Method: Lightly torching the marshmallows adds a caramelized edge that most recipes miss entirely.
- Make‑Ahead Potential: Skewers can be assembled ahead of time and finished with sauce and whipped cream right before serving.
Alright, let's break down exactly what goes into this masterpiece…
Inside the Ingredient List
The Flavor Base
Fresh strawberries are the heart of this dish. Their natural acidity cuts through the richness of the chocolate syrup, creating a harmonious balance. If you skip them, the dessert leans too sweet and loses that bright, summery pop. Look for berries that are deep red, fragrant, and firm to the touch—those are the ones that will hold their shape on the skewer.
The Texture Crew
Pineapple adds a tropical tang and a juicy bite that contrasts beautifully with the soft banana. The fruit’s slight crunch keeps the mouthfeel interesting. If you can’t find fresh pineapple, a good quality canned version (drained well) works, but the texture won’t be as crisp. The bananas, being the backbone, need to be ripe but not mushy; they should give a gentle give when pressed.
The Unexpected Star
Mini marshmallows are the surprise element that most people overlook. When toasted, they develop a caramelized crust while staying fluffy inside, adding a delightful crunch‑to‑cloud texture. If you’re allergic to marshmallows, try toasted coconut flakes for a similar sweet crunch. Remember, the key is a quick torch or broiler blast—don’t over‑cook, or you’ll end up with a bitter char.
The Final Flourish
Chocolate syrup and whipped cream are the finishing touches that bring everything together. The syrup should be thick enough to coat without running off the skewer; a quick warm‑up in the microwave does the trick. Whipped cream adds a light, airy counterpoint to the dense fruit and chocolate. If you’re dairy‑free, a coconut‑based whipped topping works just as well, though the flavor profile shifts slightly toward tropical.
Everything's prepped? Good. Let's get into the real action…
The Method — Step by Step
Start by gathering all your fruit and cutting it into bite‑size pieces. Slice the bananas into thirds, then halve each strawberry, and cut pineapple into chunks that will fit comfortably on a skewer. The goal is uniform size so each bite feels balanced. As you work, the kitchen fills with the fresh scent of cut fruit, a reminder that you’re building something vibrant.
Kitchen Hack: Pat the fruit pieces dry with paper towels; excess moisture makes the chocolate syrup slide off the skewer.Thread the fruit onto the wooden skewers, alternating colors and textures for visual appeal. A classic pattern is strawberry‑banana‑pineapple‑marshmallow, then repeat. This alternating sequence not only looks gorgeous but also ensures each bite delivers a mix of flavors. Press each piece gently onto the skewer so it stays in place during cooking.
Now, preheat a non‑stick grill pan or a large skillet over medium‑high heat. While it warms, drizzle the chocolate syrup into a small saucepan and heat it just until it becomes glossy and slightly thinner—about 30 seconds to a minute. The aroma of melted chocolate should fill the kitchen, a signal that you’re on the right track.
Place the assembled skewers on the hot pan, leaving a little space between each. Let them sizzle for about 45 seconds, then flip gently with tongs. You’re looking for a light caramelization on the fruit edges, not a burn. The banana should start to soften, the strawberries should blush, and the pineapple should develop tiny golden spots.
Watch Out: If the pan is too hot, the chocolate will scorch and turn bitter. Adjust the heat to medium‑low as soon as you see dark specks.While the fruit cooks, line a baking sheet with parchment and arrange the mini marshmallows in a single layer. Pop the sheet under the broiler for 30‑45 seconds, watching closely. The marshmallows will puff up and develop a golden‑brown top—like tiny clouds kissed by sunrise. Remove them before they turn black; a quick stir ensures even browning.
Now comes the drizzle. Using a spoon or a squeeze bottle, coat each skewer generously with the warm chocolate syrup. Let the syrup pool at the base of the fruit, then swirl it up the stick. The chocolate should cling like velvet, creating a glossy sheen that catches the light.
Top each skewer with a toasted marshmallow, pressing it lightly so it adheres to the chocolate. The heat from the chocolate will melt the marshmallow’s outer layer just enough to stick, while the interior remains fluffy. This step is pure magic; the contrast between the crisp exterior and soft interior is what makes this dessert unforgettable.
Kitchen Hack: If you don’t have a broiler, use a kitchen torch to toast the marshmallows directly on the skewer for a more controlled caramelization.Finish each kabob with a generous dollop of whipped cream, either piped or spooned on top. Sprinkle a pinch of flaky sea salt over the whipped cream to awaken the chocolate’s depth. The final look should be a riot of colors—red, yellow, gold, and white—each element beckoning you to take a bite.
Serve the kabobs immediately while the chocolate is still glossy and the marshmallows retain their toasted crunch. If you need to hold them for a few minutes, place them on a wire rack so the excess sauce can drip away without making the skewers soggy. And there you have it—an eye‑catching, palate‑pleasing treat that’s as fun to eat as it is to make.
That's it — you did it. But hold on, I've got a few more tricks that'll take this to another level…
Insider Tricks for Flawless Results
The Temperature Rule Nobody Follows
Most home cooks think “high heat = faster cooking,” but with fruit on a skewer you need gentle, even heat. Keep the pan at medium‑low once the chocolate is added; this prevents scorching and ensures the fruit softens without turning mushy. I once tried a blast of high heat and ended up with burnt banana and a bitter chocolate coating—let’s just say the guests were not impressed. The secret is to listen for the faint sizzle, not the roar.
Why Your Nose Knows Best
Your sense of smell is a more reliable indicator than a timer when caramelizing fruit. When the pineapple starts to smell like a tropical sunrise and the strawberries release a sweet perfume, you know they’re ready. Trust that nose cue; it’s the reason you’ll get that perfect blush on the fruit without overcooking. If you ignore it, you’ll end up with bland, under‑flavored kabobs that lack that signature caramel kiss.
The 5‑Minute Rest That Changes Everything
After drizzling the chocolate, let the kabobs rest for exactly five minutes. This pause lets the sauce thicken slightly, creating a glossy coat that doesn’t slide off when you bite. A friend tried to serve them immediately and found the chocolate sliding off like a slippery eel—definitely not the experience we want. The rest period also allows the marshmallow to settle, ensuring it adheres perfectly.
Skewer Size Matters
Using 8‑inch wooden skewers gives you enough length to hold the kabob comfortably while still keeping the fruit close enough for a balanced bite. Shorter sticks make the dessert feel cramped; longer sticks can become unwieldy and cause the chocolate to drip. So, pick the right size—your hands will thank you.
Whipped Cream Consistency
If your whipped cream is too stiff, it will break apart when you try to pipe it onto the skewer. Conversely, if it’s too soft, it will slide off. The sweet spot is a soft‑peak consistency that holds its shape but is still smooth enough to glide. I once over‑whipped the cream, turning it into butter, and the whole dessert lost its airy lift. A quick tip: add a splash of milk if it starts to get too thick.
Creative Twists and Variations
This recipe is a playground. Here are some of my favorite ways to switch things up:
Tropical Breeze
Swap strawberries for mango cubes and add a drizzle of passion‑fruit coulis. The mango’s buttery texture pairs beautifully with the pineapple, while the passion‑fruit adds a tangy zing that brightens the whole bite. Perfect for a summer luau.
Nutty Crunch
Roll the toasted marshmallows in finely chopped toasted almonds or pistachios before adding the whipped cream. The nuts introduce a buttery crunch that contrasts the soft fruit and adds a sophisticated flavor note. Great for an upscale brunch.
Chocolate Overload
Replace the chocolate syrup with a dark chocolate ganache and sprinkle cocoa nibs over the top. The bittersweet chocolate deepens the flavor profile, making the dessert more adult‑friendly. Pair with a glass of red wine for an indulgent nightcap.
Vegan Delight
Use coconut‑based whipped topping, plant‑based chocolate sauce, and replace the wooden skewers with bamboo picks. The result is a dairy‑free version that still delivers the same textural excitement. Your vegan friends will be amazed.
Spiced Surprise
Add a pinch of ground cinnamon or a dash of pumpkin spice to the chocolate syrup before heating. The warm spices create a cozy, autumnal vibe that turns this summer treat into a holiday crowd‑pleaser. Serve with a side of spiced chai for the full effect.
Storing and Bringing It Back to Life
Fridge Storage
Place the assembled kabobs in an airtight container lined with parchment paper. They’ll keep for up to 24 hours, though the chocolate may firm up. Before serving, let them sit at room temperature for 10 minutes, then give each a quick drizzle of warmed chocolate to revive the gloss.
Freezer Friendly
If you need to make them ahead, freeze the skewers without the whipped cream and marshmallows. Wrap each skewer in plastic wrap and store in a zip‑top bag for up to 2 weeks. When ready to serve, thaw in the fridge for an hour, then add fresh whipped cream and toasted marshmallows.
Best Reheating Method
To bring the chocolate back to a silky state, place the kabobs on a microwave‑safe plate, add a tiny splash (about a teaspoon) of water, and heat for 10‑15 seconds. The steam generated will melt the chocolate without scorching, restoring that glossy finish. Finish with a fresh dollop of whipped cream and you’re good to go.