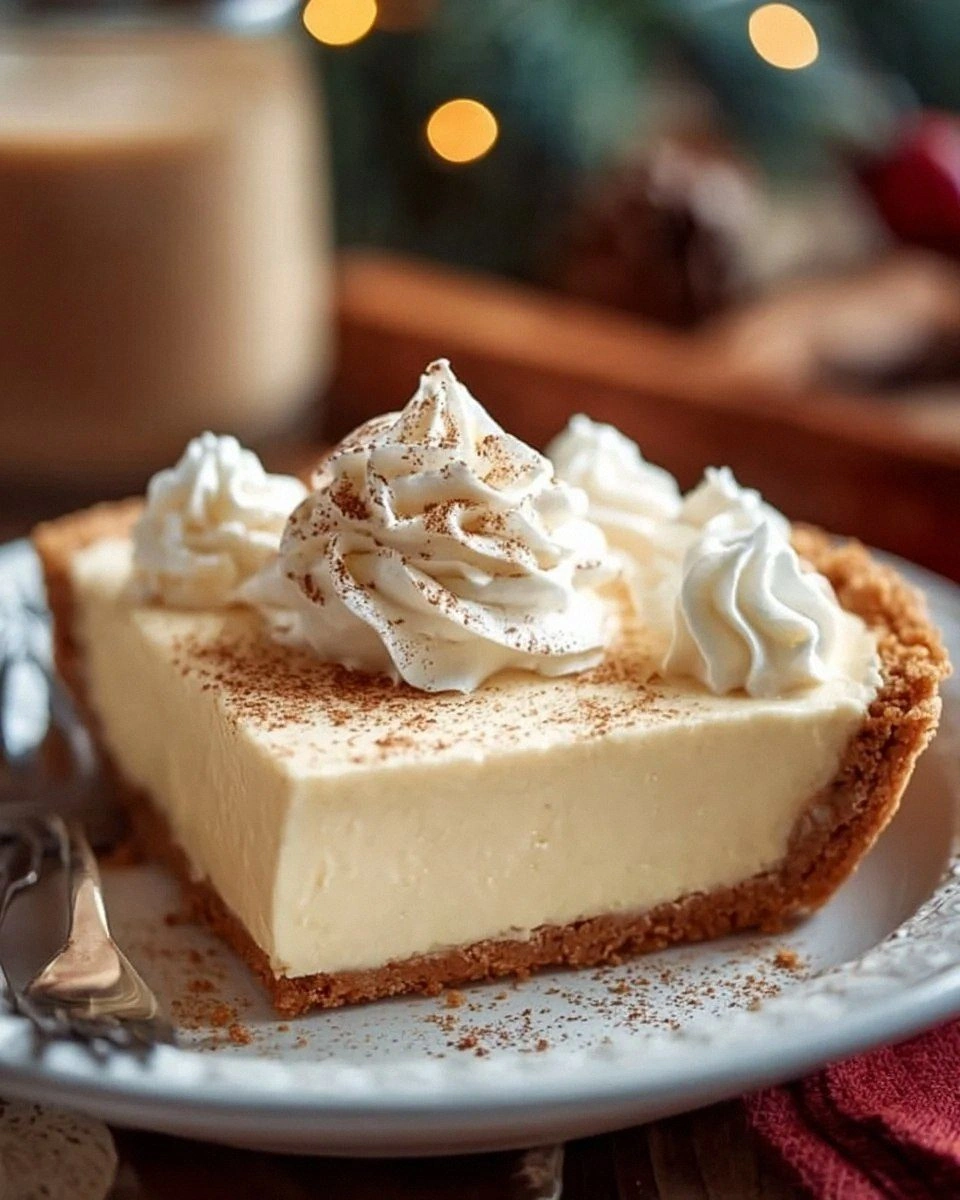
I’m going to start with a confession that will probably make you blush: I ate half the batch of this pie before anyone else even got a spoonful. That’s how addictive this creamy, no‑bake, eggnog‑style masterpiece is. Picture this: a buttery graham‑cracker crust that crumbles like fresh‑baked shortbread, topped with a cloud of spiced, velvety filling that whispers “holiday” even in July. The aroma alone is a punch of nutmeg and cinnamon that makes your kitchen feel like a cozy cabin on a snow‑capped mountain, while the texture is so smooth it could moonlight as a silk scarf. I first stumbled upon this version after a disastrous attempt at a traditional eggnog pie that turned out more like a rubbery custard disaster—yes, I’ve been there, and I’m still grateful for that kitchen nightmare because it forced me to strip everything back to the essentials.
What makes this version a total game‑changer? First, there’s no oven, no stovetop, no chance of a burnt bottom. The entire pie sets in the fridge, which means you can literally make it while binge‑watching your favorite series and still end up with a dessert that looks like it took hours of meticulous baking. Second, the secret weapon is a duo of ground nutmeg and cinnamon that’s measured with the precision of a chemist and the heart of a kid who just discovered gingerbread. I dare you to taste this and not go back for seconds—because once that first bite hits, you’ll understand why I call it “the best version you’ll ever make at home.”
Most recipes get the texture completely wrong, ending up either too dense or too runny. Here’s what actually works: a perfectly balanced ratio of cream cheese to whipped cream that creates a custard‑like body without any gelatin or eggs, and a crust that holds its shape without crumbling into a sad mess. The garnish of freshly grated nutmeg and a dusting of cinnamon isn’t just for looks; it adds that final aromatic pop that makes your taste buds do a little happy dance. And yes, I’m being a little dramatic, but that’s because this pie truly feels like a holiday miracle in a dish.
I’m also going to slip in a technique you won’t see in most recipes: I lightly toast the graham‑cracker crumbs before mixing them with butter. This tiny step adds a caramelized depth that makes the crust taste like a toasted marshmallow on a campfire—pure magic. Okay, ready for the game‑changer? Let me walk you through every single step — by the end, you’ll wonder how you ever made it any other way.
What Makes This Version Stand Out
- Taste: The blend of nutmeg and cinnamon hits the palate like a warm hug from an old friend, while the cream cheese base gives a subtle tang that cuts through the sweetness.
- Texture: Silky, airy, and just firm enough to hold its shape—think mousse meets cheesecake without the heaviness.
- Simplicity: No oven, no stovetop, just a fridge and a few minutes of mixing. If you can melt butter, you can master this.
- Uniqueness: The toasted graham‑cracker crust adds a caramel‑kissed crunch that most no‑bake pies completely miss.
- Crowd Reaction: Guests swear they’ve never tasted anything like it, and the “no‑bake” bragging rights get you instant culinary street‑cred.
- Ingredient Quality: Using full‑fat cream cheese and freshly grated spices elevates this from “just okay” to “wow, I need the recipe again.”
- Method: The set‑and‑forget approach means you can prep it the night before and still have a fresh‑tasting dessert for morning brunch.
- Make‑Ahead Potential: It actually improves after a few hours in the fridge as the flavors meld like old friends catching up.
Alright, let's break down exactly what goes into this masterpiece...
Inside the Ingredient List
The Flavor Base
The heart of this pie is the cream cheese, a 16‑ounce block softened to room temperature. It provides that luxurious, slightly tangy backbone that prevents the filling from becoming cloyingly sweet. If you skimp on the cream cheese, you’ll end up with a filling that feels like cheap frosting rather than a refined custard. For the best results, choose a brand that lists “cream cheese” as the first ingredient and avoid the low‑fat versions—they lack the necessary fat to achieve that silky mouthfeel.
The Sweetener & Spice Duo
One cup of powdered sugar does more than just sweeten; it also stabilizes the mixture, ensuring it holds together when sliced. Pair it with a teaspoon each of ground nutmeg and cinnamon, and you’ve got a spice combo that’s practically a holiday anthem. If you’re feeling adventurous, a pinch of freshly grated nutmeg can replace the ground version for an even more aromatic punch. Skipping the spices? You’ll lose the signature “eggnog” vibe and end up with a bland cheesecake.
The Texture Crew
Two cups of whipped cream are folded in at the very end, introducing air and lightness that turns the dense cream cheese mixture into a cloud‑like filling. It’s crucial to use cold, stiffly whipped cream; if it’s too soft, the filling will never set properly. A quick tip: chill your mixing bowl and whisk attachment for 10 minutes before whipping—that’s the secret behind professional‑grade mousse.
The Unexpected Star
The graham‑cracker crust is where the magic truly begins. Mixing 1.5 cups of crumbs with 0.5 cups of melted unsalted butter creates a buttery, crumbly base that holds together without the need for any additional binders. Toasting the crumbs (as mentioned in the Kitchen Hack) adds a caramelized depth that most recipes overlook. If you’re gluten‑free, swap the graham crackers for a gluten‑free cookie crumble; the flavor profile remains delightfully familiar.
Everything's prepped? Good. Let's get into the real action...
The Method — Step by Step
Start by preheating your imagination: grab a large mixing bowl and combine the 1.5 cups of graham‑cracker crumbs with the 0.5 cups of melted butter. Stir until every crumb is glossy and clings together like a tiny army of soldiers. Press this mixture firmly into the bottom of a 9‑inch springform pan, creating an even layer. The crust should feel dense under your fingertips—if it crumbles, add a splash more butter. Once set, pop the pan into the fridge to chill while you work on the filling. That cold crust is the foundation that keeps the pie from wobbling.
Watch Out: If you over‑mix the crust, the butter can start to separate, leading to a soggy base. Keep the mixing gentle and stop as soon as the crumbs are uniformly coated.
Kitchen Hack: Use the bottom of a flat measuring cup to press the crust down—this ensures an even, compact layer without over‑working the crumbs.While the crust chills, move on to the filling. In a separate bowl, beat the 16‑ounce softened cream cheese with an electric mixer on medium speed until it’s silky smooth—no lumps, no grainy bits. Add the 1 cup of powdered sugar, 1 teaspoon of vanilla extract, 1 teaspoon of ground nutmeg, and 1 teaspoon of ground cinnamon. Continue beating until the mixture is pale, fluffy, and fragrant. You’ll notice the kitchen filling with a scent that screams “holiday cheer” even if it’s a scorching summer day.
Now, gently fold in the 2 cups of cold whipped cream. Use a rubber spatula and a folding motion—cut down through the center, push the mixture up, and turn the bowl. This technique traps air, giving the filling its light, mousse‑like quality. If the whipped cream isn’t stiff enough, the filling will become runny and won’t set properly. The moment the mixture looks glossy and lifts off the spatula, you’re golden.
Retrieve the chilled crust and spoon the filling on top, spreading it evenly with the back of a spoon or an offset spatula. Smooth the surface so it’s level; any peaks will become noticeable once the pie is sliced. At this stage, you can sprinkle a light dusting of extra nutmeg and cinnamon for an added aromatic layer. Then, cover the pan loosely with plastic wrap and place it back in the fridge.
Kitchen Hack: For a flawless surface, dip a warm knife (run it under hot water, then dry) into the filling and glide it across the top—this gives a silky finish.Let the pie set for at least 4 hours, but preferably overnight. This is the “set‑and‑forget” moment where the flavors marry and the texture firms up. The longer it chills, the more the nutmeg and cinnamon permeate the cream cheese, creating a depth that’s impossible to achieve in a rushed setting.
When you’re ready to serve, run a thin knife around the edge of the springform pan to release the pie cleanly. Remove the ring, and you’ll see a perfectly set, glossy surface waiting for its final flourish. Sprinkle a final pinch of freshly grated nutmeg and a light dusting of cinnamon on top—this not only adds visual appeal but also a burst of aroma right before the first bite.
Watch Out: Avoid over‑garnishing; too much nutmeg can become bitter. A light dusting is all you need.Slice with a warm knife (dip in hot water, wipe dry) to get clean cuts. Serve each slice on a chilled dessert plate, and watch as the creamy filling holds its shape like a well‑behaved sculpture. Pair it with a cup of hot cocoa or a sparkling water with a twist of orange for a balanced palate.
That’s it — you did it. But hold on, I’ve got a few more tricks that’ll take this to another level, like a caramel drizzle or a toasted coconut topping. Stay with me here — this is worth it.
Insider Tricks for Flawless Results
The Temperature Rule Nobody Follows
Never, ever use cold cream cheese straight from the fridge. Let it sit at room temperature for at least 30 minutes. This prevents lumps and ensures a silky base. I once tried to skip this step, and the filling ended up with pockets of cheese that felt like tiny islands in a sea of mousse—definitely not the texture we’re aiming for.
Why Your Nose Knows Best
When the filling is fully blended, give it a quick sniff. If you can smell the nutmeg and cinnamon clearly, you’re good to go. If the aroma is faint, add a pinch more spice; the nose is a reliable gauge for flavor balance, far better than a measuring spoon.
The 5‑Minute Rest That Changes Everything
After folding in the whipped cream, let the mixture sit for 5 minutes before spooning it into the crust. This short rest lets the air bubbles rise to the surface, reducing the chance of a collapsed filling later on. It’s a tiny patience test that pays off with a firmer, more elegant slice.
Crust Crunch Boost
If you love a crunchier crust, toast the graham‑cracker crumbs for an extra 2 minutes as mentioned earlier, then let them cool before mixing with butter. The extra caramelization creates a subtle crunch that contrasts beautifully with the creamy filling. I swear the first bite after adding this step was like “crunch meets cloud.”
Garnish with Intent
A light dusting of nutmeg and cinnamon is not just for looks; it adds a final aromatic burst that hits the nose just before the fork hits the tongue. Use a microplane for the nutmeg to get the finest, most fragrant shavings. Over‑garnishing can make the pie taste bitter, so restraint is key.
Creative Twists and Variations
This recipe is a playground. Here are some of my favorite ways to switch things up:
Maple‑Pecan Delight
Swap half the graham‑cracker crumbs for toasted pecans and add 2 tablespoons of pure maple syrup to the crust mixture. The result is a buttery, nutty base with a caramel undertone that pairs wonderfully with the spiced filling.
Chocolate‑Espresso Fusion
Add 2 tablespoons of unsweetened cocoa powder to the cream cheese mixture and a teaspoon of instant espresso powder. This gives the pie an adult‑only twist that’s perfect for after‑dinner indulgence.
Coconut‑Lime Breeze
Replace the vanilla extract with 1 teaspoon of lime zest and fold in ½ cup of toasted coconut flakes. The citrus brightens the spices, while the coconut adds a tropical crunch.
Berry‑Infused Swirl
Gently fold in ½ cup of berry compote (raspberry or strawberry) into the filling before setting. The tartness of the berries cuts through the richness, creating a beautiful color swirl and flavor contrast.
Spiced Pumpkin Version
Add ¼ cup of pumpkin puree and a pinch of ground ginger to the filling. This transforms the pie into a pumpkin‑egg‑nog hybrid that’s perfect for autumn gatherings.
Storing and Bringing It Back to Life
Fridge Storage
Cover the pie tightly with plastic wrap or store it in an airtight container. It will keep fresh for up to 5 days. The chilled environment preserves the creamy texture and prevents the crust from becoming soggy.
Freezer Friendly
Wrap the entire pie (still in the springform pan) in a double layer of aluminum foil, then place it in a freezer‑safe bag. It freezes well for up to 2 months. When you’re ready to enjoy it, move it to the fridge to thaw overnight.
Best Reheating Method
Because this is a no‑bake dessert, you don’t actually reheat it. However, if the texture feels a bit too firm after refrigeration, let it sit at room temperature for 15 minutes and add a tiny splash of water (about a teaspoon) to the surface before serving. The moisture creates a gentle steam that revives the creaminess without compromising the set structure.