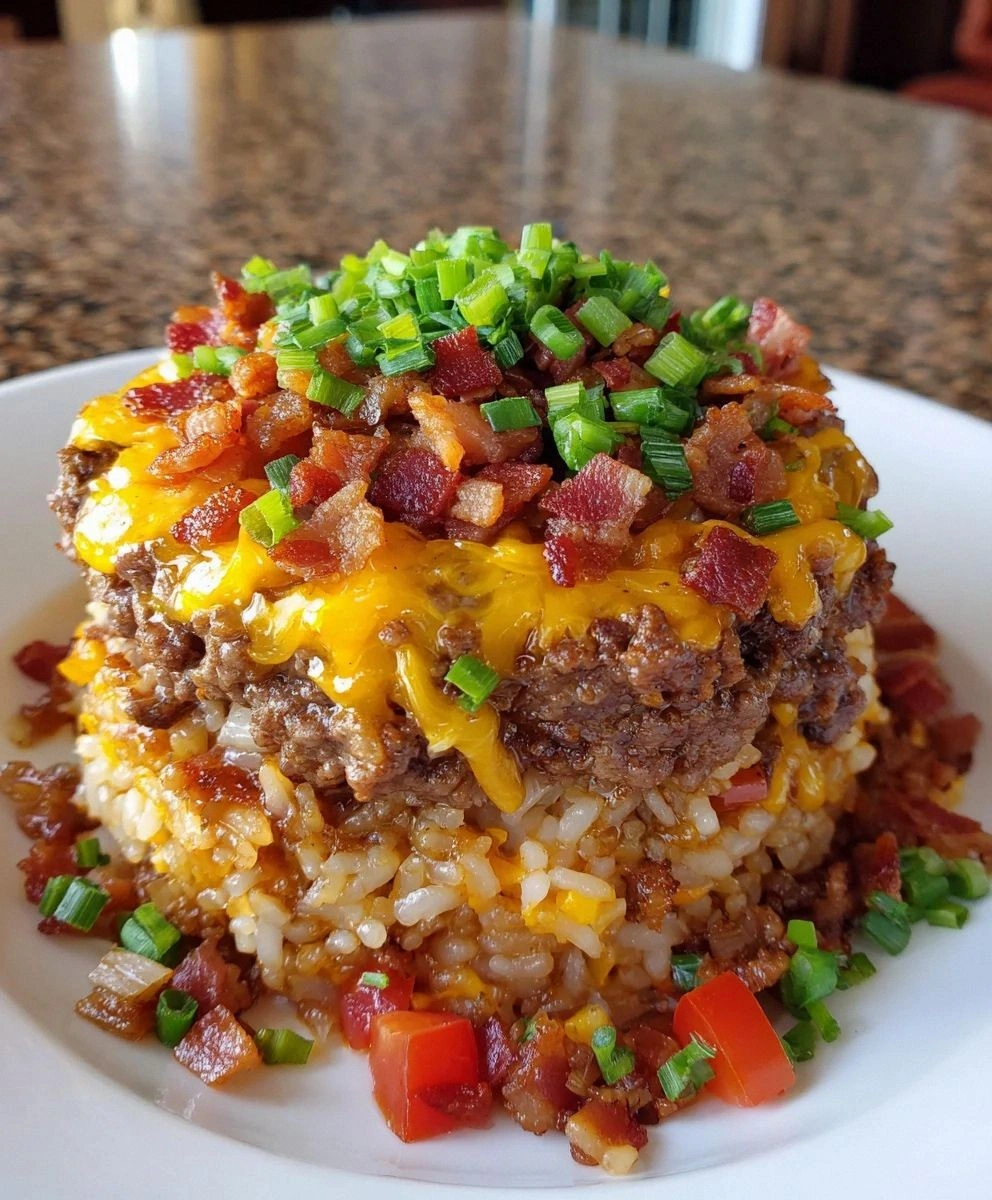
I’ll be honest — I ate half the batch before anyone else got to try it, and that’s because this dish is a straight‑up flavor bomb that refuses to be ignored. It all started on a rainy Tuesday when my pantry was looking sad, my cravings were screaming “cheeseburger,” and the only thing that could rescue the day was a stack of rice that could hold its own against a juicy patty. I tossed together ground beef, bacon, and a handful of pantry staples, and what emerged was a towering, gooey masterpiece that made my kitchen smell like a diner on fire. I dared myself to keep the secret, but the looks on my friends’ faces when they saw the first bite made me realize I had to share the magic.
Picture yourself pulling this out of the oven, the whole kitchen smelling incredible, the steam rising like a cloud of nostalgia that takes you straight back to that first bite of a classic cheeseburger. The top layer of sharp cheddar glistens, the bacon crumbles like confetti, and the rice underneath is buttery, savory, and just the right amount of fluffy. You’ll hear that satisfying sizzle as the cheese melts, and the aroma of caramelized onions and garlic will make you pause, inhale deeply, and think, “Why haven’t I been making this forever?” This isn’t just a dinner; it’s a full‑on sensory experience that turns a simple weeknight into a celebration.
Most recipes get this completely wrong. They either drown the rice in sauce, leave the beef dry, or forget the crucial crunch that bacon brings. I’ve spent countless evenings tweaking ratios, testing heat levels, and even swapping out broth for wine just to see what happens. The result? A perfectly balanced stack where each component shines yet works together like a perfectly rehearsed band. I dare you to taste this and not go back for seconds, because the combination of umami, tang, and a hint of sweetness will have you hooked from the first forkful.
Okay, ready for the game‑changer? I’m about to walk you through every single step — by the end, you’ll wonder how you ever made a cheeseburger without rice, and you’ll have a new go‑to recipe that will dominate your dinner table for months to come. Stay with me here — this is worth it.
What Makes This Version Stand Out
- Flavor Fusion: The marriage of classic cheeseburger condiments with a rice base creates a depth of flavor that’s richer than any plain beef‑and‑rice combo. The ketchup‑mustard‑tomato trio adds a sweet‑tangy glaze that coats each grain like velvet.
- Texture Symphony: Crispy bacon, melty cheddar, and fluffy rice give you a triple‑layered bite—crunch, chew, and silk all at once. No soggy bottoms here.
- Simplicity Meets Sophistication: With just a handful of pantry staples you can pull this off in under an hour, yet the result feels like a restaurant‑level dish.
- Ingredient Quality: Using an 80/20 beef blend ensures juicy, flavorful meat, while sharp cheddar provides the perfect bite‑back you crave.
- Crowd Reaction: This isn’t just a meal; it’s a conversation starter. Expect high‑fives, empty plates, and requests for “the recipe” within minutes of serving.
- Make‑Ahead Magic: The stack holds up beautifully for leftovers, and reheating brings back the same gooey goodness without any loss of texture.
- Versatile Base: Swap instant rice for quinoa or brown rice, and you have a healthier version that still delivers on flavor.
- Budget Friendly: All the ingredients are everyday items you probably already have, making it an affordable indulgence.
Inside the Ingredient List
The Flavor Base
Ground Beef is the heart of this stack. An 80/20 blend gives the perfect balance of flavor and juiciness, and the fat renders into a buttery sauce that infuses the rice. If you skip it, you’ll lose that meaty backbone, and the dish will feel flat. For a leaner version, substitute ground turkey, but be prepared to add a splash of olive oil to keep things moist.
Yellow Onion, diced finely, adds a sweet undercurrent that mellows the acidity of the ketchup and mustard. The onion’s natural sugars caramelize as they hit the pan, creating a fragrant base that’s impossible to ignore. Red onion can be swapped for a milder bite, but you’ll miss that classic burger aroma.
Garlic, freshly minced, brings an aromatic quality that complements the beef and onions beautifully. If you’re in a pinch, a half‑teaspoon of garlic powder works, but you’ll lose that bright, punchy note that makes the sauce sing.
The Seasoning Crew
Seasoned Salt is an elevated seasoning blend that mixes salt with herbs and spices, giving the dish a subtle depth without needing a separate spice rack. Regular salt works, but you’ll have to manually add dried thyme, paprika, and a pinch of black pepper to achieve the same complexity.
Tomato Sauce adds richness and moisture, acting as the glue that binds the rice and beef together. A spicy tomato sauce or enchilada sauce can be used for a kick, but keep the balance in mind—too much heat can drown the cheddar’s mellow charm.
Ketchup provides the signature sweet‑tangy note that makes a cheeseburger instantly recognizable. Swapping it for BBQ sauce introduces a smoky dimension that pairs wonderfully with bacon, but you’ll need to cut back on the mustard to avoid overwhelming the palate.
Yellow Mustard delivers a tangy contrast that balances the richness of the beef and cheese. Brown mustard offers a more robust, slightly bitter edge if you’re feeling adventurous.
The Texture Crew
Instant Rice is the quick‑cooking hero that absorbs all the flavors without turning mushy. For a more nutritious grain, quinoa or brown rice works, but you’ll need to adjust cooking times and liquid ratios to keep the stack from becoming dry.
Beef Broth adds an extra layer of savory depth to the rice, ensuring each bite is packed with umami. Vegetable broth can be used for a lighter profile, though you’ll lose some of the meaty richness that defines this dish.
Bacon, crisped to perfection, introduces a salty, smoky crunch that elevates the entire stack. Turkey bacon can be substituted for a lighter version, but the texture won’t be as satisfying.
The Final Flourish
Sharp Cheddar Cheese is the crowning glory, providing that comforting cheesiness that ties everything together. Its sharpness cuts through the richness of the beef and bacon, preventing the dish from feeling heavy. Monterey Jack or a blend of cheeses can be mixed in for an extra melty surprise.
Everything's prepped? Good. Let's get into the real action…
The Method — Step by Step
Heat a large skillet over medium‑high heat and add a drizzle of olive oil. Once the oil shimmers, toss in the diced yellow onion and let it sauté for about 3‑4 minutes, stirring occasionally until the edges turn translucent and you hear that soft sizzle that signals caramelization is beginning. Add the minced garlic and cook for another 30 seconds, just until fragrant—be careful not to let it burn, or you’ll get a bitter bite. This is the foundation; if the aromatics aren’t golden, the whole stack suffers.
Add the ground beef to the pan, breaking it up with a wooden spoon. Let it sit undisturbed for 30 seconds to develop a crust, then stir and repeat until the meat is browned all over. As the beef releases its juices, sprinkle in the seasoned salt, allowing the herbs to dissolve into the meat. At this point, the mixture should smell earthy, meaty, and slightly nutty—if it doesn’t, crank the heat up a notch.
Kitchen Hack: For extra depth, deglaze the pan with a splash of beef broth after browning the meat, scraping up all the caramelized bits before adding the rest of the liquids.Stir in the tomato sauce, ketchup, and yellow mustard, mixing until everything is evenly coated. Let the mixture simmer for 4‑5 minutes, allowing the flavors to meld and the sauce to thicken slightly. You’ll notice the sauce becomes glossy and clings to the beef like a velvety blanket. Taste and adjust seasoning if needed—remember, the bacon will add salt later, so keep the base slightly under‑seasoned.
While the sauce simmers, prepare the instant rice according to package instructions, but replace half of the water with beef broth for richer flavor. Once the rice is cooked, fluff it with a fork and set aside. The rice should be tender yet firm—if it’s mushy, you’ll lose the structural integrity of the stack.
In a separate skillet, crisp the bacon slices over medium heat until they reach a deep, crackling crunch. Transfer the bacon to a paper‑towel‑lined plate and crumble it once cooled. The rendered bacon fat should be golden and fragrant; reserve a tablespoon of it to drizzle over the rice later for an extra layer of smokiness.
Watch Out: If you overcook the bacon, it becomes too brittle and will shatter the delicate rice layer. Keep a close eye and remove it as soon as it reaches that perfect, glossy crunch.Preheat your oven to 375°F (190°C). In a greased 9‑inch baking dish, spread a thin layer of the beef‑tomato mixture, then top with half of the cooked rice, pressing it down gently. Sprinkle half of the shredded sharp cheddar over the rice, followed by a third of the crumbled bacon. Repeat the layers: remaining beef sauce, the rest of the rice, the rest of the cheese, and finally the remaining bacon. The stack should look like a colorful, layered lasagna.
Cover the dish with foil and bake for 20 minutes. Then, remove the foil and bake an additional 10 minutes, or until the cheese on top is bubbling, golden, and just beginning to form those coveted crispy edges. The aroma at this stage will be intoxicating—think “summer BBQ meets comfort food.”
Kitchen Hack: For an ultra‑crisp top, switch the oven to broil for the last 2 minutes, watching closely so the cheese doesn’t burn.Once out of the oven, let the stack rest for 5‑7 minutes. This resting period allows the layers to set, making it easier to cut clean slices. While you wait, drizzle the reserved bacon fat over the top for an extra glossy finish. The final visual should be a tower of golden cheese, speckled bacon, and a hint of caramelized onion peeking through.
Serve hot, optionally with a side of pickles or a simple green salad to cut through the richness. Each bite delivers the perfect harmony of beefy umami, tangy ketchup‑mustard zing, creamy cheddar melt, and that satisfying crunch of bacon. That sizzle when the cheese hits the hot rice? Absolute perfection.
That's it — you did it. But hold on, I've got a few more tricks that'll take this to another level...
Insider Tricks for Flawless Results
The Temperature Rule Nobody Follows
Never cook the ground beef on high heat from the start. Starting at medium‑high allows the meat to release its juices gradually, preventing a dry texture. Once browned, crank the heat up for a minute to get those caramelized bits that add depth. A friend once tried cooking on full blast and ended up with a dry, crumbly stack—lesson learned.
Why Your Nose Knows Best
Your sense of smell is the ultimate timer. When the onions turn translucent and start to smell sweet, you know they’re ready for the garlic. When the beef releases that rich, roasted aroma, the browning is complete. Trust those cues more than the clock, and you’ll avoid over‑cooking.
The 5‑Minute Rest That Changes Everything
Letting the baked stack rest isn’t just a polite pause; it lets the steam redistribute, firming up each layer. This makes slicing clean and prevents the rice from sliding apart. Skip this step and you’ll end up with a sloppy mess that looks nothing like the picture.
Bacon Fat Finish
Reserve a tablespoon of rendered bacon fat and drizzle it over the finished dish. This adds a glossy sheen and a burst of smoky flavor that can’t be replicated with any other ingredient. It’s the secret weapon that turns good into unforgettable.
Cheese Distribution Mastery
Instead of dumping all the cheese on top, sprinkle it between layers. This creates pockets of molten cheese throughout the stack, ensuring every bite has that stretchy, gooey texture. A single layer on top would leave the interior dry.
Creative Twists and Variations
This recipe is a playground. Here are some of my favorite ways to switch things up:
Southwest Fiesta
Swap the ketchup for a chipotle‑adobo sauce, add a teaspoon of cumin, and toss in black beans with the rice. Top with sliced jalapeños and a dollop of sour cream. The heat and smoky notes will transport you straight to a Tex‑Mex cantina.
Italian Inspiration
Replace the mustard with a splash of balsamic glaze, stir in some dried oregano into the sauce, and use mozzarella instead of cheddar. Finish with fresh basil leaves after baking. You’ll get a comforting lasagna‑like vibe with a burger twist.
Breakfast Boost
Swap the beef for breakfast sausage, add a handful of frozen peas, and top with a fried egg after baking. The runny yolk becomes the sauce, and you’ve turned dinner into a hearty brunch.
Veggie‑Heavy Delight
Replace the ground beef with a mix of lentils and finely chopped mushrooms, use vegetable broth, and add diced bell peppers to the onion‑garlic mix. The result is a plant‑based stack that still delivers umami and texture.
Spicy Asian Fusion
Use soy sauce and a drizzle of sriracha in place of ketchup, add a teaspoon of ginger paste, and sprinkle toasted sesame seeds on top. Swap the cheddar for a mild Asian cheese or leave it out for a cleaner flavor profile.
Storing and Bringing It Back to Life
Fridge Storage
Allow the stack to cool to room temperature, then cover tightly with foil or transfer to an airtight container. It will keep for up to 4 days. When reheating, sprinkle a tiny splash of water over the top, cover with foil, and microwave for 2‑3 minutes, then finish under the broiler for 2 minutes to restore crispness.
Freezer Friendly
Portion the cooled stack into individual servings, wrap each tightly in plastic wrap, then place in a freezer‑safe bag. It freezes beautifully for up to 3 months. To reheat, thaw overnight in the fridge, then bake at 350°F (175°C) for 20‑25 minutes, adding a splash of broth halfway through.
Best Reheating Method
The secret to reviving that perfect texture is steam. Before reheating, place a tablespoon of water or broth in the bottom of the baking dish, cover loosely with foil, and bake. The steam re‑hydrates the rice while preserving the cheese’s meltiness. Finish uncovered for the last 5 minutes to bring back the golden crust.