Picture this: it is eleven-thirty on a Tuesday night, the house is quiet except for the hum of the fridge, and I am standing over my counter in fuzzy socks, powdered sugar drifting across the backsplash like fresh snow. I had promised myself I would only taste the mixture once—just once—yet here I am, bowl half empty, sticky fingers clutching a spoon, whispering apologies to a Santa-shaped cookie cutter that will clearly not be getting a workout tonight. The original plan was to replicate those pillowy peppermint pillows my grandmother used to hide in her coat pocket, but somewhere between "let me just test the texture" and "oops, did I forget dinner?" I discovered the ultimate formula for cloud-soft Christmas peppermints that melt on your tongue faster than December snow on a wool mitten.
Most recipes you will find online are, frankly, criminal: they ask you to wrestle with rock-hard dough, over-compact sugar that cracks like thin ice, or—worse—oil extracts that taste like toothpaste left in a hot car. The internet is littered with peppermint disasters, and I have eaten every one of them so you do not have to. After three failed batches, two emergency grocery runs, and one existential crisis involving a rolling pin, I cracked the code. The secret is not more powdered sugar; it is less. The magic is not a long bake; it is no bake at all. And the wow factor? A tiny splash of sweetened condensed milk that transforms gritty candy clay into velvet-fine truffle territory.
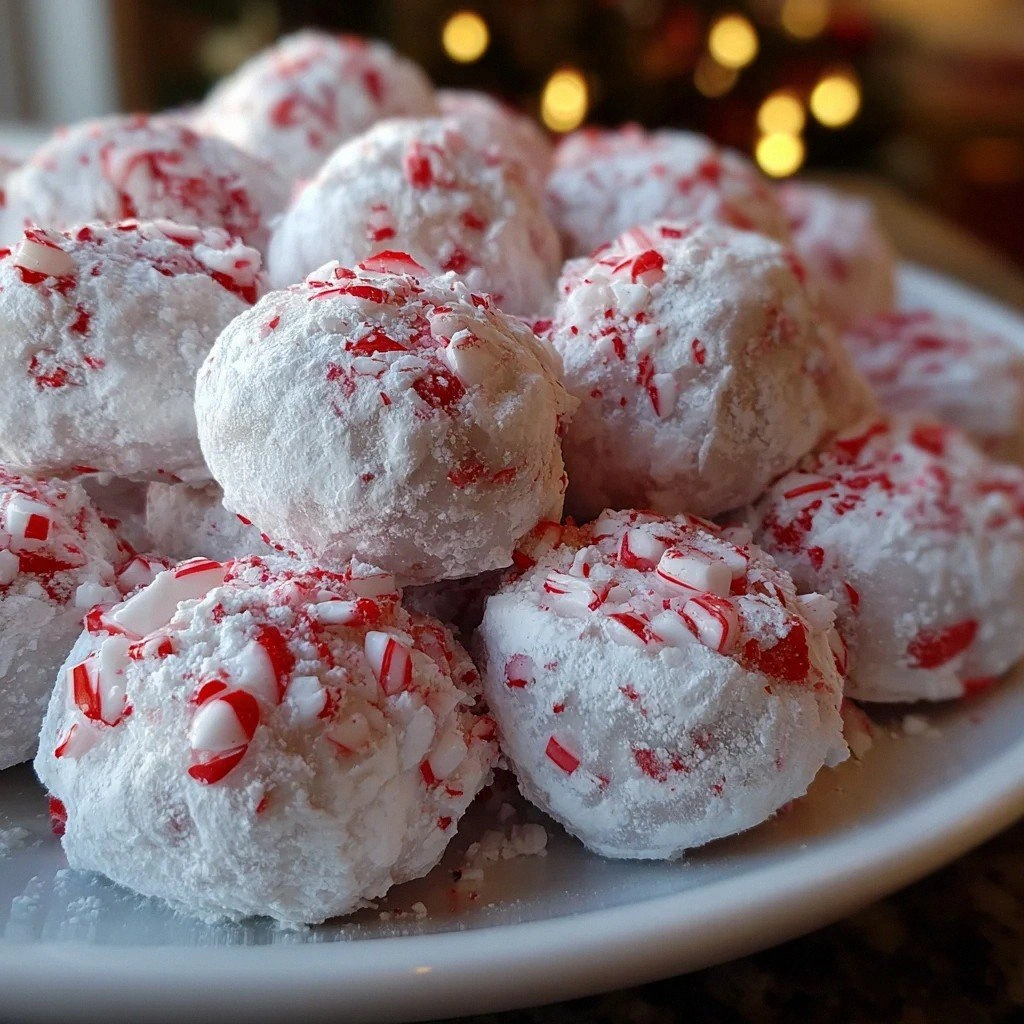
Stay with me here—this is worth it. These peppermints are soft enough to press a fingerprint into, yet firm enough to hold a dainty ridge of sugar crystals. They dissolve like snowflakes in cocoa, perfume an entire cookie tin, and—best part—require zero oven time. You will finish the whole project in under an hour, wrap the candies in wax paper, and feel like a Victorian confectioner who just invented Christmas.
Let me walk you through every single step—by the end, you will wonder how you ever made it any other way.
What Makes This Version Stand Out
Instant Gratification: No thermometer, no stove, no waiting for hard-crack stages that sound like a gym class. You whisk, knead, roll, cut, and eat—fifteen minutes start to finish. I dare you to taste this and not go back for seconds.
Pillowy Texture: The sweetened condensed milk fat coats sugar crystals so they dissolve on contact with body heat. Translation: they melt like buttery snow instead of shattering into rock-candy shards.
Customizable Punch: Most recipes load up on extract and leave you breathing icicles. Here, you start small, taste, and ramp up until the mint level matches your personality—wallflower or polar-explorer, you decide.
Kid-Friendly, Adult-Approved: Little hands love rolling dough into snakes and slicing stubby peppermint coins. Meanwhile, grown-ups sneak pieces with espresso or swirl them into spiked hot cocoa. Everyone wins.
Make-Ahead Miracle: These gems keep four weeks in the fridge, tasting fresher the longer they sit. Picture yourself pulling a tin out on New Year’s Eve and getting applause for "planning ahead," even though you actually made them during a Hallmark-movie marathon.
Show-Stopper Colors: A single drop of red dye ripples through snow-white dough like holiday northern lights. Skip the dye and you have elegant winter wedding favors; add dye and you have Santa’s workshop in edible form.
Zero Risk of Crystallization: Because we never boil sugar, you can ignore every scary warning about brushing down pan sides. The texture stays satin-smooth without a candy thermometer in sight.
Alright, let's break down exactly what goes into this masterpiece...
Inside the Ingredient List
The Flavor Base
Powdered sugar is not just sweet—it is the structural cloud that suspends air and fat. Skip it and you will have sticky taffy; substitute regular sugar and you will sandblast your teeth. I always buy organic powdered sugar because it dissolves faster and lacks the faint cornstarch aftertaste that cheaper brands carry.
Sweetened condensed milk is the velvet rope at an exclusive candy club. It brings caramelized milk sugars and butterfat that smother peppermint sharpness into something mellow and round. Do not reach for evaporated milk; that stuff is basically cloudy water here and will leave you with slurry.
Pure peppermint extract is where most recipes overdose. Start with one-quarter teaspoon, taste, and creep upward. Overdo it and your candy tastes like mouthwash; underdo it and you are just eating sugar cubes. Look for bottles labeled "peppermint" not "mint"—the latter is spearmint and will confuse your palate like toothpaste on orange juice.
The Texture Crew
Vanilla extract is the background bass note nobody notices until it is gone. It warms the cool peppermint, creating complexity your guests can not name but definitely devour. Use real vanilla, not imitation, because we have so few ingredients each one has to pull its weight like a Broadway ensemble.
Red food coloring is optional but highly recommended for holiday spirit. Gel dye gives richer color without diluting, while liquid dye is fine in micro-drops. Either way, whisk it into the condensed milk first; that way the color disperses evenly before it meets the sugar avalanche.
The Final Flourish
Granulated sugar for coating provides a delicate crunch that shatters against the soft center. I use superfine sugar because it sticks better and looks like fresh frost. Roll the mints while they are still tacky so crystals embed like snow on a wool coat.
Cornstarch for dusting is your insurance policy. A light veil on your hands and board prevents the dough from gluing itself to everything like festive cement. Do not skip this step unless you enjoy scrubbing sugar residue off your countertop with a chisel.
Everything's prepped? Good. Let's get into the real action...
The Method — Step by Step
- Whisk the powdered sugar in a large bowl first, fluffing it like winter snow. This step aerates the sugar so you will not end up with dense little hockey pucks. If you have ever tried to fold straight sugar into wet ingredients, you know it clumps like wet sand; aeration prevents that sad fate. Your arm might ache, but consider it a pre-emptive calorie burn.
- Drizzle in the sweetened condensed milk while stirring with a silicone spatula. Add it slowly—think lazy ribbon, not flash flood. The mixture will look like crumbly pie dough at first, but keep folding and pressing. When it starts to hold together like cold Play-Doh, you are on the right track. Resist the urge to add more liquid; the sugar needs about thirty seconds to hydrate.
- Drop in vanilla extract and your cautious first dose of peppermint. Stir vigorously, then taste a pinch. Yes, raw dough with powdered sugar is safe, and yes, this is the moment of truth. If you want bolder mint, whisk in another drop or two now—later is too late because oils bind quickly.
- If coloring, blend red dye into one tablespoon condensed milk in a separate cup. Splatter this rosy milk into the dough and fold until you see candy-cane swirls. Do not overmix; those ribbons look gorgeous when sliced. For uniform red, knead a minute longer until the streaks disappear.
- Dust your counter with cornstarch like a light Christmas morning snow. Scrape the dough out, flatten into a disk, and knead five or six turns. Over-kneading toughens the final candy, so treat it like biscuit dough—gentle confidence, not aggressive punishment.
- Roll the dough between two sheets of parchment to one-third-inch thickness. Too thin and the mints shatter; too thick and they feel cloying. Aim for the height of two stacked coins. Peel off the top parchment, then dust the surface lightly with superfine sugar.
- Use a one-inch cookie cutter or simply slice into tidy squares with a chef’s knife. If you choose squares, make one decisive cut rather than sawing—clean edges look professional and prevent sticking. Transfer pieces onto a cornstarch-dusted tray with room to breathe.
- Roll each piece in superfine sugar, coating every surface like frost on holly leaves. Shake off excess; you want sparkle, not a sugar shell. Let them air-dry thirty minutes so the outer sugar melds into a light crust, then pack into airtight tins. The flavor improves overnight as oils migrate and sugar crystals round their sharp corners.
That's it—you did it. But hold on, I've got a few more tricks that'll take this to another level...
Insider Tricks for Flawless Results
The Temperature Rule Nobody Follows
Cold kitchens make stiff dough; hot kitchens make gooey blobs. If you can see your breath, warm the condensed milk to body temperature in a microwave burst of five seconds—just enough to take the chill off, not hot. Conversely, if your kitchen feels like August in July, chill the bowl in the freezer five minutes before mixing. Temperature equilibrium gives you a five-minute working window before the sugar starts drinking moisture like Santa knocking back cocoa.
Why Your Nose Knows Best
Smell the dough before adding more peppermint. If you detect only sweetness, add tiny increments until the scent blooms like a winter garden. Olfactory fatigue is real; step away, sniff coffee beans, then return. Your nose resets, and you avoid the dreaded over-mint that tastes like chewing on a candy cane still attached to the tree.
The 5-Minute Rest That Changes Everything
After cutting, let the mints sit uncovered for five minutes before sugaring. The surface dries just enough for crystals to grab hold instead of dissolving on contact. A friend tried skipping this step once—let us just say her candies wept sugar tears all over the parchment and fused into a festive brick.
Storage Sweet Spot
These mints crave airtight darkness. Light bleaches the red to a sad pink, and loose lids invite refrigerator odors. I wrap tins in plastic wrap, then stash them in the crisper drawer where humidity stays constant. You will be rewarded with candies that taste like they were born yesterday, even three weeks later.
Creative Twists and Variations
This recipe is a playground. Here are some of my favorite ways to switch things up:
Cocoa-Peppermint Mocha Bites
Replace one tablespoon of powdered sugar with Dutch-process cocoa powder. The chocolate tempers the mint into a thin-mint vibe that dissolves in coffee like an edible stir stick. Roll in cocoa-sugar for a truffle look.
Orange-Clove Snowflakes
Swap peppermint extract for half orange oil and add a pinch of ground clove. The result tastes like mulled wine in candy form—perfect for New Year’s Eve when everyone is pepperminted out.
Hot Honey Fire Mints
Stir one teaspoon habanero honey into the condensed milk. The sweet heat sneaks up after the cool mint, creating a roller-coaster sensation that keeps people guessing—and reaching for another.
Coconut Snowballs
Roll the finished mints in desiccated coconut instead of sugar. The tropical note plays surprisingly well with peppermint, conjuring images of a beachside Christmas in July.
Midnight Espresso Squares
Dissolve one teaspoon instant espresso in the vanilla before mixing. The coffee bitterness makes the peppermint taste brighter, and the brown flecks give a sophisticated edge.
Almond Clouds
Add a drop of almond extract alongside the peppermint. Marzipan meets candy cane, and suddenly you are in a German Christmas market without the airfare.
Storing and Bringing It Back to Life
Fridge Storage
Layer mints in a tin lined with parchment, seal tightly, and refrigerate up to four weeks. The cold firms the fats, extending shelf life. Bring to room temp ten minutes before serving for maximum melt.
Freezer Friendly
Flash-freeze on a tray for one hour, then transfer to a zip bag. Freeze up to three months. Thaw overnight in the fridge, then let sit on the counter fifteen minutes before unwrapping to prevent condensation spots.
Best Reheating Method
There is no reheating—these are meant to be cool and silky. If they harden from cold storage, simply let them rest at room temperature fifteen minutes. Add a tiny splash of water to the tin, close the lid, and the gentle humidity revives their cloud-soft texture.