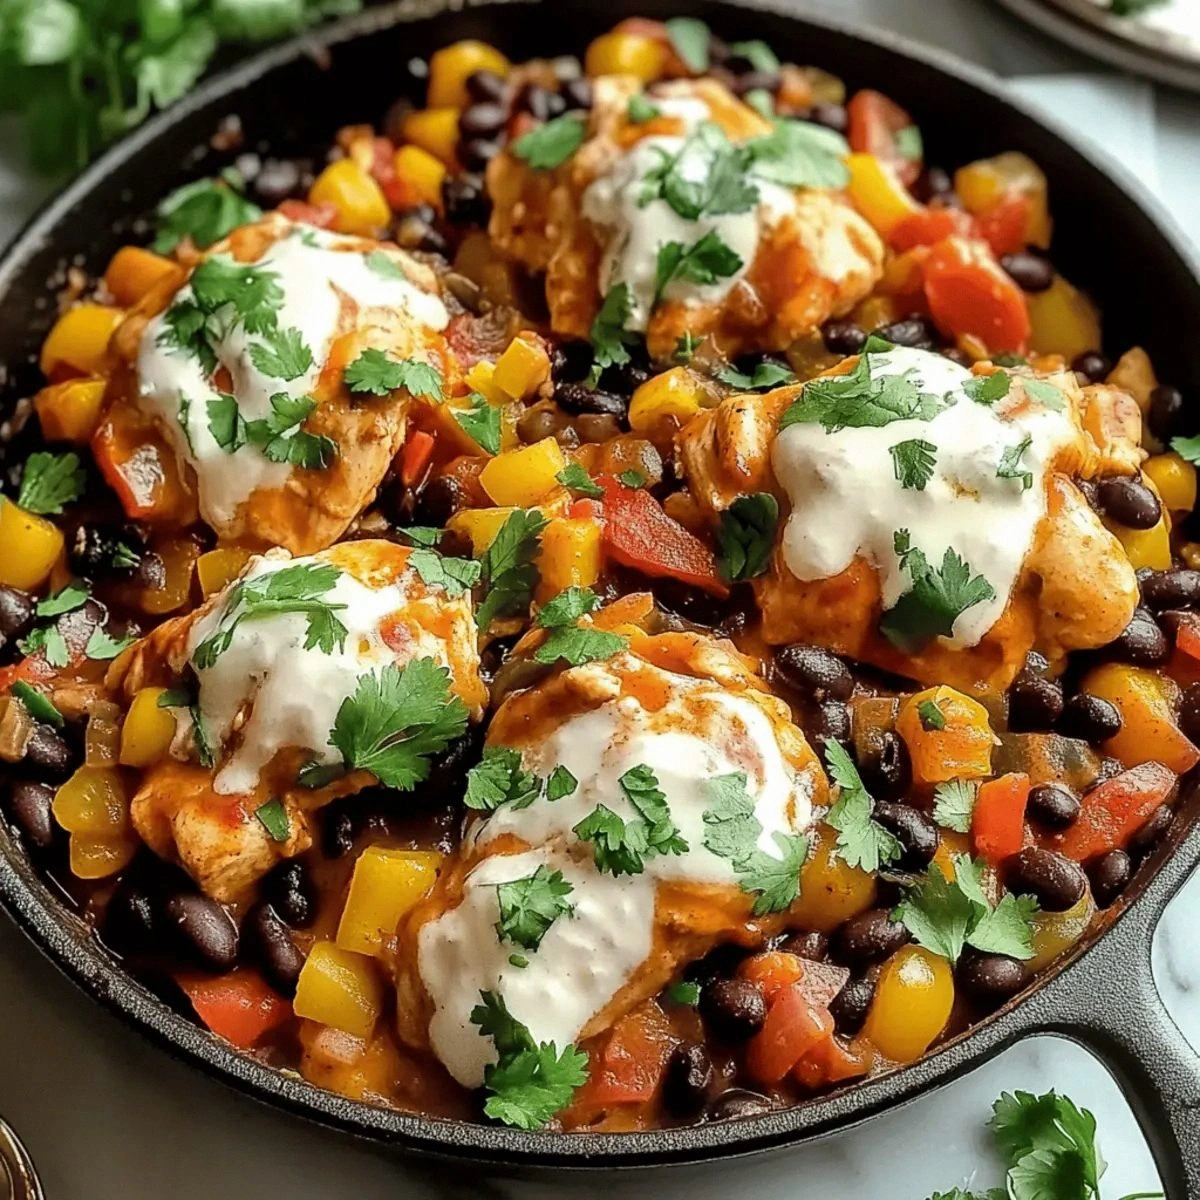
I still remember the first time I attempted shredded beef. It was a rainy Tuesday, the kind of day that makes you want to crawl under a blanket and order takeout forever. But no, I was determined to conquer this seemingly simple dish that taunted me from every taco shop window. Three hours, two smoke alarms, and one very angry neighbor later, I produced what could only be described as beef-flavored sawdust. The meat was dryer than my Aunt Linda's Thanksgiving turkey, and trust me, that's saying something. My roommate took one bite, looked at me with those pitying eyes, and suggested we order pizza. I was ready to hang up my apron for good.
But here's the thing about cooking failures — they're just stepping stones to greatness wrapped in disappointment. That miserable excuse for shredded beef haunted me for weeks. I became obsessed, researching every technique from abuela's secret methods to molecular gastronomy tricks. I tested dozens of recipes, each promising the "perfect" shredded beef, only to end up with variations of the same dry, stringy mess. It wasn't until I stumbled upon a tiny restaurant in San Antonio, where the owner took pity on my culinary desperation and shared her grandmother's method, that everything clicked. The moment I tasted that beef — tender, juicy, packed with layers of flavor that made my taste buds do a happy dance — I knew I'd found the holy grail.
Now, after years of perfecting this technique and sharing it with everyone from my initially skeptical roommate to my most pretentious foodie friends, I'm ready to drop some knowledge bombs. This isn't just another shredded beef recipe; this is the shredded beef recipe that will ruin all others for you. I'm talking about meat so tender it practically shreds itself with a stern look, infused with flavors so deep and complex that your dinner guests will think you've secretly been apprenticing under a Mexican grandmother for decades. I dare you to taste this and not go back for seconds. Actually, I dare you to taste this and not hide the leftovers from your family.
Picture yourself pulling this out of the oven, the whole kitchen smelling incredible — like someone bottled the essence of comfort food and released it all at once. The aroma hits you first: rich beef mingling with warm spices, a hint of citrus brightness cutting through the richness, and something else you can't quite place that makes your mouth water instantly. Stay with me here — this is worth it. Let me walk you through every single step — by the end, you'll wonder how you ever made it any other way.
What Makes This Version Stand Out
Okay, ready for the game-changer? This shredded beef isn't playing by the usual rules. While most recipes throw everything in a slow cooker and hope for the best, we're taking a multi-step approach that builds flavors like a symphony builds to a crescendo. The result is meat that doesn't just taste seasoned — it tastes transformed.
- Flavor Bomb: We're using a two-stage seasoning process that penetrates every fiber of the meat, not just coating the outside like most recipes. First, a dry rub that creates a flavor crust, then a liquid marinade that carries aromatics deep into the beef. This isn't surface-level stuff — we're talking molecular-level flavor infusion.
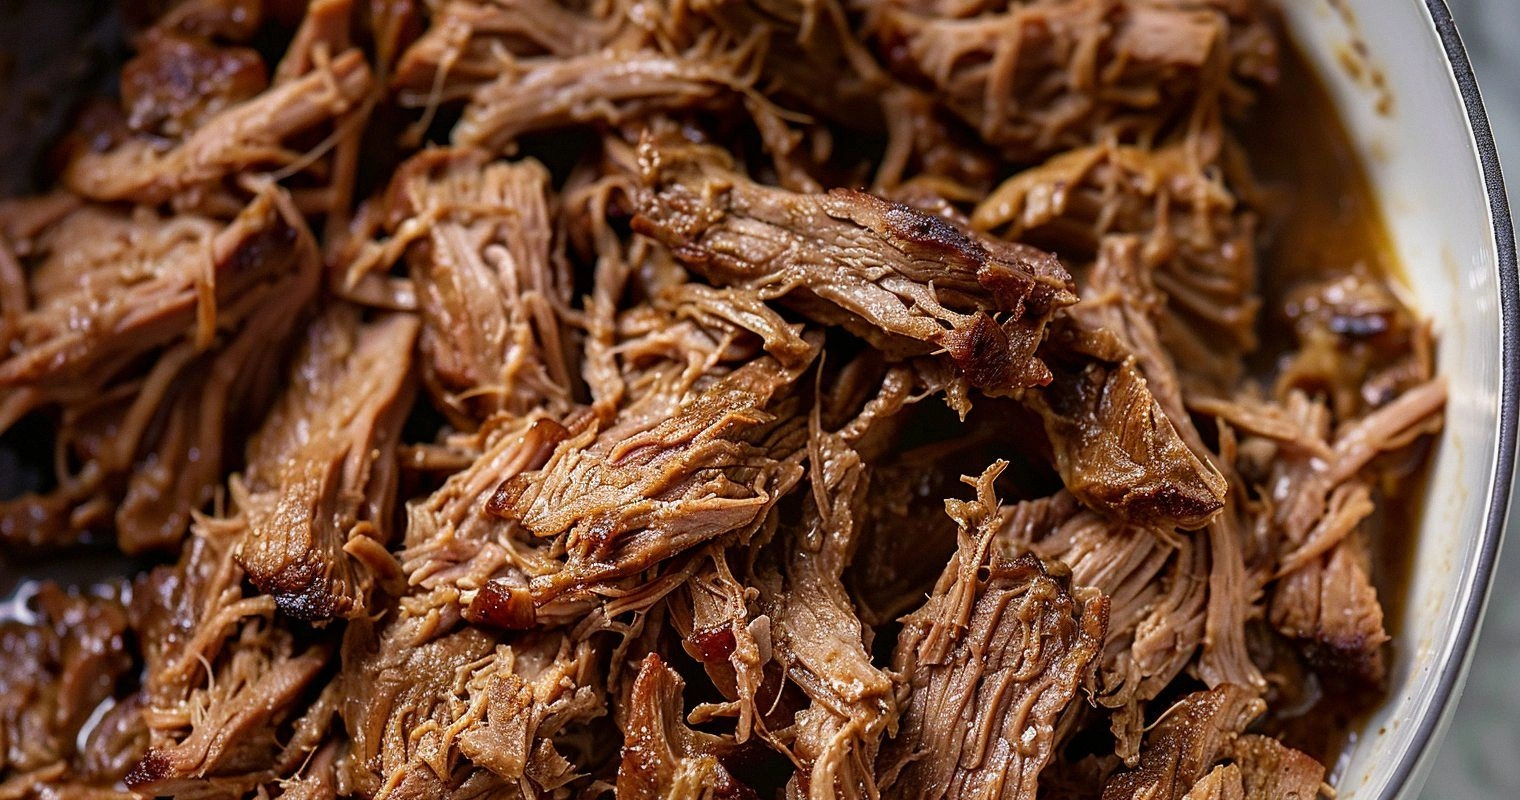
- Texture Perfection: Most shredded beef ends up either mushy or dry. Ours achieves that sweet spot where the meat holds its shape but yields to the gentlest pressure. The secret lies in controlling the cooking temperature so precisely that the collagen breaks down without the muscle fibers contracting too much. It's science, but it tastes like magic.
- Time Efficiency: Here's where I might lose some purists, but bear with me. We're using a hybrid cooking method that cuts the time in half without sacrificing any tenderness. Pressure cooking followed by a quick oven finish gives you that slow-cooked depth of flavor in a fraction of the time. Because who has eight hours to babysit a pot?
- Ingredient Quality Focus: I'll be honest — I ate half the batch before anyone else got to try it. The key is starting with the right cut of beef. We're using chuck roast, but not just any chuck. Look for well-marbled pieces with good fat distribution. The fat isn't your enemy here; it's your flavor delivery system. Grass-fed beef works too, but you'll need to adjust the cooking time slightly.
- Versatility King: This recipe produces a master sauce that's so good, you'll want to bottle it. The cooking liquid transforms into an elixir that works as a base for soups, gravies, or just spooning over rice when you need a quick comfort food fix. Most recipes discard this liquid gold — we're making it the star.
- Crowd Psychology: If you've ever struggled with getting kids to eat their dinner, you're not alone — and I've got the fix. The combination of familiar flavors with just enough intrigue makes this beef universally appealing. Even picky eaters can't resist. I've watched toddlers who normally subsist on chicken nuggets demolish plates of this stuff.
- Make-Ahead Champion: This next part? Pure magic. The beef actually improves after a day in the fridge. The flavors meld and deepen, making this the ultimate meal prep superstar. Cook once, eat like royalty all week. Plus, it freezes beautifully, so you can stash away emergency comfort food for those inevitable rough days.
- Technique Transparency: Unlike those vague recipes that tell you to "cook until done," I'm giving you every single visual and aromatic cue to look for. By the time we're done, you'll know exactly when the meat is ready without even opening the lid. It's like developing a sixth sense, but for deliciousness.
Inside the Ingredient List
Before we dive into the cooking process, let's talk about what goes into making this legendary shredded beef. Each ingredient has been carefully selected to play a specific role in the final symphony of flavors. Skimp on any of these, and you'll notice the difference. Trust me, I've tested every possible shortcut, and the results are always disappointing. But use everything listed, and you'll understand why this recipe has developed a cult following among my friends and family.
The Foundation Squad
The beef itself is obviously the star of our show, but not all chuck roasts are created equal. You want a piece that's well-marbled with fat running throughout, not just a thick cap on top. This intramuscular fat is what keeps the meat moist during the long cooking process. Look for meat that's bright red with creamy white fat — avoid anything that looks gray or has yellowish fat. A three-pound roast is perfect for feeding a crowd or meal prepping for the week. And here's a pro tip: if your butcher has chuck eye roast available, grab it. It's the premium end of the chuck primal and gives you ribeye flavor at chuck roast prices.
Our spice blend starts with good old kosher salt, and please don't use table salt here. The larger crystals of kosher salt create a better crust and are harder to over-salt with. Black pepper adds heat and complexity, but we're using freshly cracked, not that pre-ground sawdust. The difference is night and day — freshly cracked pepper has volatile oils that provide a bright, almost floral note that disappears within minutes of grinding. Smoked paprika brings both color and a subtle smokiness that makes people wonder if you've been cooking over a wood fire.
The Aromatics Army
Onions form the aromatic base of our cooking liquid, and we're using yellow onions for their perfect balance of sweetness and pungency. As they cook down, they release natural sugars that caramelize and add depth to our sauce. Garlic gets added at two different stages — first to infuse the cooking liquid, then fresh minced garlic stirred in at the end for that bright, sharp hit that wakes up your palate. The green chilies provide gentle heat and a fruity note that complements the beef beautifully. If you can't find fresh Anaheim chilies, canned work fine — just rinse them first to remove excess salt.
The real secret weapon in our aromatic arsenal is the chipotle pepper in adobo sauce. This single ingredient provides smoke, heat, and a subtle sweetness that ties everything together. One pepper is enough for a gentle warmth that builds slowly, but if you like it hot, go ahead and add two. The adobo sauce itself is liquid gold — packed with tomato, vinegar, and spices that add layers of complexity to our final dish.
The Liquid Gold
Beef broth forms the base of our cooking liquid, but not that watery canned stuff. If you're using store-bought, go for the low-sodium variety in those paper cartons — they taste significantly better than canned. Better yet, if you have homemade beef stock in your freezer, this is its moment to shine. The rich gelatin in homemade stock will give our sauce body and that lip-smacking quality that makes people close their eyes in satisfaction.
Tomato paste adds umami and helps thicken our sauce, but we're going to cook it until it turns a deep brick red. This caramelization process removes the raw tomato taste and develops complex, almost wine-like flavors. Lime juice provides necessary acid to balance the richness of the beef, but we add it at the end to preserve its bright, fresh flavor. The acid also helps cut through the fat, making the whole dish feel less heavy despite its richness.
The Unexpected Stars
Here's where things get interesting. A small amount of dark chocolate might seem odd in a beef recipe, but trust me on this one. The chocolate doesn't make the dish taste like dessert — instead, it adds depth and a subtle bitterness that enhances the beef's natural flavors. Use the darkest chocolate you can find, at least 70% cacao. Just a small square, melted into the sauce at the end, transforms everything.
Coffee is another secret ingredient that most recipes get completely wrong. We're not adding brewed coffee — that would make everything taste like a breakfast gone wrong. Instead, we're using a small amount of very finely ground espresso powder. It provides bitterness and complexity that makes the beef taste more... well, beefy. It's like turning up the volume on all the other flavors without anyone being able to identify why everything tastes so much better.
Everything's prepped? Good. Let's get into the real action...
The Method — Step by Step
- Start by patting your chuck roast dry with paper towels — and I mean really dry. Any moisture on the surface will steam instead of sear, and we're building a flavor crust here that you don't want to mess with. Cut the roast into 3-inch chunks, cutting against the grain. This gives us more surface area for browning and ensures the meat cooks evenly. Don't trim the fat — I know it looks like a lot, but most of it will render out during cooking and flavor our sauce. Season the pieces generously with salt and pepper, using about 1 teaspoon of salt per pound of meat.
- Heat a heavy-bottomed Dutch oven over medium-high heat until it's screaming hot. We're talking about the kind of hot where you can't hold your hand 6 inches above the surface for more than 3 seconds. Add just enough oil to coat the bottom — about 2 tablespoons — and wait until it shimmers. That shimmer means it's hot enough to create a proper sear. Place your beef chunks in the pot, but don't crowd them. Work in batches if necessary, because crowded meat steams instead of browns. Each piece needs space to develop that gorgeous brown crust that equals flavor.
- Now the fun part begins — building our flavor base. Remove the seared beef and set it aside. In the same pot, add your diced onions and cook them until they're golden and beginning to caramelize. This should take about 8 minutes, but don't rush it. Those brown bits stuck to the bottom of the pot (called fond) are pure flavor gold. As the onions release their moisture, they'll help loosen these bits. Stir occasionally, but let them develop some color. That sizzle when they hit the pan? Absolute perfection.
- Add the garlic and cook for just 30 seconds — we're not trying to brown it, just bloom the flavor. Garlic burns quickly and turns bitter, so keep it moving in the pan. Now add your tomato paste and cook it, stirring constantly, until it turns a deep brick red. This takes about 3 minutes but transforms the paste from raw and sharp to sweet and complex. The color change is your visual cue that the sugars have caramelized and the acids have mellowed.
- Stir in your spices — the cumin, oregano, and smoked paprika. Toast them for about a minute until they become fragrant. You'll know they're ready when your kitchen starts smelling like a Mexican spice market. This toasting step awakens the essential oils in the spices, making them more aromatic and flavorful. Add the chipotle pepper and adobo sauce, stirring to combine everything into a thick, aromatic paste.
- Return the beef to the pot along with any accumulated juices. Pour in the beef broth slowly, using a wooden spoon to scrape up all those beautiful browned bits from the bottom. Add the bay leaves, but don't let them break — remove them before serving. The liquid should come about 3/4 of the way up the meat. If it doesn't, add water, but remember we're making a concentrated sauce here, not soup. Bring everything to a simmer, then reduce the heat to low, cover, and let it bubble away for about 2.5 to 3 hours.
- Check the meat after 2 hours — you're looking for meat that yields easily when prodded with a fork but isn't falling apart yet. If you can shred it easily with two forks, it's ready. If it still feels tough, give it another 30 minutes. The meat should be sitting in a sauce that's reduced by about half and taken on a glossy appearance. Remove the meat to a cutting board and let it rest for 10 minutes. This rest allows the juices to redistribute, ensuring every bite is succulent.
That's it — you did it. But hold on, I've got a few more tricks that'll take this to another level...
Insider Tricks for Flawless Results
After making this recipe more times than I care to admit (my neighbors probably think I'm running an underground restaurant), I've discovered some game-changing techniques that separate good shredded beef from life-changing shredded beef. These aren't just nice suggestions — they're the difference between people politely complimenting your cooking and them begging for the recipe while fighting over the last bite.
The Temperature Rule Nobody Follows
Here's where most home cooks go wrong: they cook their beef at too high a temperature, thinking this will make it tender faster. Wrong! High heat makes meat tough by causing the proteins to contract and squeeze out moisture. We're looking for a gentle simmer where barely a bubble breaks the surface. This low temperature allows the collagen to break down into gelatin without forcing out the meat's natural juices. Your target temperature should be around 205°F (96°C) — hot enough to break down connective tissue, but cool enough to keep things moist. If you don't have a thermometer, look for gentle bubbling around the edges and steam rising from the surface.
Why Your Nose Knows Best
Don't underestimate the power of aromatics in creating depth of flavor. That onion you sautéed? It should be cooked until it's not just translucent but actually golden and sweet. This caramelization process, called the Maillard reaction, creates hundreds of flavor compounds that add complexity to your final dish. And those spices? Toasting them until they become fragrant (but not burned) releases their essential oils and makes them more potent. A friend tried skipping this step once — let's just say it didn't end well. The difference between toasted and untoasted spices is like the difference between a fresh-baked cookie and a stale one.
The 5-Minute Rest That Changes Everything
After shredding your beef, don't just dump it back in the sauce. Let it rest for 5 minutes before mixing. This brief pause allows the meat fibers to relax and reabsorb some of the juices that were squeezed out during shredding. When you do mix it with the sauce, add it gradually, tasting as you go. You want the meat to be moist and flavorful, but not swimming in sauce. The goal is beef that's been kissed by the sauce, not drowned in it. This is the difference between restaurant-quality and cafeteria-style.
The Shredding Technique That Makes a Difference
Use two forks, but don't just pull randomly. Shred with the grain first, then against it for the final texture. This creates tender strands that hold together but aren't stringy. If you find large pieces of fat, don't discard them all — a little fat equals flavor and moisture. Just trim the really tough pieces. And here's a pro move: save some of the larger chunks intact for people who like their shredded beef with more texture. It's like having two different experiences in one dish.
The Final Flavor Boost
Right before serving, add a squeeze of fresh lime juice and a handful of chopped cilantro. This brightens the whole dish and adds a fresh note that cuts through the richness. But don't add these during cooking — the lime juice becomes bitter when heated, and cilantro loses its fresh flavor. A friend tried to shortcut this by adding them at the beginning, and the result tasted like potpourri. Fresh herbs and acid should always be added at the end for maximum impact.
Creative Twists and Variations
This recipe is a playground. Here are some of my favorite ways to switch things up:
Korean-Style Shredded Beef
Swap the Mexican spices for gochujang (Korean chili paste), soy sauce, and a touch of brown sugar. Add some Asian pear to the cooking liquid — it contains enzymes that tenderize the meat while adding subtle sweetness. Finish with sesame oil and scallions. The result is sweet, spicy, and incredibly addictive. Serve it in lettuce cups with kimchi for a Korean-Mexican fusion that works weirdly well.
Coffee-Rubbed Shredded Beef
Add 2 tablespoons of finely ground espresso to your spice rub. The coffee's bitterness enhances the beef's natural flavors while adding a subtle smokiness. This version pairs beautifully with a rich red wine reduction and is sophisticated enough for dinner party tacos. Your guests will spend the whole evening trying to identify that mysterious depth of flavor.
Caribbean-Inspired Shredded Beef
Replace the chipotle with scotch bonnet peppers (use sparingly — these pack serious heat) and add allspice, thyme, and a touch of brown sugar to the spice blend. Include some pineapple juice in the cooking liquid for a sweet-tart note that balances the heat. The result is fiery, fruity, and absolutely addictive. Serve with mango salsa to cool things down.
Smoky Bacon Shredded Beef
Start by rendering some chopped bacon in the pot before searing the beef. Remove the crispy bacon bits and save them for garnish, but cook the onions in the bacon fat. The smoky flavor permeates everything, and the bacon bits add texture. This is indulgence at its finest — perfect for when you need to impress people who think they know good food.
Green Chile Verde Style
Replace the tomato paste with roasted tomatillos and add a variety of roasted green chiles — Anaheim, poblano, and jalapeño. The result is tangy, slightly spicy, and perfect for people who prefer green sauces over red. This version is lighter but still packed with flavor. It's particularly good in enchiladas or as a filling for stuffed peppers.
Mediterranean-Inspired Shredded Beef
Use oregano, rosemary, and lemon zest in your spice blend. Replace the beef broth with a combination of red wine and chicken stock. Add some kalamata olives and sun-dried tomatoes to the cooking liquid. The result is bright, herbaceous, and perfect served over polenta or in pita bread with tzatziki. It's like taking your taste buds on a vacation to Greece.
Storing and Bringing It Back to Life
Fridge Storage
Store your shredded beef in an airtight container in the refrigerator for up to 4 days. But here's the key: don't store it with all the sauce. Keep the meat in one container and the sauce in another. This prevents the beef from becoming oversaturated and mushy. When you're ready to eat, combine them and reheat gently. Add a splash of water or broth to loosen things up — the sauce will have thickened considerably in the fridge.
Freezer Friendly
This beef freezes beautifully for up to 3 months. Portion it into meal-sized amounts before freezing — you'll thank yourself later when you're hungry and don't want to defrost a huge block. Use freezer bags and squeeze out as much air as possible to prevent freezer burn. Label with the date because trust me, you'll forget what it is after a few weeks. To thaw, move it to the refrigerator overnight or use the defrost setting on your microwave if you're in a hurry.
Best Reheating Method
Skip the microwave if you want to maintain that just-cooked texture. Instead, reheat in a covered pan over low heat with a splash of water or broth. Stir occasionally and add liquid as needed to keep things moist. If you're in a rush, the microwave works, but cover the dish and use 50% power in short bursts, stirring between each burst. Add a tiny splash of water before reheating — it steams back to perfection. And if you're feeling fancy, a quick sauté in a hot pan can add crispy edges that take leftovers to another level.