I’ll be honest — I ate half the batch before anyone else got a chance to try it, and that’s because this dish is an absolute flavor bomb that detonates the moment it hits your tongue. Picture this: it’s a Tuesday night, you’re staring at a fridge that’s as empty as a desert, and a friend dares you to make something that’s both quick and daringly bold. I took that dare, tossed a handful of chicken thighs into a bowl, and the kitchen transformed into a battlefield of sizzling, aromatic fireworks. The air filled with the sharp snap of garlic, the warm hum of ginger, and a whisper of dried chilies that made my nose tingle like a neon sign. The first bite? A perfect clash of sweet, tangy, and fiery that made me gasp, “This is hands down the best version you’ll ever make at home.”
Most recipes for spicy chicken either drown you in a swamp of sauce or leave you with bland, rubbery meat that feels like chewing on a shoe sole. I’ve tried the “quick” shortcuts that promise a 15‑minute miracle, only to end up with soggy, over‑cooked pieces that cling to the pan like a bad habit. This version flips the script: we coat the thighs in a light, crisp cornstarch veil, flash‑fry them to golden perfection, then smother them in a sauce that clings like velvet while still letting the crunch sing. The secret weapon? A splash of sesame oil that adds a nutty depth you never expect from a weekday dinner. And the sauce? It balances tomato ketchup’s sweet tang with soy sauce’s salty umami, chili garlic heat, and a dash of vinegar that cuts through the richness like a razor‑sharp sax solo.
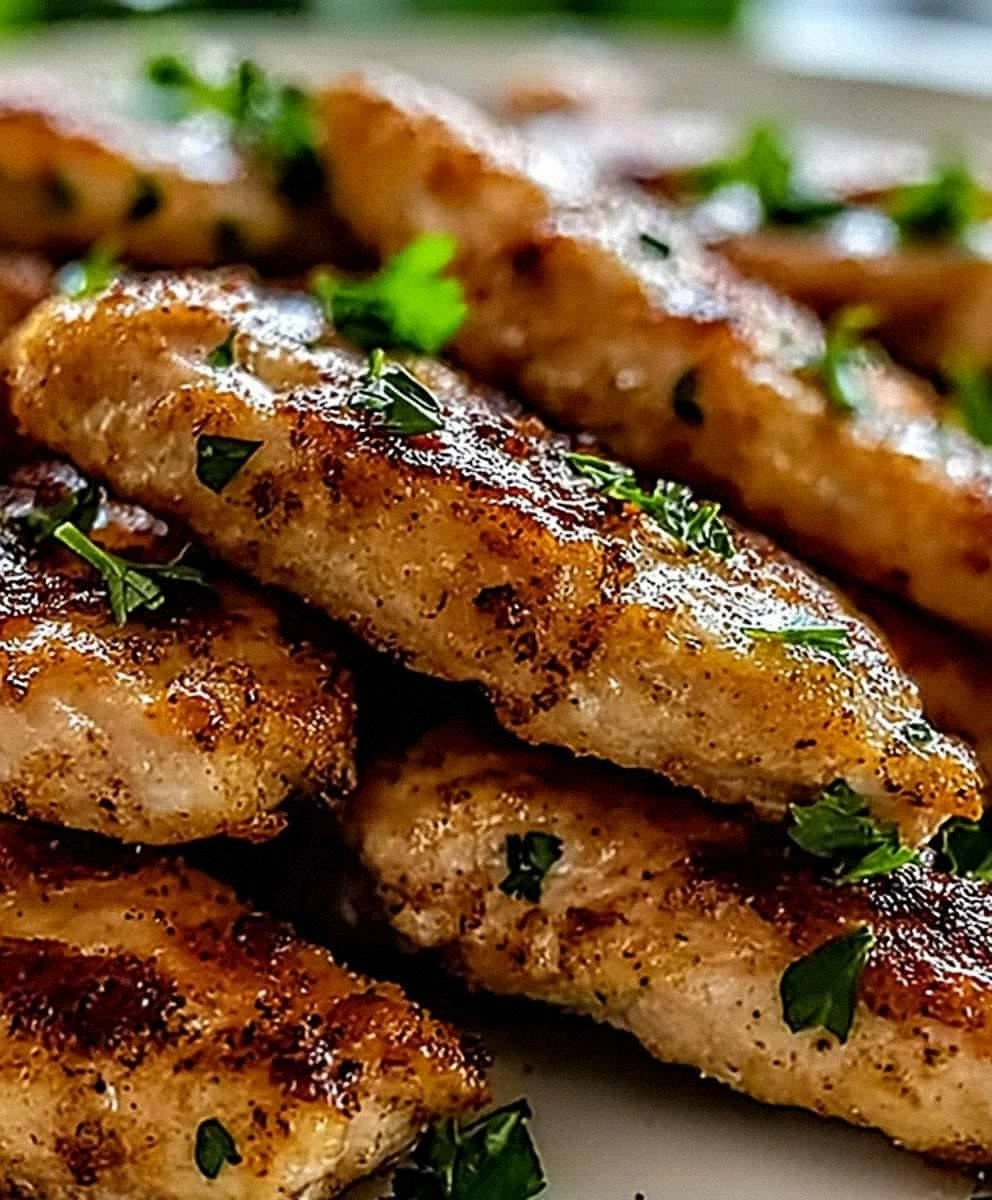
The magic doesn’t stop at the sauce. I’ve thrown in a handful of thin fried onion strips that add a whisper of caramelized crunch, and toasted sesame seeds that sprinkle a buttery finish over every bite. The result is a dish that’s as satisfying to chew as it is to look at — glossy, ruby‑red pieces perched on a bed of green onions, each bite a fireworks display of texture and taste. I dare you to taste this and not go back for seconds; the cravings are real, and the leftovers (if you even dare to have any) taste even better the next day. This is the kind of recipe that makes you feel like a culinary wizard, turning a handful of pantry staples into a show‑stopping main course.
Okay, ready for the game‑changer? I’m about to walk you through every single step — from picking the perfect chicken thigh to the final garnish that makes this dish Instagram‑ready. By the end, you’ll wonder how you ever made it any other way, and you’ll have a new go‑to recipe that turns any hectic weeknight into a flavor adventure. Stay with me here — this is worth it.
⚡ What Makes This Version Stand Out
- Flavor Explosion: The sauce marries sweet ketchup, salty soy, and fiery chili garlic into a symphony that hits every taste bud, and the vinegar lifts the whole thing like a perfect high note.
- Crunch Factor: A thin cornstarch coating gives each thigh a crisp edge that shatters like thin ice, while the fried onion strips add a caramelized crunch that keeps you reaching for more.
- Simplicity: Fewer than fifteen ingredients and a straightforward two‑step cooking process mean you can throw this together in under an hour, no fancy gadgets required.
- Unique Twist: The addition of toasted sesame oil and seeds brings a nutty depth that most “quick” chicken recipes completely miss.
- Crowd Reaction: Guests often ask for the recipe immediately, and the bold, vibrant color makes it a centerpiece that sparks conversation before the first bite.
- Ingredient Quality: Using boneless, skinless chicken thighs ensures juicy, tender meat that stays moist even after a quick fry.
- Cooking Method: Flash‑frying locks in juices while giving a golden crust, then the sauce finishes the cooking, creating a perfect balance of texture.
- Make‑Ahead Potential: The sauce can be pre‑made and stored, and the chicken reheats beautifully, making it ideal for meal prep.
🍋 Inside the Ingredient List
The Flavor Base
The trio of garlic, ginger, and dried red chilies forms the aromatic backbone of this dish. Garlic brings a pungent, caramelized sweetness when sautéed, while ginger adds a bright, peppery zing that cuts through the richness of the chicken. Dried red chilies release a smoky heat that lingers on the palate, ensuring each bite carries a gentle burn without overwhelming the senses. If you’re allergic to fresh ginger, a pinch of ground ginger works, but the texture and burst of flavor won’t be the same. Pro tip: crush the chilies just before adding them to release their essential oils.
The Texture Crew
Cornstarch is the unsung hero that creates that coveted crackle on the chicken’s surface. It forms a delicate lattice that fries up golden and stays light, preventing the meat from becoming greasy. The egg white acts as a binder, ensuring the cornstarch adheres evenly, while the thin strips of fried onion add a sweet, caramelized crunch that contrasts beautifully with the tender meat. If you’re out of egg whites, a tablespoon of plain yogurt can substitute, though you’ll lose a bit of that crispness. Watch out: over‑coating the chicken can lead to a gummy texture; aim for a thin, even dusting.
The Unexpected Star
Sesame oil and toasted sesame seeds might seem like garnish, but they’re the secret flavor amplifiers. The oil infuses a nutty, aromatic richness that elevates the entire sauce, while the seeds add a subtle crunch and a buttery finish. If you’re not a fan of sesame, try a drizzle of peanut oil for a similar depth, though the flavor profile will shift toward a more earthy note. When toasting the seeds, keep them moving in a hot pan for just 30 seconds; they’ll pop and turn golden without burning. Fun Fact: Sesame seeds are one of the oldest known oil seeds, cultivated for over 3,000 years.
The Final Flourish
Soy sauce, ketchup, chili garlic sauce, vinegar, and sugar compose the sauce’s sweet‑savory‑tangy balance. Soy sauce delivers umami depth, ketchup provides a mellow sweetness, and chili garlic sauce adds a punch of heat and garlic aroma. Vinegar brightens the mixture, cutting through the richness, while a pinch of sugar rounds everything out, preventing any sharp edges. If you’re watching sodium, opt for low‑sodium soy sauce, but be sure to taste and adjust the seasoning accordingly. The water helps thin the sauce just enough to coat the chicken without drowning it.
Everything's prepped? Good. Let’s get into the real action — the part where the kitchen becomes a stage and you’re the star performer.

🔥 The Method — Step by Step
-
Start by patting the chicken thighs dry with paper towels; moisture is the enemy of crispiness. Cut each thigh into bite‑size pieces, about 1‑inch cubes, and toss them into a large bowl. Add the cornstarch, egg white, salt, and black pepper, then mix until every piece is lightly coated. Let the mixture sit for 10 minutes — this resting period lets the coating set, creating a glass‑like crust when fried. Power transition: Okay, ready for the game‑changer?
🪄 Kitchen Hack: Sprinkle a pinch of baking soda into the cornstarch mix; it raises the pH and makes the coating even crispier. -
Heat a large skillet or wok over medium‑high heat and add the vegetable oil, swirling to coat the bottom. When the oil shimmers (you’ll see tiny ripples), carefully add the coated chicken in a single layer; you may need to work in batches to avoid crowding. Let the pieces fry undisturbed for about 2‑3 minutes; you’ll hear a satisfying sizzle that signals the crust is forming. Flip the chicken and fry the other side until golden brown and the interior reaches 165°F (about 4‑5 minutes total). Once done, transfer the pieces onto a paper‑towel‑lined plate to drain excess oil.
-
While the chicken rests, lower the heat to medium and add the sesame oil to the same pan — the residual bits from the chicken add extra flavor. Toss in the minced garlic, ginger, and dried red chilies; stir quickly, and you’ll smell a fragrant perfume that makes your mouth water. Let them sauté for 30‑45 seconds, just until the garlic turns a light golden and the chilies release their aroma, but be careful not to burn them. Watch Out: Garlic burns in seconds and becomes bitter, so keep the heat moderate and stay close.
👀 Watch Out: If the garlic starts to brown too quickly, add a splash of water to de‑glaze and keep the aromatics from scorching. -
Now it’s sauce time. Stir in the ketchup, soy sauce, chili garlic sauce, vinegar, and sugar, mixing until the mixture becomes a glossy, deep‑red glaze. Add the quarter‑cup of water to loosen the sauce just enough to coat the chicken without drowning it. Let the sauce simmer for 2‑3 minutes, allowing the flavors to meld; you’ll notice it thickening slightly and becoming glossy. Taste and adjust seasoning — a pinch more sugar if you like sweet, or a dash more chili garlic sauce for extra heat.
-
Return the fried chicken pieces to the pan, tossing them gently to coat each morsel in the velvety sauce. Cook for another 2 minutes, allowing the chicken to absorb the sauce while retaining its crisp exterior. You’ll see the sauce cling like a second skin, and the edges of the chicken will start pulling away, indicating they’re perfectly coated. Power transition: This is the moment of truth — the sauce should be thick enough to cling but still glossy.
🪄 Kitchen Hack: Add a splash of chicken broth instead of water for an extra umami boost that makes the glaze silkier. -
Once the chicken is fully coated, stir in the sliced green onions, toasted sesame seeds, and the crispy fried onion strips. The green onions add a fresh, slightly sharp bite that brightens the dish, while the sesame seeds provide a buttery crunch. The fried onion strips are the final texture surprise — they stay crisp even after the sauce coats the chicken, delivering a delightful contrast.
-
Give everything a final toss, making sure every piece is evenly speckled with green onions, sesame seeds, and onion strips. Transfer the chicken to a serving platter, and let it rest for a minute so the flavors settle. Micro‑challenge: I dare you to taste this and not go back for seconds — the combination of sweet, sour, salty, and heat is addictive.
-
Serve hot over steamed jasmine rice, fluffy quinoa, or even a bed of sautéed greens if you’re feeling light. Picture yourself pulling this out of the wok, the whole kitchen smelling incredible, steam rising, and the glossy sauce glistening like jewels. That sizzle when it hits the pan? Chef’s kiss. And now the fun part — dig in, snap a photo, and brag to your friends that you just mastered a restaurant‑level dish in under an hour.
That's it — you did it. But hold on, I've got a few more tricks that'll take this to another level, ensuring every bite is as perfect as the first.
🏆 Insider Tricks for Flawless Results
The Temperature Rule Nobody Follows
A common mistake is frying the chicken over too low a heat, which results in soggy, oil‑logged pieces. Keep your oil at a steady 350°F (175°C); use a thermometer or the “bread cube test” (a small piece of bread should sizzle and turn golden in 30 seconds). This ensures the coating crisps instantly, sealing in juices. I once tried a low‑heat fry and ended up with chicken that felt like chewing on a rubber band — not fun. Power transition: This next part? Pure magic.
Why Your Nose Knows Best
When sautéing garlic and ginger, trust your sense of smell more than a timer. The moment you detect a nutty, slightly caramelized aroma, you know they’re ready. Over‑cooking will turn them bitter, while under‑cooking leaves a raw edge. I once let the garlic brown too long and the entire dish acquired a burnt aftertaste — a total flavor disaster. So keep the lid off, stay close, and let the fragrant steam guide you.
The 5‑Minute Rest That Changes Everything
After frying, let the chicken rest on a paper towel for exactly five minutes. This short pause lets excess oil drain and the coating firm up, preventing sogginess when you later toss it in the sauce. It also allows the meat fibers to relax, keeping the interior juicy. Skipping this step is like skipping the cool‑down after a sprint — you’ll feel the difference.
Balancing Sweet and Acid
The sauce’s harmony hinges on the sugar‑vinegar duet. If you find the sauce too sharp, add a teaspoon more sugar; if it’s too sweet, a splash more vinegar will brighten it. Taste as you go — the best chefs never trust a recipe blindly. I once added too much ketchup, making it cloyingly sweet; a quick dash of vinegar rescued the dish and brought it back to balance.
The Final Garnish Timing
Add the green onions, sesame seeds, and fried onion strips at the very end, just before serving. This preserves their texture and color, ensuring they don’t wilt or lose crunch. A friend tried mixing them in early, and the onions turned limp, ruining the contrast. Keep them fresh, and you’ll get that satisfying snap with every bite.
Sauce Consistency Check
If the sauce thickens too much after simmering, thin it with a tablespoon of water or chicken broth. Conversely, if it stays too runny, let it reduce a bit longer; you’ll see it coat the back of a spoon and leave a glossy sheen. Remember, the sauce should cling to the chicken like a second skin, not pool at the bottom of the pan.
🎨 Creative Twists & Variations
This recipe is a playground. Here are some of my favorite ways to switch things up:
Coconut‑Lime Dragon
Swap the soy sauce for coconut aminos and add a tablespoon of lime zest plus a splash of coconut milk to the sauce. The result is a tropical, slightly sweet version that pairs beautifully with jasmine rice. Perfect for summer evenings when you want a breezy twist.
Peanut‑Butter Heat
Stir in two tablespoons of smooth peanut butter and a dash of fish sauce into the sauce base. This creates a rich, nutty umami layer reminiscent of Thai satay, while the chili garlic sauce keeps the heat alive. Serve over rice noodles for a full‑on Thai-inspired feast.
Veggie‑Loaded Dragon
Add sliced bell peppers, snap peas, and shredded carrots during the sauce simmer step. The vegetables absorb the glaze and add vibrant color and crunch, turning the dish into a balanced one‑pan wonder. Great for sneaking extra nutrients into a kid‑friendly meal.
Spicy Honey Glaze
Replace half of the ketchup with honey and increase the dried chilies to a teaspoon. The honey caramelizes during the final toss, giving a glossy, sticky coating that’s sweet‑hot perfection. This version shines when served with buttery naan or flatbread.
Garlic‑Infused Crispy Tofu
Swap the chicken for firm tofu cubes, pressing them dry before coating in cornstarch. Follow the same frying and sauce steps; the tofu absorbs the flavors beautifully while staying crisp. This makes a fantastic vegetarian alternative that even meat‑eaters adore.
Smoky Chipotle Dragon
Add a teaspoon of chipotle in adobo sauce to the sauce mixture for a smoky depth. The chipotle’s subtle wood‑smoke complements the sweet and sour elements, delivering a complex flavor profile that feels like a backyard BBQ in a bowl.
❄️ Storing & Bringing It Back to Life
Fridge Storage
Let the chicken cool to room temperature, then transfer it to an airtight container. It will keep nicely for up to three days. When reheating, add a splash of water or broth and gently stir over low heat to revive the sauce’s shine. The fried onion strips may lose some crunch, so sprinkle fresh ones on top before serving.
Freezer Friendly
Portion the cooked chicken (with sauce) into freezer‑safe bags, removing as much air as possible. Freeze for up to two months. To reheat, thaw overnight in the fridge, then warm in a skillet over medium heat, adding a tablespoon of water to loosen the glaze. The texture remains impressive, especially if you re‑crisp the chicken quickly in a hot pan.
Best Reheating Method
For the ultimate reheated bite, use a wok or large skillet: heat a drizzle of oil, add the chicken, splash a tablespoon of water, and toss for 2‑3 minutes until the sauce bubbles and clings again. This method restores the glossy coating and revives the crispy edges, making leftovers taste almost as fresh as the original.