Picture this: the kitchen is a battlefield, the oven a war‑zone, and you—armed with a whisk and a dream—are about to unleash the most legendary cookie yet. I was halfway through a game‑day party when the last batch of plain chocolate chip cookies fell flat, bland, and utterly forgettable. The crowd was silent, the scoreboard still, and my confidence was as low as a dropped basketball. Then, a dare from a friend—“I dare you to taste this and not go back for seconds”—sparked a culinary rebellion.
I grabbed my trusty apron, pulled out every ingredient that could make a cookie feel like a championship trophy, and started the experiment. The kitchen smelled of vanilla and cocoa, the sound of butter cutting into sugar a rhythmic drumbeat, and the anticipation hung thick in the air like the sweet aroma of freshly cut grass. I could almost hear the crowd cheering as I rolled the dough, the dough itself a glossy, buttery sphere that promised a crunch that would shatter like thin ice. The texture, I imagined, would be the perfect blend of soft center and crisp edges, a sensory slam dunk that would leave everyone begging for more.
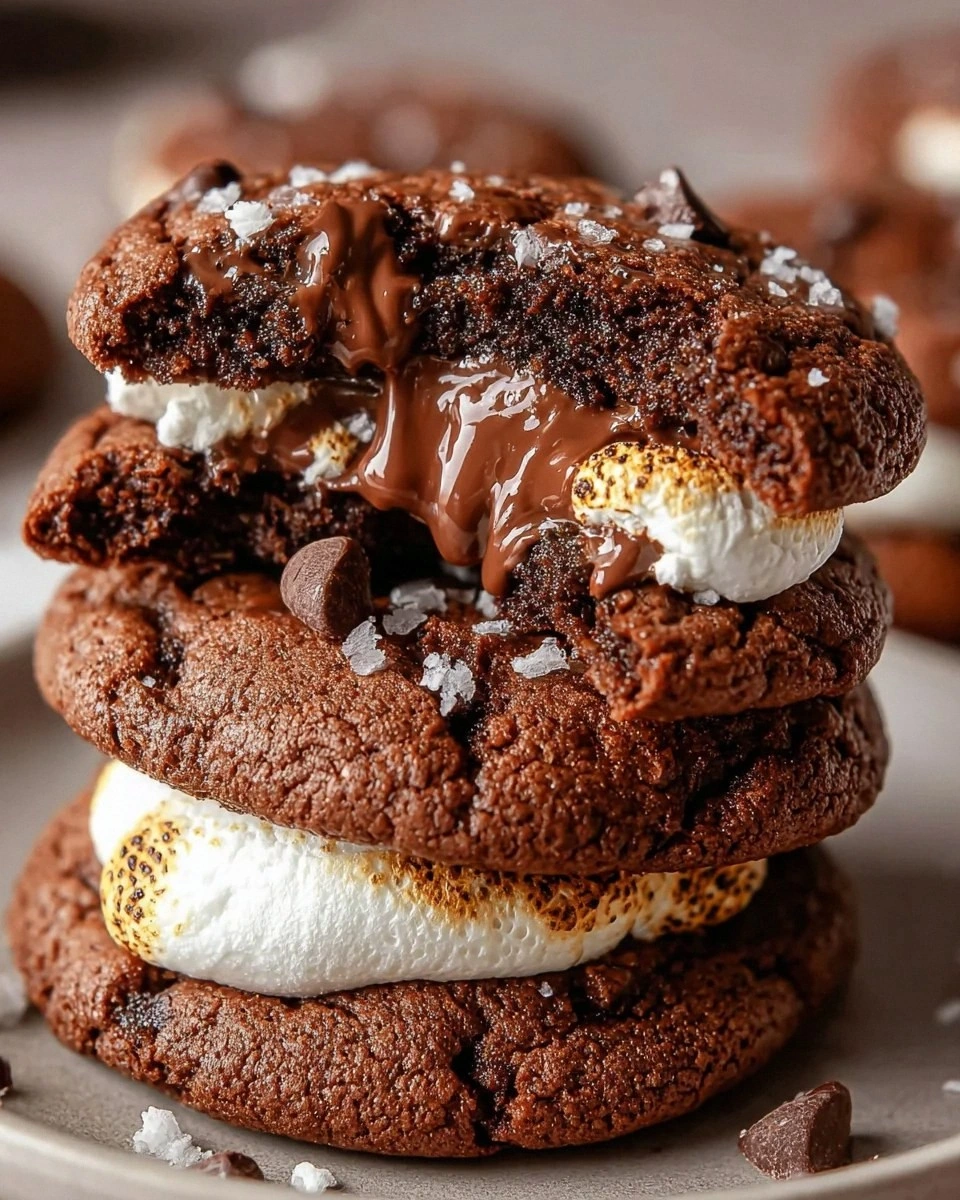
What sets this version apart from the endless array of cookie recipes on the internet is the secret weapon: a frosted, chocolate‑cocoa core that melts into a silky drizzle as soon as you bite. It’s not just a cookie; it’s a play‑by‑play of flavors that starts with a buttery base, layers on a chocolatey crunch, and finishes with a frothy, sweet glaze that feels like a victory lap. I’ll be honest—my first batch was a disaster, but I learned fast; a few tweaks, a new technique, and the cookies transformed into a crowd‑pleaser that stole the show. If you’ve ever struggled with bland cookies, you’re not alone—this recipe is the fix you’ve been searching for.
Now, let’s dive into every single step. By the end, you’ll wonder how you ever made cookies any other way. The journey from dough to dessert is a thrilling game plan that will have you shouting, “Okay, ready for the game‑changer?” and “This next part? Pure magic.” Trust me, you’re going to love the way the flavors unfold.
What Makes This Version Stand Out
- Flavor: The combination of cocoa powder and chocolate chips creates a deep, rich chocolate profile that feels like a championship trophy in every bite.
- Texture: The cookie’s center is soft and chewy, while the edges crisp up like a perfect dunk—each bite delivers a satisfying contrast.
- Frosting: A quick glaze of powdered sugar and butter adds a velvety finish that melts in your mouth, turning every cookie into a showstopper.
- Ingredient Quality: Using high‑grade butter and real cocoa powder ensures the flavor stays true and never feels artificial.
- Make‑ahead: The dough can be prepared up to 24 hours in advance, allowing you to focus on the party instead of the kitchen.
- Visual Appeal: The glossy finish and chocolatey rim make the cookies look like mini basketballs—perfect for themed parties.
Inside the Ingredient List
The Flavor Base
All‑purpose flour provides the structure that holds the cookie together. It absorbs moisture from the butter and sugar, creating a tender crumb. If you skip it, the cookies will collapse and become overly sticky, losing that iconic basketball shape. For a gluten‑free twist, substitute an equal amount of a 1:1 gluten‑free blend, but keep the baking soda level the same to maintain lift.
The Texture Crew
Unsalted butter, softened, is the key to that buttery, melt‑in‑your‑mouth quality. It also helps carry the cocoa and sugar, giving each bite a balanced sweetness. Skipping butter will result in a dry cookie that feels more like a cracker than a treat. When using butter, make sure it’s room temperature so it blends smoothly with the sugars.
The Unexpected Star
Unsweetened cocoa powder adds depth and a hint of bitterness that balances the sweetness. It also intensifies the chocolate flavor without making the cookie overly sweet. If you prefer a milder taste, replace half the cocoa with milk chocolate chips for a sweeter finish. A pinch of sea salt on top after baking can highlight the cocoa’s complexity.
The Final Flourish
Powdered sugar and melted butter combine to create a frosted glaze that drips like a victory ribbon. This glaze is the finishing touch that turns a simple cookie into a showstopper. If you’re watching the sugar burn, reduce the oven temperature by 10°F and keep a close eye. For a colorful variation, add a few drops of food coloring to the glaze before it sets.
Everything’s prepped? Good. Let’s get into the real action…

The Method — Step by Step
- Preheat the oven to 350°F (175°C) and line a baking sheet with parchment paper. This ensures even baking and a clean surface. Let the oven fully preheat before placing the cookies inside; a cold oven can cause uneven rise. The smell of butter and sugar will start to dance in the air, signaling the start of something sweet.
- In a large bowl, cream together the softened butter and both sugars until light and fluffy. Use a stand mixer on medium speed for about 3 minutes. The mixture should be pale and airy, indicating the fats have been properly incorporated. This step is crucial; a dull mixture leads to dense cookies.
- Add the vanilla extract and mix until dissolved. The vanilla’s aroma should fill the room, hinting at the depth of flavor to come. A fresh vanilla bean gives a more complex flavor than extract; if you have one, use it. The mixture should feel silky, ready for the dry ingredients.
- Sift together the flour, cocoa powder, baking soda, and salt. Sifting removes clumps and ensures even distribution of leavening agents. Stir the dry mixture into the wet until just combined. Overmixing here can cause the cookies to be tough, so stop at the first sign of incorporation.
- Fold in the chocolate chips, peanut butter chips, and chopped nuts if using. These add texture and a burst of flavor with each bite. The nuts provide a pleasant crunch that contrasts the soft center. The mixture should feel slightly chunky, not dry.
- Drop rounded tablespoonfuls of dough onto the prepared sheet, spacing them 2 inches apart. The dough should hold its shape but not spread excessively. For a smoother finish, chill the dough for 30 minutes before baking. The cookies will bake into a golden, slightly crispy edge.
- Bake for 10-12 minutes, or until the edges are set and the centers still look slightly underbaked. This creates a chewy middle that will soften as they cool. The cookies should smell toasty, with a hint of chocolate. Keep a close eye; oven temperatures vary.
- Let the cookies cool on the sheet for 5 minutes before transferring to a wire rack. This allows the cookies to firm up slightly. The cooling process is where the chocolate inside begins to set, creating that signature drizzle. While cooling, prepare the glaze.
- Whisk powdered sugar, melted butter, vanilla extract, and a splash of milk until smooth. The glaze should be glossy and pourable but not too runny. Drizzle or dip the tops of the cookies for an instant finish. The glaze should set in a few minutes, adding a sweet finish.
That’s it—you did it. But hold on, I’ve got a few more tricks that will take this to another level. The next section will give you insider knowledge that even seasoned bakers will appreciate.
Insider Tricks for Flawless Results
The Temperature Rule Nobody Follows
Many bakers set the oven to 375°F, but a lower temperature ensures a more even bake and prevents the cookies from browning too quickly. I’ve found that 350°F gives the perfect golden edge while keeping the center soft. If you’re using a convection oven, reduce the temperature by 25°F. This small tweak can make the difference between a cookie that’s a treat and one that’s a disappointment.
Why Your Nose Knows Best
The aroma of baking butter and cocoa is a reliable indicator that the cookies are ready. When the scent hits your nose, it’s a sign the sugars are caramelizing. If you’re unsure, touch the center of a cookie; it should feel slightly warm but not hot. Trust your senses—they’re the best judge of perfection.
The 5‑Minute Rest That Changes Everything
Letting the cookies rest on the baking sheet for 5 minutes before transferring to a rack allows them to set. This short pause prevents the cookies from breaking apart and helps the glaze set properly. It also gives the chocolate inside a chance to thicken, creating that signature drizzle. Don’t rush this step; the cookies will thank you.
The Secret of Even Spread
Use a cookie scoop to ensure each dough ball is the same size, which guarantees even baking. A slightly larger scoop will spread more, while a smaller scoop will stay thicker. I recommend a 1.5‑cup scoop for these cookies. Consistency is key to a uniform finish.
The Power of Parchment
Parchment paper not only prevents sticking but also helps the cookies maintain a flat shape, essential for that basketball look. If you’re using a silicone mat, it’s even better because it provides a non‑stick surface and a slightly firmer base. The combination of parchment and silicone ensures a clean, even bake.
The Final Touch of Sea Salt
A pinch of sea salt on the glaze amplifies the chocolate’s depth and balances the sweetness. Sprinkle it lightly over the glaze before it sets. The salt should be visible but subtle, giving the cookies a sophisticated finish. This small addition makes the difference between a cookie that’s good and one that’s unforgettable.
Creative Twists and Variations
This recipe is a playground. Here are some of my favorite ways to switch things up:
Nutty Crunch Edition
Replace the peanut butter chips with chopped walnuts or pecans. The added crunch gives a new texture that pairs well with the chocolate drizzle. The nuts also introduce a subtle, buttery flavor that complements the cocoa. This version is great for those who love a little extra bite.
Minty Fresh Twist
Add a teaspoon of peppermint extract to the dough for a cool, refreshing aftertaste. The mint balances the richness of the chocolate and gives the cookie a lively finish. Use a small amount to avoid overpowering the chocolate. The result is a cookie that feels like a refreshing break after a long game.
Caramel Swirl Variation
Swirl caramel sauce into the dough before baking for a sweet, buttery center. The caramel adds a glossy sheen and a buttery sweetness that pairs perfectly with the chocolate glaze. Drizzle extra caramel over the cooled cookies for an indulgent treat. This version is ideal for those who love a sweet, sticky finish.
Spiced Chocolate Surprise
Add a pinch of cinnamon and a pinch of cayenne pepper to the dry ingredients. The spices give a warm, slightly spicy undertone that elevates the chocolate flavor. The subtle heat adds excitement to every bite. This variation is a hit with spice lovers.
Vegan Delight
Use coconut oil instead of butter and replace dairy milk with almond milk. The coconut oil provides a subtle coconut flavor that pairs nicely with the cocoa. Use a plant‑based vanilla extract for a smooth finish. The vegan version retains the same texture and flavor profile, making it inclusive for all.
Holiday Holiday Edition
Incorporate holiday spices like nutmeg, allspice, and clove for a festive twist. The warm spices pair beautifully with the chocolate and create a cozy feel. Add a handful of dried cranberries for color and tartness. This version is perfect for holiday gatherings.
Storing and Bringing It Back to Life
Fridge Storage
Store cookies in an airtight container at room temperature for up to 5 days. The airtight seal keeps the cookies fresh and prevents them from drying out. If you want a crispier texture, place a slice of bread in the container; the bread will absorb excess moisture. The cookies will stay soft and chewy for a week.
Freezer Friendly
Freeze cookies in a single layer on a parchment‑lined tray for 2 weeks. Once frozen, transfer them to a freezer bag or airtight container. Thaw at room temperature for 15 minutes before serving. Freezing preserves the flavor and texture, making them perfect for future game days.
Best Reheating Method
Warm cookies in a preheated 350°F oven for 5 minutes to revive the crispness. If you’re in a hurry, microwave on low for 15 seconds; the cookies will stay soft. Add a tiny splash of water before reheating to steam back to perfection. This trick keeps the cookies from becoming stale.
If you’re looking for a quick snack, pop them in the toaster oven at 325°F for 2 minutes. The cookies will become warm and slightly crunchy. They’re perfect for a mid‑game pick‑up. Keep them in a sealed container to maintain freshness.
Why These Cookies Win at Parties
Picture a group of friends gathering around a table, the room filled with laughter, the smell of chocolate, and the sound of a basketball bouncing. These cookies become the centerpiece of the spread, their glossy surface catching the light like a trophy. When the first bite hits the tongue, the chewy center gives way to a burst of chocolatey glaze, followed by a subtle salt kick that leaves everyone craving more. The texture is a perfect balance of soft and crisp, creating a satisfying bite that satisfies the craving for both comfort and indulgence.
What sets these cookies apart in a party setting is not just the flavor but the experience they provide. The chocolate glaze acts as a visual cue, making the cookies instantly recognizable and irresistible. The buttery base and the subtle crunch from the chocolate chips create a multi‑sensory experience that feels like a celebratory treat. This is not just a cookie; it’s a moment of shared joy that turns an ordinary gathering into a memorable celebration.
The best part is how versatile these cookies are. They can be served alongside drinks, used as a dessert topping, or even incorporated into a layered cake. Their bold flavor profile makes them a favorite among both kids and adults. The cookies also pair well with coffee, tea, or a glass of milk, making them a versatile addition to any menu.
Another advantage is the ease of preparation. The dough can be made in advance, and the cookies can be stored for days or frozen for weeks. This flexibility ensures that you can focus on entertaining rather than constantly cooking. When you’re ready to serve, a quick reheat brings them back to their original glory, and everyone will be impressed with how fresh and delicious they taste.
Finally, the presentation is a win. The glossy glaze, the chocolatey rim, and the perfect basketball shape make these cookies a visual treat. They’re a conversation starter, a centerpiece, and a dessert that everyone will rave about. Whether you’re hosting a game day, a family gathering, or a casual get‑together, these cookies are guaranteed to be the star of the show.