Picture this: I’m standing in a cramped kitchen, a half‑finished chocolate cake on the counter, and a friend’s dare hanging in the air like a daredevil banner. “Make a cheesecake that’s more mousse than cake,” she challenged, eyes gleaming with mischief. I laughed, grabbed a jar of Nutella, and decided that the only way to win was to throw the whole “cheesecake” concept into a blender and let the chocolate do its thing. The result? A silky, cloud‑like dessert that feels like a chocolate hug and tastes like a secret society of nutty, sweet, and slightly bitter indulgence. I’ve never been one to shy away from a kitchen experiment, but this one felt like I’d just cracked the code to the ultimate comfort food.
The first time I tasted it, the aroma hit me like a velvet curtain opening—rich chocolate, nutty undertones, and a faint vanilla whisper that made my eyes water. The texture was a revelation: a mousse so airy that it practically melted into my mouth, yet it held its shape like a delicate sculpture. I was instantly convinced that this wasn’t just a recipe; it was a revolution. I knew I had to document every single detail so that anyone who reads this could replicate the magic, or better yet, surpass it. I’ll be honest—after the first bite, I almost swore I’d never eat anything else that day.
What makes this version stand out is not just the combination of ingredients but the way they interact. The heavy whipping cream gives it that lightness, the Nutella adds depth, and the dark chocolate’s intensity rounds everything out. It’s a recipe that challenges the conventional notion of a cheesecake—no baking, no crust, just pure, unapologetic decadence. I dare you to taste this and not go back for seconds. I promise you, the first spoon is the hardest part, and the second will feel like a betrayal of your own taste buds. By the end of this post, you’ll wonder how you ever made a cheesecake any other way.
Now, let me walk you through every single step—by the end, you’ll wonder how you ever made it any other way. I’ll share the secrets that turned a kitchen mishap into a showstopper, the techniques that keep the mousse from collapsing, and the subtle tweaks that elevate the flavor profile. Stay with me, because this isn’t just a recipe; it’s a culinary adventure that will leave you craving more. And if you’re ready for the game‑changer, let’s dive right in.
What Makes This Version Stand Out
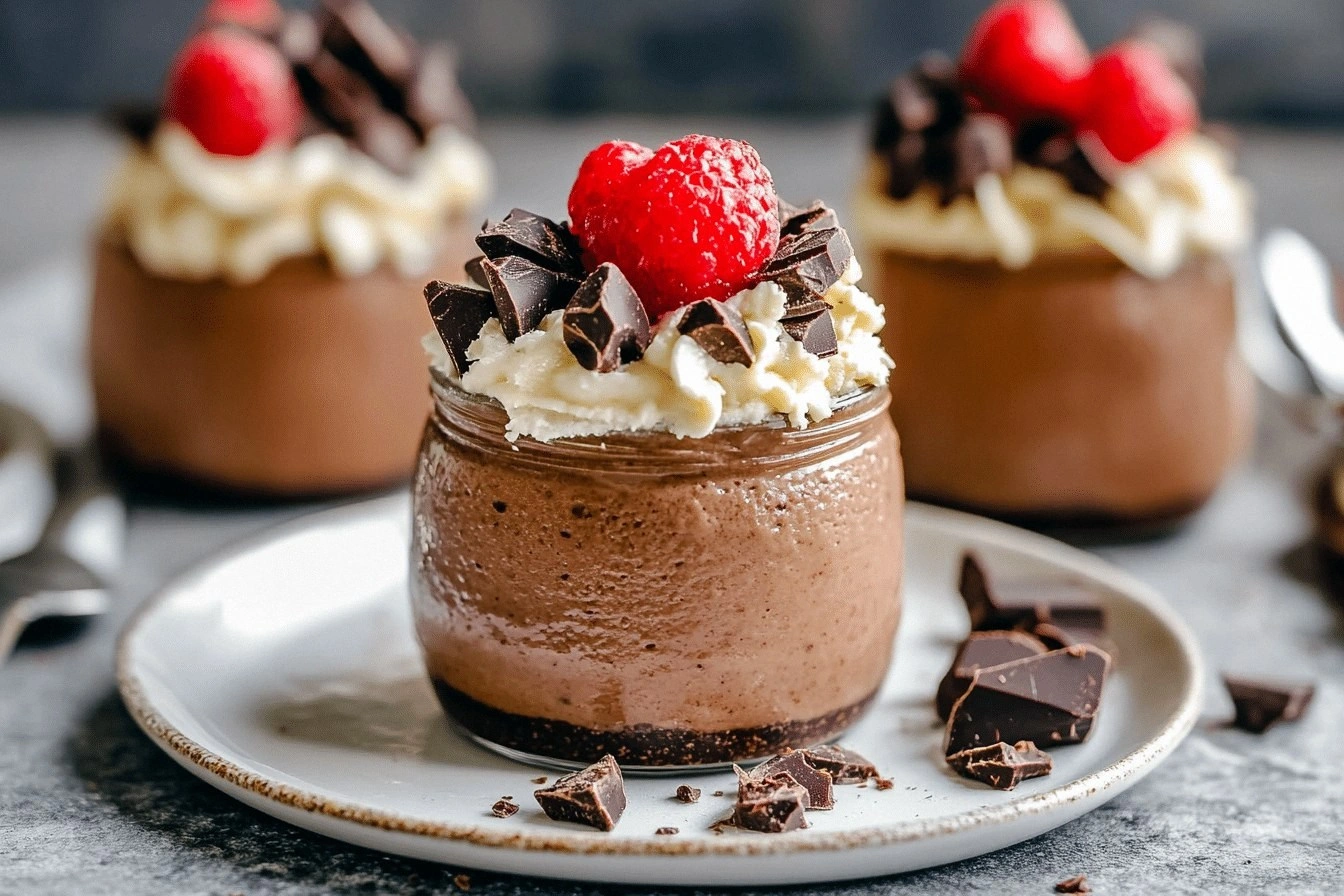
- Texture: Unlike traditional cheesecake, this version boasts a mousse‑like consistency that melts in your mouth without the heaviness of a stone‑cold dessert. The airy whipped cream creates a cloud of flavor that lingers on the palate.
- Flavor Depth: The combination of Nutella and dark chocolate layers nutty sweetness with bittersweet richness, creating a complex profile that satisfies both sweet and savory cravings.
- Speed: No baking required—just a few minutes of whisking and a short chill. You can have a full‑blown dessert ready in under 30 minutes, perfect for last‑minute dinner parties.
- Make‑Ahead Friendly: Chill overnight or even a week ahead, and it’ll stay fresh. The mousse stays firm and glossy, making it ideal for prep‑and‑serve situations.
- Ingredient Quality: Using high‑quality Nutella and dark chocolate elevates the taste. The better the chocolate, the richer the finish.
- Versatility: Works beautifully as a standalone dessert, a base for layered parfaits, or a decadent topping for ice cream.
- Visual Appeal: The glossy finish and chocolate drizzle look as stunning as they taste, making it a showstopper for Instagram or dinner guests.
Alright, let's break down exactly what goes into this masterpiece…
Inside the Ingredient List
The Flavor Base
Cream Cheese is the backbone of any cheesecake, but here it plays a dual role. It provides a smooth, tangy base that balances the sweetness of Nutella and chocolate. If you skip it, the mousse will lose its creamy texture and become a thin, watery spread. For best results, choose a full‑fat, room‑temperature variety; it blends seamlessly and gives the mousse a richer mouthfeel.
The Texture Crew
Heavy Whipping Cream is the secret to that airy, melt‑in‑your‑mouth consistency. Whipped until soft peaks form, it folds into the cream cheese and Nutella, creating a light, cloud‑like body. If you’re short on time, a quick 30‑second whisk will suffice—just don’t overwhip, or you’ll end up with butter.
The Unexpected Star
Nutella is the star nutty chocolate spread that adds sweetness and texture with every spoonful. Its hazelnut base gives a subtle nutty undertone that cuts through the richness of the chocolate. If you’re vegan or lactose intolerant, you can substitute a dairy‑free cream cheese and a vegan chocolate spread, but the flavor profile will shift slightly.
The Final Flourish
Dark Chocolate, melted and folded in, adds an intense chocolate kick and luscious body to the mousse. The higher cocoa content gives a bittersweet finish that balances the Nutella’s sweetness. If you prefer a smoother texture, melt the chocolate gently over a double boiler and let it cool to lukewarm before folding.
Everything's prepped? Good. Let's get into the real action…
The Method — Step by Step
- Prepare the Base: In a medium bowl, beat the cream cheese on medium speed until smooth and creamy—about 2 minutes. The goal is to eliminate lumps; a silky texture ensures the mousse won’t separate later. If you’re using a stand mixer, a gentle pulse works just as well. I always keep the bowl chilled to help the cream cheese blend more easily.
- Add Nutella: Spoon the Nutella into the bowl and continue to mix until fully incorporated. The mixture should look glossy and even. If the Nutella feels too thick, let it sit at room temperature for a minute to soften. This step is crucial; any clumps will ruin the mousse’s smooth finish.
- Whip the Cream: In a separate chilled bowl, whip the heavy cream until soft peaks form—roughly 2–3 minutes on high speed. The whipped cream should be light and airy, with a slight stiffness that holds its shape. Keep an eye on it; overwhipping turns it into butter.
- Fold in the Cream: Gently fold the whipped cream into the cream cheese mixture using a spatula. The folding action should be light—think gentle, not vigorous—to keep the airy texture intact. The mixture should look light and airy, with a subtle sheen.
- Sweeten the Mousse: Stir in powdered sugar and vanilla extract until fully dissolved. Powdered sugar melts instantly, preventing a gritty texture. Vanilla adds warmth, tying all the flavors together.
- Melt the Dark Chocolate: Melt the dark chocolate over a double boiler or in the microwave at 30‑second intervals, stirring each time. Let it cool to lukewarm before adding. This prevents the chocolate from seizing or becoming grainy.
- Fold in the Chocolate: Fold the melted chocolate into the mousse until fully incorporated. The mixture should become glossy and slightly thicker. This step adds a deep, bittersweet layer that balances the Nutella’s sweetness.
- Transfer to Serving Cups: Spoon the mousse into individual serving glasses or a large dish. The cups should be chilled to help the mousse set faster. I like to use clear glasses to showcase the glossy finish.
- Chill: Place the cups in the refrigerator for at least 2 hours, or overnight for a firmer set. The mousse will firm up and develop a silky mouthfeel. If you’re short on time, a 30‑minute chill will still give a pleasant texture, but the longer you wait, the better the flavor integration.
- Final Touches: Before serving, drizzle a thin ribbon of melted chocolate on top and, if desired, sprinkle a few crushed hazelnuts or chocolate shavings for texture. The drizzle should look like a glossy, chocolate river flowing over a cloud of mousse.
That’s it — you did it. But hold on, I've got a few more tricks that'll take this to another level…
Insider Tricks for Flawless Results
The Temperature Rule Nobody Follows
Temperature is everything in mousse. Keep all ingredients at room temperature, except the cream, which should be chilled. If the cream is too warm, it won’t whip properly; if it’s too cold, it won’t incorporate smoothly. I’ve seen countless attempts fail because the cream cheese was too cold, leading to a lumpy texture.
Why Your Nose Knows Best
Smell the mixture as you go. A faint, buttery aroma indicates the cream is just right. If the chocolate smells burnt, it’s over‑melted and will taste bitter. Trust your nose; it’s a reliable indicator of quality.
The 5‑Minute Rest That Changes Everything
After folding in the chocolate, let the mixture rest for five minutes before pouring into cups. This pause allows the flavors to meld, resulting in a more cohesive mousse. Skipping this step can leave the chocolate flavor underdeveloped.
Use a Silicone Spatula for Smoothness
A silicone spatula is perfect for folding; it slides easily through the mousse, preventing lumps. A metal whisk can tear the mixture, causing it to lose its airy quality. I’ve found that a silicone spatula keeps the mousse silky and light.
Keep the Cups Chilled
Chill your serving glasses beforehand. This reduces the time the mousse takes to set and prevents condensation, which can dilute the texture. It also makes for a more visually appealing presentation.
Don’t Rush the Chill
Patience is key. The mousse needs time to develop its full flavor profile. A quick chill may leave it slightly runny. Give it at least two hours for the best results.
Creative Twists and Variations
This recipe is a playground. Here are some of my favorite ways to switch things up:
Hazelnut Crunch Layer
Add a layer of crushed hazelnuts between the mousse and the chocolate drizzle. The crunch contrasts the silky texture, creating a delightful bite. It’s a nod to the original Nutella base and adds an extra dimension.
Minted Chocolate Mousse
Stir in a teaspoon of peppermint extract after folding the chocolate. The minty undertone brightens the chocolate flavor, making it refreshing. Serve with a sprig of fresh mint for garnish.
Almond Joy Swirl
Fold in a handful of toasted almond slivers and a splash of coconut milk. The coconut gives a tropical hint while the almonds add crunch. It’s perfect for a beach‑inspired dessert.
Espresso Infusion
Dissolve a tablespoon of instant espresso powder in the powdered sugar before adding. The coffee flavor deepens the chocolate notes and pairs wonderfully with a glass of red wine.
Red Velvet Twist
Replace half of the Nutella with red cocoa powder and add a splash of red food coloring. The result is a striking red mousse that’s both eye‑catching and delicious. It’s great for a themed party.
Caramelized Banana Layer
Top the mousse with a thin layer of caramelized banana slices. The sweet banana complements the chocolate, adding a fruity note. This variation is ideal for a brunch dessert.
Storing and Bringing It Back to Life
Fridge Storage
Store the mousse in an airtight container in the refrigerator for up to 3 days. Keep the container sealed to prevent the mousse from absorbing fridge odors. If you notice a slight separation, give it a quick stir before serving.
Freezer Friendly
The mousse freezes well—place it in a freezer‑safe container and freeze for up to 2 weeks. Thaw overnight in the refrigerator before serving. A quick 15‑minute warm water bath can also help revive the texture if you need a faster option.
Best Reheating Method
To reheat, add a splash of heavy cream or milk to the mousse and gently warm it in a double boiler. Stir constantly until silky and warm. Adding a tiny splash of water before reheating helps steam back to perfection, preventing the mousse from becoming too thick.