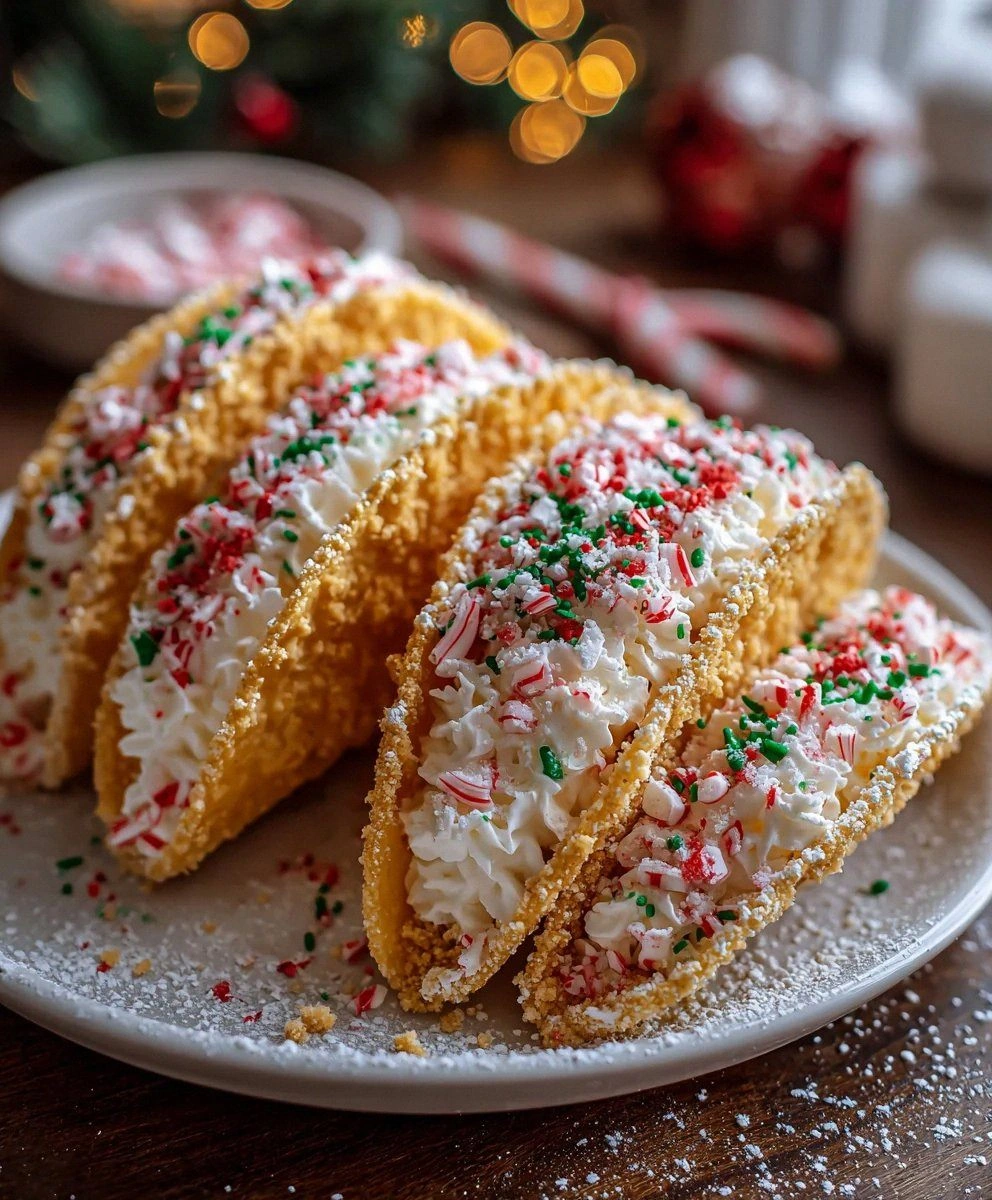
I burnt an entire tray of gingerbread cookies last Christmas, and in a panic-induced moment of genius, I stuffed their charred remains into a taco shell with leftover cheesecake filling. What emerged from that beautiful disaster were these Christmas Cheesecake Tacos — a dessert so ridiculously good that my family now demands them instead of traditional pie. The crispy, cinnamon-dusted tortilla shells cradle clouds of vanilla bean cheesecake, studded with candy cane shards that melt on your tongue like winter snowflakes.
Picture this: It's Christmas Eve, you're elbow-deep in flour, the kitchen smells like cinnamon and chaos, and you realize you forgot to make dessert. Again. Your relatives are arriving in two hours, the kids are bouncing off the walls from candy canes, and you need something that looks like you planned it for weeks. These tacos are your culinary superhero cape — they come together faster than Santa sliding down a chimney, and they taste like someone bottled the entire holiday season into handheld form.
What makes these stand out from every other Christmas dessert? The contrast, my friend. We're talking about shells that shatter like thin ice between your teeth, giving way to silky cheesecake that melts like velvet on your tongue. The temperature play alone is worth the price of admission — cool, creamy filling against the slight warmth of a freshly-made shell. And that moment when you bite through a candy cane piece and get that burst of peppermint? Pure holiday magic.
But here's the real kicker — these look impossibly fancy, yet they're easier than assembling those nightmare gingerbread houses that always collapse. I dare you to taste one and not go back for seconds. Actually, I double-dog dare you, because I ate half the batch before anyone else got to try it last year, and I'm not even sorry. Let me walk you through every single step — by the end, you'll wonder how you ever made it any other way.
What Makes This Version Stand Out
Taco Shell Technology: Most recipes get this completely wrong, using hard taco shells that taste like cardboard. We're brushing soft flour tortillas with butter, coating them in graham cracker magic, and baking them into dessert shells that taste like cheesecake crust. The edges curl up like they're waving hello, creating the perfect edible bowl for our filling.
Cheesecake Cloud Factor: This isn't your dense, brick-heavy cheesecake. We're whipping heavy cream into the cream cheese base, creating a filling so light it practically floats off your spoon. Think of it as the difference between a lead balloon and a cloud — both hold shape, but only one makes you close your eyes and sigh.
Christmas in Every Bite: The combination of white chocolate, peppermint, and vanilla creates a flavor profile that tastes exactly like Christmas morning feels. It's like someone took all the best parts of the holiday — the warmth, the sweetness, the sparkle — and condensed them into handheld form.
Assembly Line Simplicity: While everyone's arguing about whether Die Hard is a Christmas movie, you'll have these babies assembled faster than Ralphie can say "Fra-gee-lay." The shells bake while you whip the filling, then it's just scoop, sprinkle, and serve.
Make-Ahead Magic: Here's what actually works — make the shells up to three days ahead, store them in an airtight container, and fill them right before serving. The filling holds for two days refrigerated, so you can spread the workload across your holiday chaos.
Instagram-Worthy Without Trying: These tacos look like they belong on a Pinterest board titled "Christmas Desserts That Actually Work." The red and white color scheme, the way the filling peaks out like a present waiting to be unwrapped, the candy cane dust on top — it's all photogenic without being fussy.
Crowd Psychology: There's something about handheld desserts that makes people lose their minds. Maybe it's the childhood nostalgia of ice cream cones, or maybe it's just that tacos make everything better. Watch your uncle who claims he "doesn't eat sweets" demolish three of these without blinking.
Alright, let's break down exactly what goes into this masterpiece...
Inside the Ingredient List
The Flavor Base
Flour tortillas are the unsung heroes here — they're neutral enough to let the dessert flavors shine, but sturdy enough to hold their shape when loaded with filling. Skip the whole wheat ones unless you want tacos that taste like health food. The butter acts as both flavor carrier and glue, helping our graham cracker coating stick while adding richness that makes the shells taste like shortbread.
White chocolate might seem like an odd choice, but it's what gives these tacos their luxurious sweetness without competing with the peppermint. Buy the good stuff — not those waxy chips that taste like sweetened plastic. Real white chocolate contains cocoa butter, which melts smoothly and adds a subtle complexity that cheap imitations can't touch.
The Texture Crew
Graham cracker crumbs are our secret weapon for that authentic cheesecake flavor. They toast up in the oven, creating a nutty, caramelized flavor that makes people ask "what's in these?" Don't substitute with breadcrumbs — you'll end up with tacos that taste like stuffing. The crumbs also provide crucial texture contrast against the smooth filling.
Crushed candy canes aren't just for show — they provide little bursts of peppermint that wake up your palate between bites of rich cheesecake. Crush them right before using; pre-crushed ones from the store are stale and sad. You want pieces big enough to crunch but small enough that they don't stab your tongue.
The Unexpected Star
Cream cheese is obvious, but here's what most recipes miss — it needs to be room temperature, not just "not cold." Cold cream cheese creates lumps that no amount of beating will fix, leaving you with filling that looks like cottage cheese. Let it sit out for at least two hours, or microwave it for 15-second bursts until it's soft enough to leave fingerprints when pressed.
Heavy whipping cream is what transforms dense cheesecake filling into something ethereal. Cold cream whips better, so keep it refrigerated until the moment you need it. Don't try to substitute with half-and-half or milk unless you want soup instead of filling.
The Final Flourish
Christmas sprinkles are where you can let your personality shine. Go classic with red and green jimmies, get fancy with metallic dragees, or go full kid-mode with shaped sprinkles. Just avoid the ones that bleed color — nobody wants tie-dyed cheesecake. The sprinkles add visual appeal and a slight crunch that makes each bite more interesting.
Everything's prepped? Good. Let's get into the real action...
The Method — Step by Step
- Preheat your oven to 375°F (190°C). While it's heating, grab your flour tortillas and a pastry brush. Melt 4 tablespoons of butter until it's just liquid — you don't want it hot, just melted. Lay out your tortillas on a clean surface and brush them generously with butter. Don't be shy here; the butter is what helps our graham cracker coating stick and gives the shells their golden color. Think of it as sunscreen for tortillas — you want complete coverage.
- Now for the fun part: pour your graham cracker crumbs onto a plate. Take each buttered tortilla and press it crumb-side down into the crumbs, really working them into the surface. You want an even coating that'll toast up beautifully. Flip and repeat on the other side. The crumbs should stick like glitter after craft time — if they're falling off, you need more butter.
- Time to shape these babies. Flip a muffin tin upside down and nestle the tortillas between the muffin cups, creating that perfect taco shell shape. If you don't have a muffin tin, you can use rolled-up balls of foil — just make sure they're evenly sized. The key is creating a valley for the filling to sit in later. Don't worry if they look a little sad and deflated; they'll puff up slightly as they bake.
- Slide the whole contraption into your preheated oven and bake for 12-15 minutes. This is where the magic happens — the tortillas will crisp up, the graham crackers will toast and smell like you're baking actual cheesecake, and your kitchen will start smelling like Christmas morning. Don't walk away from the oven here; they go from golden to burnt faster than you can say "fruitcake."
- While the shells cool, let's make the filling. In a large bowl, beat your room-temperature cream cheese until it's smooth and fluffy — about 2 minutes on medium speed. You're looking for a texture that resembles whipped butter, with no lumps or bumps. This step is crucial; if you rush it, you'll have lumpy filling that no amount of mixing will fix. I once tried to shortcut this step and ended up with filling that looked like it had cottage cheese mixed in.
- Add the powdered sugar and vanilla extract to the cream cheese. Beat for another minute until everything is incorporated and smooth. The mixture should be thick but spreadable, like really good buttercream frosting. If it's too stiff, add a tablespoon of heavy cream; if it's too loose, add more powdered sugar a tablespoon at a time. Taste it now — it should make you want to eat it with a spoon.
- In a separate bowl, whip the heavy cream until it forms stiff peaks — you want it to hold its shape when you lift the beaters, but not be so stiff that it looks like butter. This usually takes 3-4 minutes on high speed. Watch for the moment when the cream starts leaving trails in the bowl — that's your cue that it's almost ready. Over-whipped cream will ruin the texture of your filling.
- Gently fold the whipped cream into the cream cheese mixture using a spatula. This is where patience pays off — you want to maintain all that beautiful air you just whipped into the cream. Use a figure-eight motion, scooping from the bottom and folding over the top. The mixture should lighten in color and increase in volume. If you've done it right, it should look like clouds that taste like cheesecake.
- Melt the white chocolate in 30-second bursts in the microwave, stirring between each burst. Let it cool slightly — you want it warm and pourable but not hot enough to melt your filling. Drizzle it into your cheesecake mixture and fold gently. The chocolate will create little pockets of sweetness throughout the filling, like buried treasure in clouds.
- Time to assemble! Spoon the filling into a piping bag (or a zip-top bag with the corner snipped off). Pipe the filling into your cooled taco shells, filling them generously. You're aiming for a generous swirl that mounds up slightly — these aren't the time to be stingy. Top with crushed candy canes and Christmas sprinkles. Serve immediately or refrigerate for up to 2 hours before serving.
That's it — you did it. But hold on, I've got a few more tricks that'll take this to another level...
Insider Tricks for Flawless Results
The Temperature Rule Nobody Follows
Room temperature ingredients aren't just a suggestion — they're the difference between silky smooth filling and a lumpy mess. I set my cream cheese out the night before, but if you're in a rush (and when aren't we during the holidays?), cut it into small cubes and microwave it on 50% power for 30-second bursts. The cream cheese should feel like room-temperature butter — soft enough to leave fingerprints when pressed, but not melted. Cold cream cheese will fight you every step of the way, creating lumps that no amount of beating will smooth out.
Why Your Nose Knows Best
Trust your sense of smell when toasting the graham cracker-coated tortillas. When they start smelling like you're baking a cheesecake crust, they're done. The scent will change from raw tortilla to toasted graham cracker — that's your cue to check them. If you wait for them to look golden brown in the oven, they'll be burnt by the time they cool. They continue cooking from residual heat, so pull them when they're just lightly golden around the edges.
The 5-Minute Rest That Changes Everything
After you whip the heavy cream, let it rest for exactly 5 minutes before folding it into the cream cheese. This little pause lets the cream stabilize, so it won't deflate when you fold it. I discovered this trick after making batch after batch of runny filling that oozed out of the shells like a dessert avalanche. Those five minutes feel like forever when you're racing against the holiday clock, but they're the difference between tacos that hold their shape and ones that collapse into a sad puddle.
The Candy Cane Crushing Secret
Don't crush your candy canes until right before serving — they get sticky and clump together if left to sit. I learned this the hard way when my beautiful crushed candy canes fused into one giant peppermint rock overnight. Use a rolling pin or the bottom of a heavy pan, and aim for pieces that are about the size of coarse sea salt. You want crunch, but not a trip to the dentist. The candy canes will start weeping moisture after about an hour, so top these right before serving for maximum crunch.
Presentation Perfection
Tilt your piping bag at a 45-degree angle and start piping from the center, working your way out in a spiral. This creates a professional-looking swirl that makes people think you went to culinary school. Don't worry if your first few look like a kindergartener's art project — by the third taco, you'll have the motion down. The filling should mound up slightly in the center, like a little cheesecake mountain waiting to be discovered.
Creative Twists and Variations
This recipe is a playground. Here are some of my favorite ways to switch things up:
Eggnog Extravaganza
Replace the vanilla extract with 2 tablespoons of good eggnog and add a pinch of nutmeg to the filling. Top with a dusting of fresh nutmeg instead of candy canes. The eggnog flavor is subtle but unmistakable — like Christmas in liquid form. This version is dangerously good with a cup of coffee on Christmas morning.
Chocolate Mint Madness
Add 2 tablespoons of cocoa powder to the graham cracker crumbs for chocolate shells, and use crushed mint chocolate candies instead of candy canes. The chocolate shells taste like Oreo cookies and provide the perfect base for mint chocolate filling. It's like a Thin Mint cookie and a cheesecake had a beautiful baby.
Tropical Christmas
Add 1/2 cup of toasted coconut to the graham cracker coating and use crushed pineapple in the filling. Top with toasted coconut flakes and a cherry. This version tastes like Christmas on a tropical island — all the holiday flavors with a beach vacation twist. My aunt from Florida swears by this variation.
Salted Caramel Dream
Drizzle caramel sauce over the filled tacos and sprinkle with flaky sea salt instead of candy canes. The salt cuts through the sweetness and adds a sophisticated edge that makes these feel restaurant-worthy. Use good sea salt — the crunchy crystals provide little bursts of flavor that make people close their eyes and sigh.
Peppermint Patty
Add 1/4 teaspoon of peppermint extract to the filling and use crushed peppermint bark on top. This version is for the serious mint lovers — the kind who stock up on peppermint ice cream and count down the days until candy cane season. It's like eating a cloud that tastes like your favorite peppermint candy.
White Chocolate Raspberry
Fold fresh raspberries into the filling right before piping and top with white chocolate shavings instead of candy canes. The tart raspberries cut through the richness of the cheesecake, creating a flavor balance that's absolutely addictive. Use the best raspberries you can find — this isn't the time for sad, mushy berries.
Storing and Bringing It Back to Life
Fridge Storage
Store assembled tacos in an airtight container in the refrigerator for up to 24 hours, but here's the thing — they're best within the first 6 hours. The shells will start to soften from the moisture of the filling, going from crispy to pleasantly chewy. If you must store them, place a paper towel in the container to absorb excess moisture. Don't stack them — the weight will crush the beautiful filling swirls. I arrange them in a single layer on a baking sheet, cover with plastic wrap, and hope nobody discovers them before dessert time.
Freezer Friendly
Here's a game-changer: freeze the shells separately for up to 2 months. Wrap each cooled shell individually in plastic wrap, then store in a freezer bag. When you're ready to serve, let them thaw at room temperature for 30 minutes, then crisp them up in a 350°F oven for 3-4 minutes. The filling can be frozen too, but it changes texture slightly — it'll be denser but still delicious. Thaw it overnight in the fridge, then give it a quick whip to restore some of its fluffiness.
Best Reheating Method
If your shells have gone soft, resist the urge to microwave them — you'll end up with rubbery tortillas that taste like sadness. Instead, pop them in a 350°F oven for 5-6 minutes until they crisp up again. The filling should stay cold, so remove it first if you're reheating assembled tacos. For single servings, I use my air fryer at 350°F for 2-3 minutes — it brings back that fresh-baked crunch without drying them out. Add a tiny splash of water to the filling before serving if it's been refrigerated — it steams back to its original fluffy perfection.