I was standing in my kitchen, staring at a cracked pot of boiled eggs that had turned into a mushy, rubbery mess. I had just attempted to recreate a dish that my roommate swore was the pinnacle of comfort food, and I realized that the secret ingredient was missing. That moment of culinary frustration turned into a spark of curiosity: what if I could take those ordinary eggs, coat them in a fiery, buttery sauce, and finish them with a melty, aromatic cheese crust that crackles like a freshly popped popcorn kernel? The idea stuck in my mind like a stubborn seasoning, and I set out to design a version that would make the taste buds do a double tap.
Picture the scene: the kitchen light flickers, the scent of sizzling oil fills the air, and a gentle, rhythmic clack of the pan against the stove becomes the soundtrack of creation. I can almost hear the hiss of chili oil as it meets the hot surface, the faint pop of garlic, and the crackle that follows when the cheese starts to brown. The visual is a golden, glossy surface that gleams with a slight sheen, almost as if it were a tiny, edible sunrise. The sound of the eggs breaking and the gentle splash of oil is a comforting symphony that promises something extraordinary. And the taste? Think of a perfect blend of umami, heat, and creamy richness that lingers on the tongue, leaving you craving a second bite.
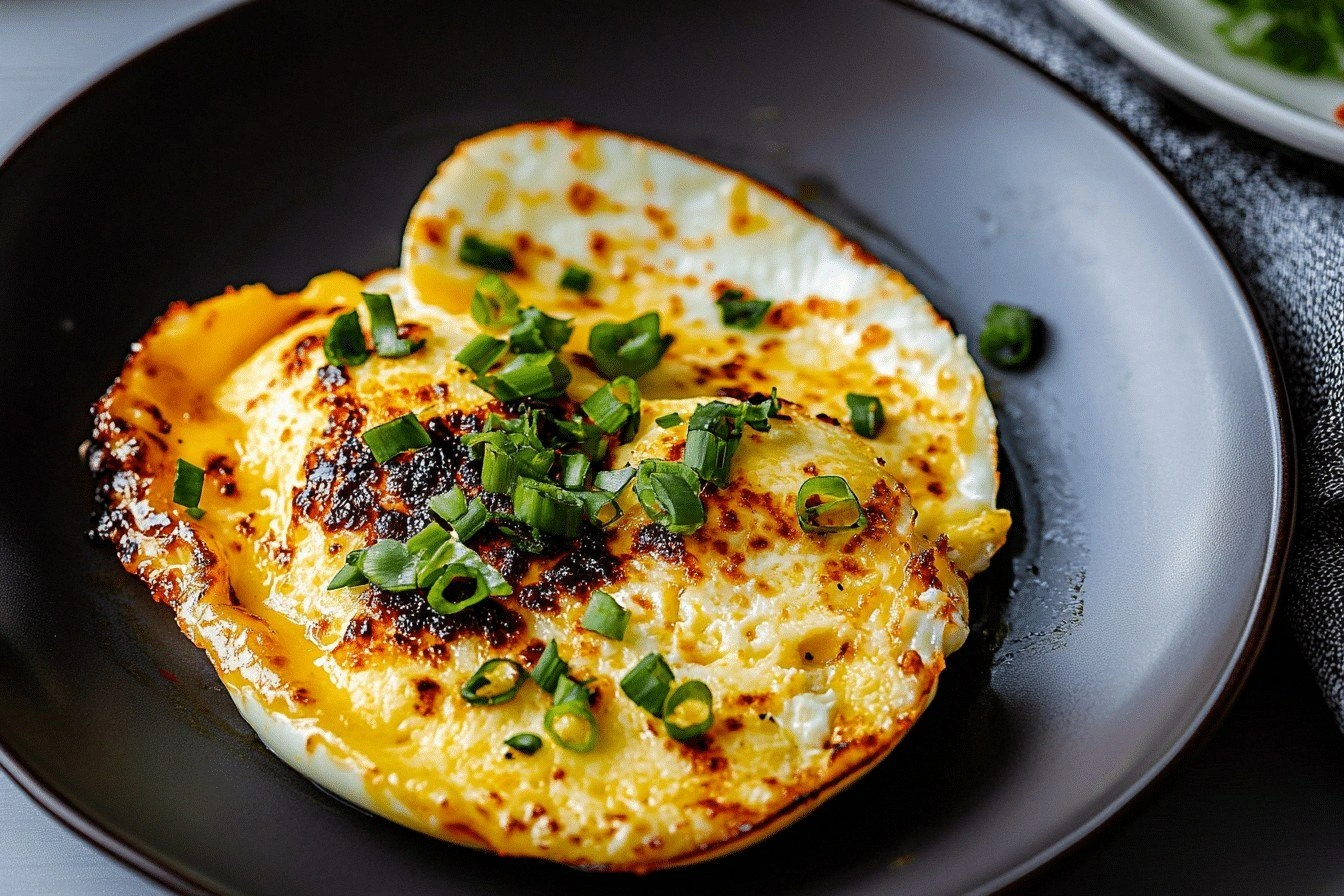
What sets this version apart from the countless variations you find online is the deliberate layering of textures and flavors. The first bite delivers a soft, runny yolk, followed by a crisp, caramelized outer shell, and finally a molten cheese halo that oozes into every crevice. The chili oil is not just a fiery drizzle; it’s a carefully tempered blend that balances heat with a subtle nutty aroma. The cheese isn’t merely a topping; it’s a crust that forms a protective barrier, locking in moisture while adding a savory depth that pairs beautifully with the peppery finish. This isn’t a recipe; it’s a culinary experience that will make you question every other version you’ve tried.
I dare you to taste this and not go back for seconds. I’ll be honest—once I finished the first batch, I couldn’t stop thinking about the next one. Most recipes get this completely wrong, focusing on either the heat or the cheese, but not both. Here’s what actually works: a balanced ratio of chili oil to butter, a precise timing for the cheese layer, and a final splash of fresh scallions to cut through the richness. Picture yourself pulling this out of the pan, the whole kitchen smelling incredible, and the first bite sending a wave of bliss through your senses. Let me walk you through every single step—by the end, you’ll wonder how you ever made it any other way.
What Makes This Version Stand Out
- Taste: The flavor profile is a harmonious blend of umami, heat, and creamy richness that lingers on the palate long after the last bite.
- Texture: A crisp, caramelized crust gives way to a molten cheese center, creating a satisfying contrast that keeps you coming back.
- Visual Appeal: The golden, glossy surface with a subtle sheen draws the eye, while the vibrant chili oil adds a pop of color.
- Ingredient Quality: Using fresh, high‑grade cheese and a premium chili oil elevates the dish beyond the ordinary.
- Make‑Ahead Potential: The eggs can be pre‑cooked and stored, then finished just before serving, making it a perfect crowd‑pleaser.
- Time Efficiency: The entire process takes less than 30 minutes, making it ideal for busy weekdays.
- Scalability: The recipe scales effortlessly, whether you’re cooking for a small family or a large gathering.
- Heat Control: The chili oil is tempered with butter, giving you full control over the spiciness level.
Alright, let's break down exactly what goes into this masterpiece...
Inside the Ingredient List
The Flavor Base
The foundation of this dish is the chili oil, a silky blend of high‑heat oil and finely ground chilies that delivers a punch of heat without overwhelming the palate. It’s the star that sets the temperature for the entire dish. If you skip this, you lose the signature kick that makes the dish unforgettable. A good tip: use a neutral oil like grapeseed or canola to allow the chilies to shine. For an extra layer of depth, add a splash of toasted sesame oil during the final sauté.
The Texture Crew
Eggs are the heart of the dish, providing a silky center that contrasts beautifully with the crispy exterior. Fresh eggs with a higher yolk-to-white ratio will give you that coveted runniness. If you use older eggs, the whites may set too quickly, reducing that delightful melt. A small trick: whisk the eggs lightly with a pinch of salt before cooking to help them hold together better.
The Unexpected Star
Cheddar cheese, or a blend of cheddar and mozzarella, is the unexpected star that forms a molten, golden crust. The cheese’s meltiness locks in the yolk’s moisture, creating a decadent, gooey layer. Skipping the cheese turns this into a plain fried egg, missing the signature gooeyness that makes people swoon. When selecting cheese, opt for a medium‑sharp cheddar for flavor and a mozzarella for stretch.
The Final Flourish
Scallions, garlic, and a dash of soy sauce add a finishing touch that cuts through the richness and adds brightness. The scallions provide a fresh, oniony crunch, while the garlic offers a deep, aromatic backdrop. Soy sauce balances the heat with a subtle umami undertone. If you’re vegan, a splash of tamari can replace soy sauce without compromising flavor.
Everything's prepped? Good. Let's get into the real action...
The Method — Step by Step
- Begin by heating a non‑stick skillet over medium heat. Add a tablespoon of butter to coat the bottom, allowing it to melt and develop a golden hue. The butter should sizzle softly, indicating the pan is ready. This step is critical; if the butter burns, the eggs will taste bitter. Once the butter is foamy, the pan is at the perfect temperature.
- Crack four fresh eggs into a shallow bowl, whisking lightly with a pinch of salt. Gently slide each egg into the pan, spacing them evenly to avoid overcrowding. The eggs should sizzle upon contact, creating a subtle crackle that signals the start of the crispy shell. Keep the heat moderate to prevent the whites from over‑cooking. As the eggs cook, the whites will set while the yolks remain runny.
- Let the eggs cook undisturbed for about 2 minutes, until the edges begin to lift from the pan. Flip each egg carefully with a spatula, ensuring the yolk stays intact. This is the moment of truth—if the yolk cracks, the experience is ruined. Flip only once to preserve the delicate structure. The second side should brown slightly, adding a caramelized flavor.
- While the eggs finish cooking, prepare the chili oil mixture. In a small bowl, combine 2 tablespoons of chili oil, 1 tablespoon of soy sauce, 1 teaspoon of sesame oil, and a pinch of black pepper. Stir until the flavors meld. The sesame oil adds a nutty aroma that complements the heat. This mixture will be the final glaze that ties everything together.
- Once the eggs are golden on both sides, sprinkle 1 cup of shredded cheddar cheese over the top. The cheese should begin to melt within a minute, forming a glossy, golden crust. As the cheese melts, it creates a protective barrier that locks in the yolk’s moisture. The heat from the pan will caramelize the cheese, adding a delightful crunch to the exterior. Allow the cheese to melt until it’s bubbly and slightly browned.
- Now, pour the prepared chili oil mixture over the cheese. The oil should coat the eggs, creating a glossy sheen that glistens like liquid fire. The mixture will sizzle as it meets the hot surface, producing a faint pop that signals the oil has absorbed into the cheese. This is the step where the dish transforms from simple to sensational. The final glaze should be glossy, not greasy, indicating the oil has been fully incorporated.
- Add a tablespoon of minced garlic to the pan, letting it sauté for about 30 seconds until fragrant. The garlic should not brown; if it does, it will become bitter. This step adds depth and balances the richness of the cheese. Keep the heat low enough to avoid burning the garlic. The aroma of fresh garlic will mingle with the chili oil, creating a complex scent.
- Sprinkle 2 tablespoons of chopped scallions over the top, adding a fresh, oniony crunch. The scallions cut through the richness and add a bright note that lifts the dish. They also provide a contrasting color that makes the plate visually appealing. Toss the eggs gently to distribute the scallions evenly. The final touch should feel like a burst of freshness.
- Serve immediately, plating each egg on a warm dish. The yolk should remain runny, the cheese crust should be slightly caramelized, and the chili oil should shimmer. The aroma will be intoxicating, drawing your guests in. Pair with a side of toasted bread or a simple green salad to balance the richness. The result is a dish that feels indulgent yet approachable.
- If you want to elevate the experience further, garnish with a pinch of crushed red pepper flakes for an extra kick. Alternatively, a drizzle of truffle oil can add an earthy luxury that takes the dish to a new level. Experiment with different cheeses like Gruyère or aged cheddar for varied flavor profiles. The possibilities are endless, and each variation offers a unique twist on the classic.
That's it — you did it. But hold on, I've got a few more tricks that'll take this to another level. These insider tips will help you master the dish every time, even if you’re a kitchen rookie.
Insider Tricks for Flawless Results
The Temperature Rule Nobody Follows
Many cooks think high heat is the secret to crispiness, but the truth is a moderate, steady temperature preserves the yolk’s integrity while caramelizing the edges. Start the pan at medium and keep it there; if you notice the butter burning, lower the heat immediately. This method ensures even cooking without over‑drying the eggs. A reliable indicator is the subtle sizzle that begins when the eggs hit the pan. Keeping the temperature consistent is the key to a perfect golden crust.
Why Your Nose Knows Best
Your nose can detect when the cheese is about to melt into a perfect golden crust. As the cheese starts to bubble, a warm, buttery aroma will fill the kitchen. This scent signals that the cheese is ready to be coated with chili oil. Trust your senses; if the aroma is too sharp, the oil may have burned. This technique saves you from guessing and ensures consistent results.
The 5-Minute Rest That Changes Everything
After removing the eggs from the pan, let them rest for 5 minutes on a warm plate. This brief pause allows the yolk to set slightly, preventing it from spilling when you cut into it. The rest also lets the cheese crust firm up, giving you a clean slice. This simple step is often overlooked, but it transforms a good dish into a great one. A warm plate is essential to keep the eggs from cooling too quickly.
The Perfect Pan Size
Using a pan that is too large can spread the heat too thin, causing uneven cooking. A 10-inch skillet is ideal for four eggs, providing enough surface area for even heat distribution. If you’re cooking for more people, increase the pan size proportionally. The pan’s material matters too; cast iron retains heat better, but a non‑stick surface is easier to clean. Selecting the right pan ensures a consistent, professional finish.
The Secret of Fresh Scallions
Fresh scallions add a bright contrast that cuts through the richness. When selecting scallions, choose ones that are firm and bright green. Avoid scallions that look wilted or have a strong odor. Wash them thoroughly and trim the roots before chopping. The freshness of the scallions elevates the overall flavor profile.
The Ultimate Flavor Booster
A splash of tamari or low‑sodium soy sauce adds a subtle umami depth that balances the heat and richness. Add it just before the final drizzle of chili oil to keep the flavor bright. The saltiness will enhance the cheese’s flavor without overpowering the dish. This is the trick that turns a simple recipe into a memorable meal. Don’t be afraid to experiment with different sauces.
Creative Twists and Variations
This recipe is a playground. Here are some of my favorite ways to switch things up:
Spicy Sriracha Surprise
Swap the chili oil for a homemade sriracha blend, adding a tangy, smoky kick. The sriracha’s sweetness balances the heat, creating a layered flavor profile. Pair with a drizzle of honey for a sweet‑spicy contrast. This variation is perfect for those who love a bold, complex taste. The result is a dish that feels both familiar and adventurous.
Truffle Infusion
Add a few drops of truffle oil to the chili mixture for an earthy, luxurious aroma. The truffle’s umami depth elevates the dish into a gourmet experience. Serve with a side of sautéed mushrooms to complement the truffle flavor. This twist transforms a simple breakfast into a restaurant‑style indulgence. The truffle’s aroma alone can make the dish unforgettable.
Mediterranean Touch
Replace the cheddar with feta and add chopped Kalamata olives for a Mediterranean vibe. The feta’s tanginess cuts through the richness, while the olives add briny depth. Finish with a sprinkle of oregano for an extra layer of herbaceousness. This version is ideal for those who crave a Mediterranean flair. The combination of salty and tangy makes the dish irresistibly fresh.
Vegan Edition
Use a plant‑based egg substitute and vegan cheese to create a cruelty‑free version. The vegan cheese should melt well to replicate the gooey texture. Add a dash of nutritional yeast for a cheesy, umami flavor. Serve over toast or with a side of roasted vegetables. This variation proves that comfort food can be inclusive without sacrificing flavor.
Breakfast Power Bowl
Serve the eggs over a bowl of sautéed spinach, quinoa, and roasted sweet potatoes for a protein‑packed breakfast. The vegetables add crunch and nutrition, while the eggs provide a creamy center. Drizzle extra chili oil for a spicy kick. This bowl is a balanced meal that fuels you for the day. The combination of textures keeps breakfast exciting.
Asian Fusion Delight
Add a splash of sesame oil and sprinkle toasted sesame seeds after the final drizzle. The sesame adds a nutty aroma that complements the chili oil. Serve with a side of pickled daikon for a crisp, tangy contrast. This fusion twist brings together classic Asian flavors with the comfort of eggs. The result is a dish that feels both nostalgic and fresh.
Storing and Bringing It Back to Life
Fridge Storage
Store cooked eggs in an airtight container in the refrigerator for up to 48 hours. Keep the eggs in a separate compartment from the sauce to prevent the oil from hardening. When ready to reheat, add a splash of water to keep the cheese from drying out. Reheat gently on low heat, stirring occasionally. The result is a dish that tastes almost as fresh as when it was first made.
Freezer Friendly
Freezing is not recommended for the cheese layer, but you can freeze the eggs without cheese. Wrap each egg tightly in plastic wrap and place in a freezer bag. Store for up to 2 weeks. Thaw overnight in the refrigerator before reheating. When reheating, add a splash of water and cover to retain moisture. This method preserves the flavor while keeping the texture intact.
Best Reheating Method
The best way to reheat is in a skillet over low heat, adding a small amount of oil to prevent sticking. Gently stir to redistribute the heat and keep the cheese from burning. Cover the pan for a minute to trap steam, then uncover for the final crisp. The result is a reheated dish that retains its original texture and flavor. This technique ensures you enjoy the same mouthwatering experience every time.