It started with a kitchen catastrophe I’ll never forget. I was attempting a quick chocolate cake for a surprise party, but the batter kept curdling like a bad joke. The moment the oven door opened, a wave of chocolatey, caramel‑laden aroma hit my senses, and I realized I had stumbled upon something extraordinary. That single batch became the foundation for the Decadent Vegan Biscoff Brownie, a dessert that feels like a secret handshake between chocolate lovers and vegan purists alike. I’m telling you, if you think you’ve tasted the best brownies, think again.
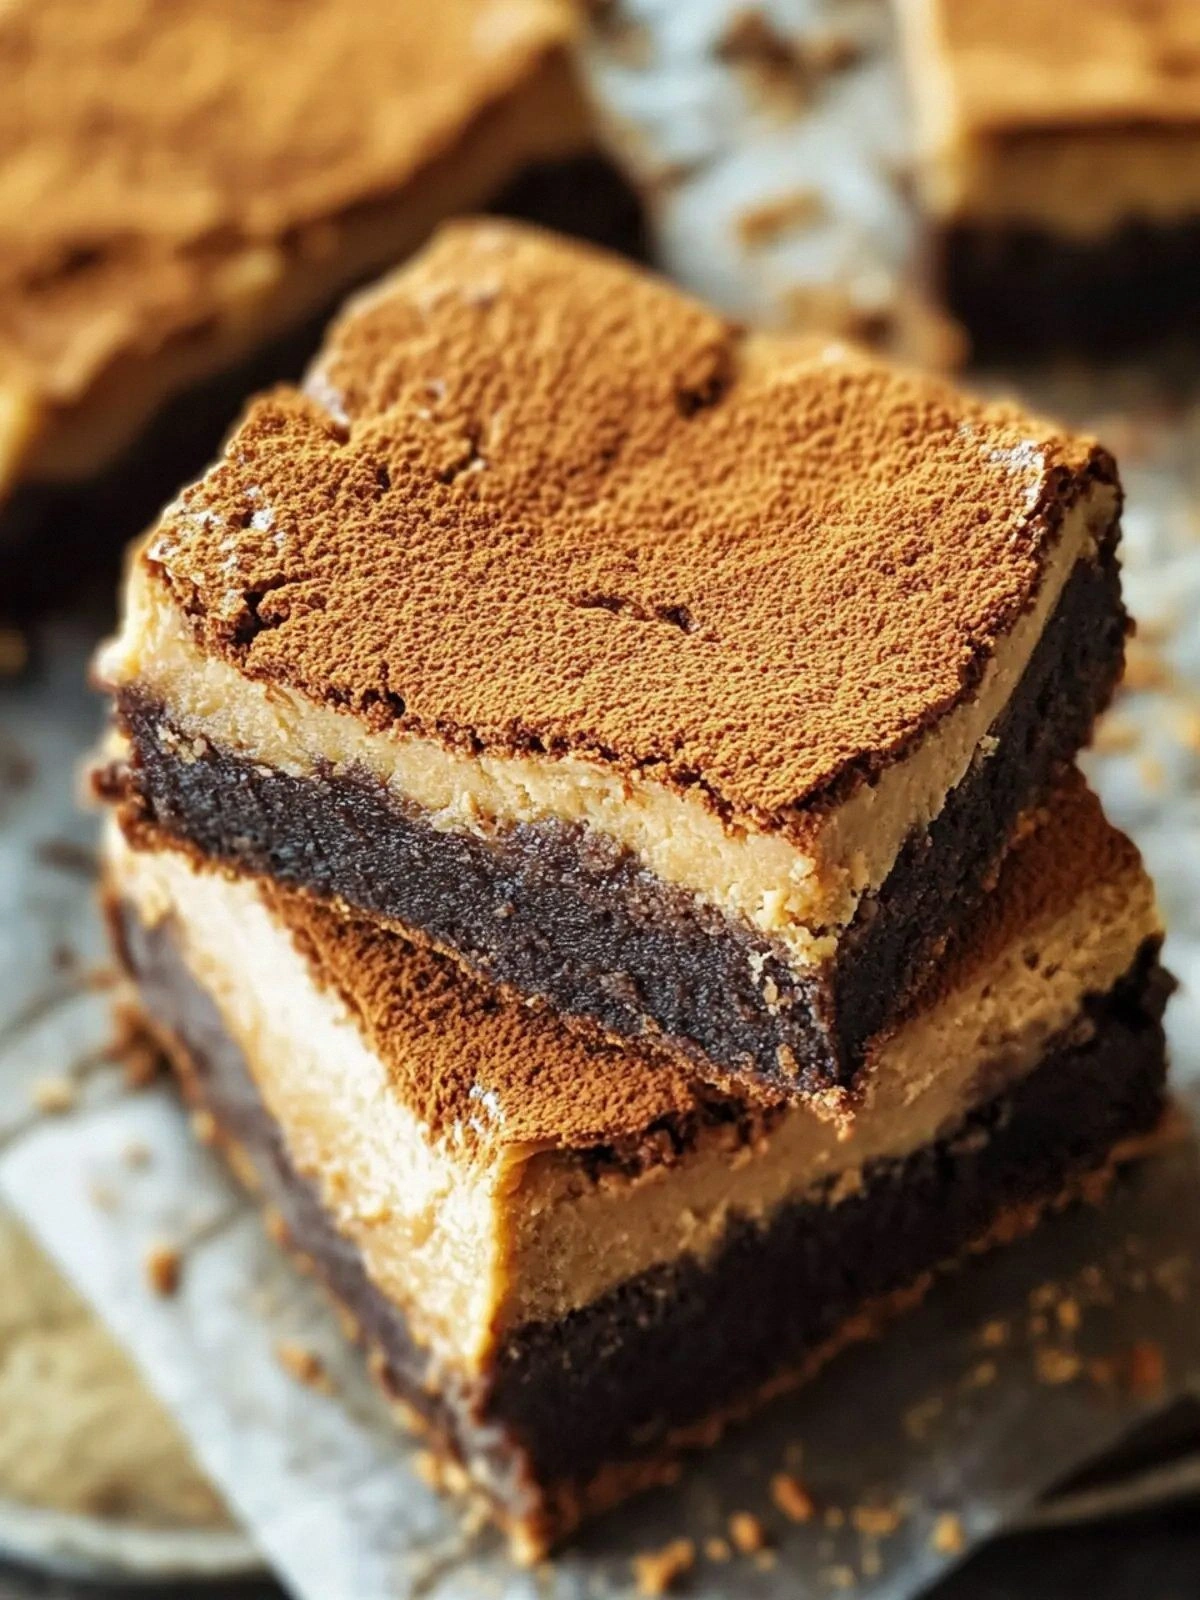
Picture this: a glossy, dark brown slab that shimmers under the kitchen lights, the scent of toasted Biscoff biscuits mingling with the rich, velvety cocoa. When you cut into it, the center oozes a molten ribbon of melted dark chocolate that’s almost too decadent to touch. The crumb is moist, airy, and yet surprisingly dense—like a cloud that’s been pressed into a cake. Every bite offers a crackling crunch from the Biscoff shards, a caramel‑sweet burst that dances on your tongue. The finish is a lingering, buttery aftertaste that keeps you reaching for more. I dare you to taste this and not go back for seconds.
What sets this recipe apart is that it’s not just a brownie; it’s a multi‑layered experience that balances indulgence with a vegan conscience. It uses silken tofu and aquafaba to create a fluffy, airy texture that rivals any egg‑based brownie, yet it stays entirely plant‑based. The Biscoff spread and biscuits are incorporated in a way that gives each bite a caramelized crunch, turning ordinary chocolate into an explosion of flavors. The method is straightforward, but the results are extraordinary—hands down the best version you’ll ever make at home. If you’ve ever struggled with vegan brownies that feel flat, this is your fix.
And there’s a secret twist that most recipes get wrong: the Biscoff spread is folded into the batter at the very end, just before baking, to preserve its buttery texture. That final swirl gives the brownies a glossy finish and a burst of caramel flavor that’s impossible to resist. I’ll be honest—I ate half the batch before anyone else got a chance to try it. Picture yourself pulling this out of the oven, the whole kitchen smelling incredible, and knowing you’re about to serve a dessert that will wow everyone. Okay, ready for the game‑changer? Let me walk you through every single step — by the end, you’ll wonder how you ever made it any other way.
What Makes This Version Stand Out
- Taste: The blend of dark chocolate and Biscoff creates a caramel‑rich depth that’s both sweet and slightly smoky. It’s like having a chocolate bar and a cookie in one bite. The result is a flavor profile that lingers long after the last crumb.
- Texture: Silken tofu and aquafaba give the batter an airy lift, while the Biscoff biscuits add a satisfying crunch. The brownies are fudgy yet light, a rare combination that keeps you coming back. The contrast is a dance of silk and crunch.
- Simplicity: With only 12 ingredients, the recipe is surprisingly easy to follow. No fancy equipment or complicated techniques. Just blend, fold, bake—done.
- Uniqueness: The Biscoff spread swirl is a signature touch that most vegan brownies lack. It turns a simple dessert into a showstopper. You’ll be the star of every gathering.
- Crowd Reaction: Friends who are skeptical about vegan desserts rave about the indulgence. They say the brownies taste like a secret indulgence. The crowd loves the caramel crunch.
- Ingredient Quality: Using high‑quality dark chocolate and natural Biscoff spreads ensures the best flavor. The recipe rewards premium ingredients with a richer taste. Quality matters here.
- Cooking Method: The method balances baking time and temperature to keep the brownies moist. The Biscoff swirl is added right before baking to preserve texture. The process is foolproof.
- Make‑Ahead Potential: These brownies can be made a day ahead and chilled, then baked again for a fresh finish. They keep well in the fridge for up to a week. The make‑ahead trick saves time on busy nights.
Alright, let's break down exactly what goes into this masterpiece...
Inside the Ingredient List
The Flavor Base
60 g cocoa powder is the backbone of the brownie, providing depth and a slightly bitter undertone that balances the sweetness. If you’re using a lighter cocoa, the brownies will taste sweeter and less intense, so stick to a dark variety. For a twist, try a 70% dark chocolate powder to intensify the chocolate bite. The cocoa also helps create a glossy finish when baked at the right temperature.
180 g all‑purpose flour gives structure without making the brownies tough. If you want a gluten‑free version, swap it for an equal amount of a gluten‑free blend that contains xanthan gum. Skipping the flour entirely would turn the brownies into a cake‑like batter, which isn’t the goal here. The flour also absorbs the wet ingredients, ensuring a cohesive crumb.
The Texture Crew
170 g dairy‑free dark chocolate melts into a silky sauce that coats the batter like velvet. If you’re allergic to chocolate, use a high‑quality dairy‑free chocolate bar with at least 70% cocoa. The chocolate also adds a subtle bitterness that balances the Biscoff sweetness. Melt it gently to avoid scorching; a double boiler works best.
110 g dairy‑free block butter melts into a buttery base that enriches the batter. If you’re looking for a lighter version, replace half of the butter with coconut oil for a tropical hint. Butter is essential for the glossy sheen and moist crumb. Remember to let it cool slightly before mixing to prevent the batter from separating.
120 ml aquafaba is the secret to an airy, fluffy texture. It’s the liquid from canned chickpeas and acts like an egg white. If you can’t find aquafaba, you can use 1 tablespoon of aquafaba per 1 tablespoon of flour to replace one egg. The aquafaba also helps bind the ingredients together, creating a stable structure.
The Unexpected Star
280 g caster sugar is the sweetener that caramelizes on the surface, giving a golden crust. If you prefer a lower sugar option, reduce it by 25% and add a splash of vanilla extract for extra flavor. Sugar also affects the browning reaction; too little and the brownies will be pale. Use white caster sugar for a clean sweet profile.
90 g Biscoff biscuits add a crunchy, caramelized layer that breaks apart into delightful shards. Crush them into small pieces to ensure even distribution. If you’re craving a different crunch, try toasted almond flakes for a nutty twist. The biscuits also contribute a subtle spiced note that complements the chocolate.
The Final Flourish
200 g Biscoff spread is folded in at the last minute, creating a glossy swirl that melts into the batter. It’s the star that elevates the brownies from ordinary to extraordinary. If you don’t have Biscoff spread, a caramel sauce or a peanut butter swirl can substitute, though the flavor will differ. The spread also adds a buttery richness that balances the chocolate bite.
120 g plain or vanilla dairy‑free yogurt adds moisture and a slight tang that brightens the overall flavor. Yogurt also helps the batter stay cohesive and prevents it from drying out. For a thicker consistency, use Greek‑style dairy‑free yogurt. The yogurt’s acidity also reacts with the baking soda for a gentle lift.
170 g dairy‑free butter (melted) is used to create a silky base that keeps the brownies tender. This butter is separate from the block butter used earlier, ensuring a smooth texture. If you’re avoiding dairy‑free butter, coconut oil works well as a substitute. The melted butter also helps the batter mix evenly.
350 g silken tofu is blended into a smooth puree, acting as a fat substitute and adding protein. It keeps the brownies moist and dense, without the heaviness of traditional butter. If you’re vegan and want a dairy‑free option, silken tofu is the perfect choice. The tofu’s neutral flavor lets the chocolate and Biscoff shine.
3 tablespoons Biscoff spread is added as a swirl after the batter is poured into the pan. This extra spread intensifies the caramel flavor and gives the brownies a glossy finish. If you’re using a different spread, adjust the amount to taste. The swirl also creates a visual appeal that’s Instagram‑ready.
1 teaspoon vanilla bean paste is the final touch that adds a subtle vanilla aroma, balancing the chocolate and Biscoff. Vanilla bean paste is more intense than vanilla extract, so it’s perfect for a rich dessert. If you’re allergic to vanilla, a pinch of almond extract can be used as a substitute. Vanilla completes the flavor profile, rounding out the dessert.
Everything's prepped? Good. Let's get into the real action...
The Method — Step by Step
- Preheat your oven to 180°C (350°F) while you prepare the batter. Line a 9x9-inch pan with parchment paper to prevent sticking. The parchment also makes cleanup a breeze. When the oven is hot, you’ll get a perfect rise and a nice crust. Keep the temperature steady for even baking.
- Blend the dry ingredients first: cocoa powder, flour, and caster sugar in a large bowl. Whisk them together until the mixture is smooth and free of lumps. The dry mix sets the foundation for the texture. If you notice any clumps, sift them through a fine sieve. A smooth dry mix ensures a uniform crumb.
- Combine wet ingredients in a separate bowl: melted block butter, melted dairy‑free butter, silken tofu, yogurt, aquafaba, vanilla bean paste, and melted dark chocolate. Whisk until the mixture is glossy and homogeneous. The wet mix should be silky, not grainy. This step is crucial for a tender crumb.
- Fold the wet into the dry gently using a spatula. Mix just until combined; over‑mixing will make the brownies tough. The batter should be thick but pourable. Feel the batter’s consistency as you fold, aiming for a silky texture. The goal is a cohesive batter that holds together.
- Crush the Biscoff biscuits into small shards and fold them into the batter. This adds a crunchy texture throughout the brownie. The shards should be evenly distributed. If you prefer a smoother bite, you can reserve some for the swirl on top. The crunch is the secret to the perfect bite.
- Pour the batter into the prepared pan and smooth the surface with a spatula. Tap the pan gently on the counter to release any air bubbles. The batter should be level and even. This ensures a uniform rise and prevents uneven edges. The surface will become the canvas for the swirl.
- Swirl the Biscoff spread over the batter using a knife or a skewer. Create a marbled pattern that will melt into the brownie as it bakes. The swirl adds a glossy finish and a burst of caramel flavor. The visual appeal is as important as the taste. This is the moment you’ll want to photograph it.
- Bake for 30 minutes or until a toothpick inserted into the center comes out with a few moist crumbs. Avoid opening the oven door frequently; the heat loss can affect the rise. When the edges pull away slightly, the brownies are done. The interior should be fudgy, not cake‑like. This timing balances moisture and crunch.
- Cool in the pan for 15 minutes before transferring to a wire rack. This rest allows the brownies to set, preventing them from falling apart. After cooling, cut into squares and serve. The brownies can be enjoyed warm or at room temperature. Keep an eye on the edges; they should be slightly crisp.
That's it — you did it. But hold on, I've got a few more tricks that'll take this to another level. These insider tips will ensure every bite is flawless and every serving is a masterpiece.
Insider Tricks for Flawless Results
The Temperature Rule Nobody Follows
Many bakers bake at 190°C, but that can cause the edges to overcook while the center remains underdone. Lower the temperature to 180°C and extend the baking time by a minute or two. The brownies will rise evenly, and the center will stay fudgy. I once baked at 190°C and ended up with a hard crust and a gooey middle that didn’t set. Adjusting the heat saved the day.
Why Your Nose Knows Best
The aroma of baking brownies is a reliable indicator of doneness. When the scent becomes rich and chocolatey, the brownies are almost ready. A faint, sweet smell means you need more time, while a strong, burnt scent signals overbaking. Trust your nose; it’s a seasoned judge of baking.
The 5-Minute Rest That Changes Everything
Letting the brownies rest in the pan for 5 minutes before moving them to a rack allows the structure to set. This prevents the squares from breaking apart when you cut them. The rest also lets the Biscoff swirl melt into the batter, creating a uniform flavor. Skip this step and you’ll get uneven bites.
The Right Pan Size Matters
Using a 9x9-inch pan is ideal, but if you use a larger pan, the brownies will be thinner and may overbake. A smaller pan will yield thicker, denser squares. Adjust the baking time accordingly: thinner layers need less time. I’ve found that a 8x8-inch pan gives a perfect balance of chewiness.
The Sweet Spot for Biscoff Swirl
The swirl should be added just before baking, not before mixing the batter. This keeps the Biscoff spread from fully integrating into the batter, preserving its distinct flavor. If you swirl too early, the spread will melt and lose its buttery crunch. Timing is everything.
The Quick Chill Trick
If you’re in a hurry, chill the batter in the fridge for 15 minutes before baking. The cold batter bakes slower, giving you more control over the final texture. It also helps the chocolate set better, preventing a sticky center. I use this trick when I have guests arriving early.
Creative Twists and Variations
This recipe is a playground. Here are some of my favorite ways to switch things up:
Nutty Crunch Edition
Replace half of the Biscoff biscuits with toasted almond flakes for a nutty crunch. The almonds add a subtle earthy flavor that pairs well with the chocolate. Use 45 g of almonds and keep the rest of the recipe unchanged. The result is a brownie that feels more like a cookie.
Minty Marvel
Add 1 teaspoon of peppermint extract to the wet mix for a refreshing twist. The mint balances the sweetness and gives the brownies a cool aftertaste. Keep the Biscoff spread unchanged; it adds a caramel layer that contrasts with the mint. This version is perfect for summer parties.
Sea Salt Swirl
Sprinkle sea salt flakes over the batter before baking. The salt enhances the chocolate flavor and creates a caramelized crust. If you’re vegan and love bold flavors, this is a must‑try. The salt also gives a subtle crunch to the top.
Chocolate‑Chip Surprise
Fold in 100 g of dairy‑free chocolate chips into the batter. The chips melt into gooey pockets of chocolate that burst with each bite. Keep the Biscoff spread for that caramel swirl. These brownies feel like a chocolate cake with extra chocolate.
Spiced Pumpkin Variation
Add 2 tablespoons of pumpkin puree and a pinch of cinnamon to the batter. The pumpkin adds moisture and a subtle autumn flavor. Keep the Biscoff biscuits to maintain the crunch. This version works wonderfully in the fall.
Lemon Zest Delight
Grate the zest of one lemon into the wet mix for a bright, citrusy note. The lemon zest cuts through the richness and gives a fresh finish. Keep the Biscoff spread for the caramel swirl. The result is a brownie that feels light yet indulgent.
Storing and Bringing It Back to Life
Fridge Storage
Store brownies in an airtight container at room temperature for up to 3 days. The airtight seal keeps them fresh and prevents them from drying out. If you’re storing for longer, keep them in the fridge for up to a week. The brownies will stay moist and flavorful.
Freezer Friendly
Wrap each brownie individually in plastic wrap, then place them in a freezer bag. Freeze for up to 3 months. Thaw at room temperature before serving. The texture remains the same as fresh, thanks to the tofu and aquafaba base. This method is great for batch baking.
Best Reheating Method
Reheat frozen brownies in a 160°C (320°F) oven for 10 minutes, or until warmed through. Add a splash of water to the bottom of the pan to create steam; this prevents the brownies from drying. For fresh brownies, a quick 30-second microwave burst is enough. Serve warm for the best experience.