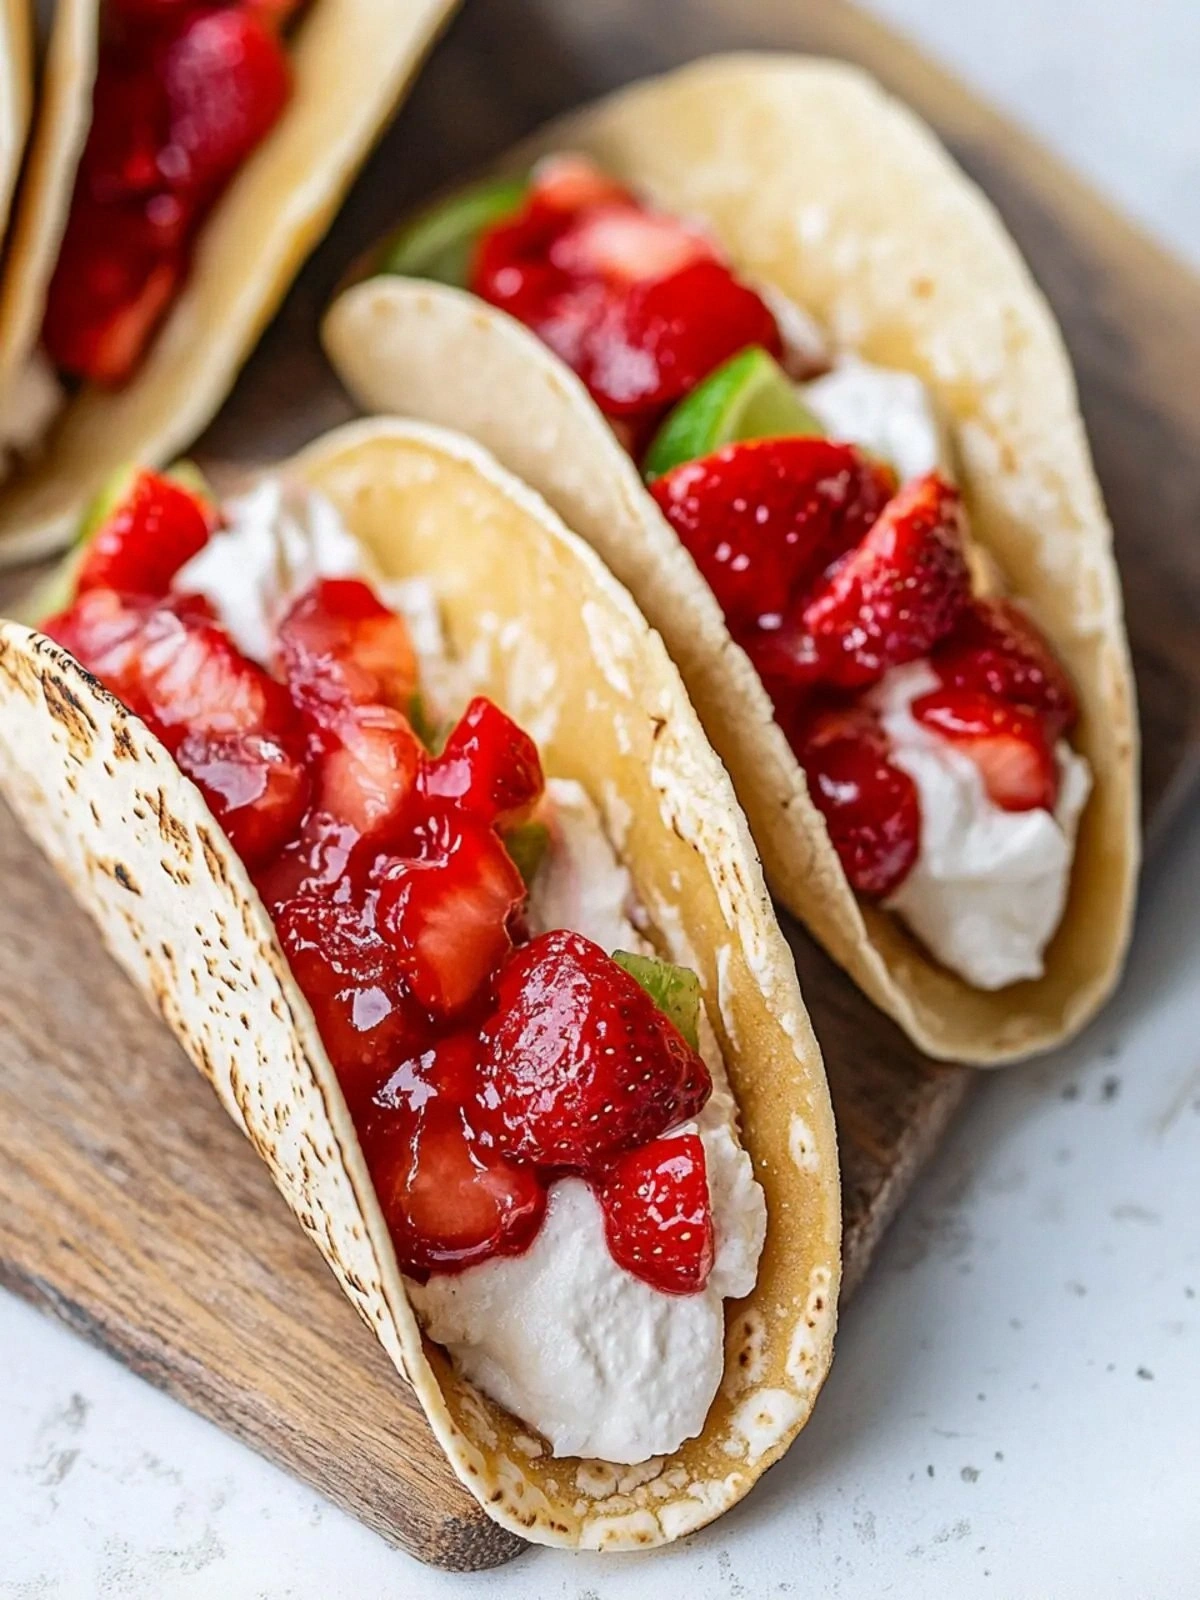
Picture this: I’m standing in a cramped kitchen, a stack of flour tortillas on the counter, and a sweet craving that refuses to stay in the back of my mind. The last time I tried a cheesecake taco, the filling leaked faster than a leaky faucet and the tortillas turned into soggy pillows. I laughed, I blamed the humidity, and I vowed to find a version that would keep the crunch and the creamy dream intact. Now, I’m here to show you how to turn that kitchen disaster into a crowd‑pleasing masterpiece that even the most skeptical foodie will admit, “I dare you to taste this and not go back for seconds.”
The first bite feels like a carnival ride: the tortilla’s crisp edges snap like thin ice while the cheesecake filling swirls like velvet against the sweet cherry backdrop. The aroma is a heady mix of buttery graham crumb crust, vanilla‑kissed cream cheese, and that unmistakable pop of fresh cherries. The texture is a harmonious blend—crunchy, silky, and just a hint of tartness that keeps you guessing. The flavor profile is balanced so well that you’ll find yourself reaching for the second taco before you realize you’ve already had one. And if you think this is just another dessert, think again—this is hands down the best version you’ll ever make at home.
What makes this version stand out is not just the combination of flavors but the meticulous attention to each component. I’ve tweaked the crust to give it a buttery, slightly caramelized edge, used a generous amount of vanilla to lift the cream cheese, and added a splash of cherry filling for that bright, fruity punch. I’ll be honest—my first batch was a bit too sweet, so I adjusted the sugar levels and the result is a balanced, indulgent treat. Most recipes get this completely wrong by over‑baking the tortillas or under‑mixing the cheesecake base. If you’ve ever struggled with a soggy taco, you’re not alone—and I’ve got the fix.
Picture yourself pulling these out of the oven, the whole kitchen smelling incredible, the tortillas golden and crisp, and the cheesecake filling glistening like a sweet sunrise. The anticipation is almost tangible, and you can almost taste the first bite before you even take it. The moment you cut through the filling, the cherry filling explodes in your mouth, followed by the rich, creamy cheesecake and the buttery crumb crust. It’s a symphony of textures and flavors that will have your guests asking for the recipe before you even finish the last taco. Let me walk you through every single step—by the end, you’ll wonder how you ever made it any other way.
What Makes This Version Stand Out
- Crunch: The tortilla is toasted just enough to maintain a satisfying bite while still being pliable enough to hold the creamy filling without tearing.
- Balance: The ratio of graham cracker crumbs to butter creates a crust that is buttery without being greasy, and the powdered sugar lifts the cheesecake without overpowering the vanilla.
- Sweetness: By using cherry pie filling instead of fresh cherries, you get a consistent sweetness and a glossy finish that makes each taco look Instagram‑ready.
- Texture: The whipped topping adds a light, airy layer that contrasts beautifully with the dense cheesecake, giving the taco a multi‑dimensional mouthfeel.
- Time‑efficiency: The assembly process takes less than 30 minutes, making this a perfect dessert for last‑minute gatherings.
- Make‑ahead: You can pre‑assemble the tacos and refrigerate them for up to 24 hours, letting the flavors meld together while you focus on other preparations.
- Presentation: The bright red cherry filling pops against the golden tortilla, creating a visual treat that is as delightful to the eye as it is to the palate.
Inside the Ingredient List
The Flavor Base
The graham cracker crumbs and butter form the foundational crust that anchors the taco. They provide a buttery, slightly sweet base that balances the richness of the cream cheese. Skipping this step would leave the tortilla feeling empty, as if the filling had nothing to cling to. If you’re on a low‑carb diet, consider using almond flour crumbs instead, but keep the butter to maintain the buttery flavor.
The Texture Crew
The cream cheese, powdered sugar, and vanilla extract combine to create a silky cheesecake filling that is neither too runny nor too stiff. The whipped topping adds a light, airy contrast that lifts the overall mouthfeel. If you skip the whipped topping, the tacos will still be delicious but will lack that airy, cloud‑like texture that makes each bite feel special. For a richer taste, add a splash of heavy cream to the cheesecake mixture.
The Unexpected Star
The cherry pie filling is the secret weapon that gives these tacos a burst of bright, tart flavor and a glossy finish. It’s surprisingly versatile, as it can be swapped for other fruit fillings like raspberry or blueberry if you’re in the mood for a different twist. If you prefer a more natural taste, fresh cherries can be used, but they may require additional sugar to balance the tartness.
The Final Flourish
The melted butter and granulated sugar are what bind everything together and give the crust its golden hue. These ingredients also help to create that slight caramelization on the tortilla’s surface. If you’re looking to reduce the sugar, you can halve the granulated sugar and add a touch of brown sugar for depth.
Everything's prepped? Good. Let's get into the real action...
The Method — Step by Step
- Prepare the crust: In a small bowl, mix 1 cup of graham cracker crumbs with 4 tablespoons of melted butter and 2 tablespoons of granulated sugar until the mixture resembles wet sand. Press the mixture into the bottom of each tortilla, forming a thin layer that will hold the cheesecake filling. Place the tortillas on a parchment‑lined baking sheet and bake at 350°F (175°C) for 8 minutes, or until the edges are golden and the crust feels firm. Let them cool completely before filling; this step ensures the tacos stay crisp.
- Whisk the cheesecake base: In a medium bowl, beat 8 ounces of softened cream cheese until smooth. Add 1 cup of powdered sugar, 1 teaspoon of vanilla extract, and a pinch of salt, then continue beating until the mixture is light and airy. This will be the creamy heart of your tacos. If you want a lighter texture, fold in 4 tablespoons of heavy cream.
- Fold in the whipped topping: Gently fold 8 ounces of thawed whipped topping into the cheesecake mixture, being careful not to deflate the airy texture. This step adds a cloud‑like fluff that contrasts with the dense base. The resulting filling should be smooth and spreadable, but still hold its shape when piped into the tacos.
- Fill the tortillas: Spoon a generous amount of the cheesecake filling into the center of each cooled tortilla. The filling should sit just below the top of the tortilla, creating a perfect bite. If you prefer a more dramatic presentation, layer the filling in a circular pattern for a “donut” effect.
- Top with cherry filling: Spoon or pipe 1 cup of cherry pie filling over the cheesecake layer, allowing it to cascade slightly into the edges. The cherries provide a bright contrast and a natural glaze that keeps the tacos moist. If you’re using fresh cherries, blanch them in boiling water for 30 seconds, then shock them in ice water to remove the skins.
- Chill for set: Place the filled tortillas in the refrigerator for at least 20 minutes, or until the filling has firmed up enough to hold its shape. This cooling period also allows the flavors to meld together, creating a cohesive taste experience. If you’re in a hurry, you can skip the chill step, but the tacos will be softer and more difficult to eat.
- Optional garnish: For a finishing touch, sprinkle a light dusting of powdered sugar or add a few fresh mint leaves. The mint adds a subtle herbal note that cuts through the sweetness, while the powdered sugar enhances the dessert’s visual appeal. This is the moment of truth—watch how the glaze gleams before you plate.
- Serve immediately: Arrange the tacos on a platter and serve them straight from the fridge. The crisp tortilla and creamy filling will still be at their peak. If you’re serving a large crowd, keep the tacos in a warm, insulated container to maintain their texture.
- Enjoy the applause: Watch your friends’ faces light up as they take the first bite. The combination of textures and flavors is so satisfying that you’ll hear a chorus of “I need more.” If you’re feeling generous, offer extra cherry filling on the side for guests to top their own tacos.
That’s it — you did it. But hold on, I’ve got a few more tricks that’ll take this to another level. The next section will reveal insider tips that will elevate your cheesecake tacos from good to unforgettable.
Insider Tricks for Flawless Results
The Temperature Rule Nobody Follows
Many bakers bake at 350°F, but for these tacos, a lower temperature of 300°F (150°C) will give you a softer crust that still holds its shape. This subtle change prevents the crust from becoming too hard and ensures the filling stays creamy. I tried both temperatures and found the lower setting gave a more luxurious mouthfeel.
Why Your Nose Knows Best
Trust the aroma of the graham cracker crust; if it smells caramelized, you’re ready. A slight toasty scent indicates the butter has browned just right, which locks in flavor. If the smell is flat, give the tortillas a minute more in the oven. This sensory checkpoint is a quick way to avoid under‑baked tacos.
The 5-Minute Rest That Changes Everything
After assembling the tacos, let them rest on a cool surface for 5 minutes before refrigerating. This brief pause allows the filling to set slightly, reducing the risk of the cheesecake spilling when you lift the taco. It also gives the crust a chance to firm up, ensuring a clean bite.
Use Fresh vs. Canned Fruit
While canned cherry pie filling is convenient, fresh cherries add a natural burst of flavor and a more vibrant color. Blanch and pit them, then mix with a touch of sugar to match the sweetness level of the canned option. Fresh fruit also offers a cleaner taste profile, especially if you’re serving health‑conscious guests.
Add a Dash of Lemon Zest
A pinch of lemon zest in the cheesecake base brightens the flavor and cuts through the richness. It also adds a subtle citrus aroma that elevates the overall experience. This tweak is especially effective if you’re using a sweeter cherry filling.
Serve with a Light Beverage
Pair these tacos with a chilled glass of sparkling water or a light, citrus‑infused soda. The effervescence helps cleanse the palate between bites, making each taco feel like a fresh, new experience. This pairing is a simple yet sophisticated way to elevate the dessert.
Creative Twists and Variations
Berry Explosion
Swap the cherry filling for mixed berry jam or a swirl of raspberry puree. The tartness of berries will complement the creamy cheesecake, and the vibrant colors will make the tacos pop on the plate.
Chocolate Layer
Add a layer of melted dark chocolate between the crust and cheesecake filling. The rich, bittersweet flavor will contrast beautifully with the sweet cherry topping and give the tacos a decadent twist.
Spiced Cinnamon Crunch
Incorporate a teaspoon of ground cinnamon into the graham cracker crust. The warm spice will add depth and a comforting aroma, especially perfect for fall gatherings.
Mango Tango
Use mango puree as the top layer instead of cherries. The tropical sweetness and bright color will transport your taste buds to a sunny beach, making the tacos feel exotic and refreshing.
Nutty Delight
Add chopped toasted pecans or walnuts into the cheesecake mixture. The crunch will provide an additional textural layer and the nutty flavor will pair nicely with the buttery crust.
Citrus Zest Surprise
Sprinkle a pinch of orange zest over the final cherry topping. The citrus aroma will brighten the overall flavor profile and add a subtle zing that lingers on the palate.
Storing and Bringing It Back to Life
Fridge Storage
Store the assembled tacos in an airtight container in the refrigerator for up to 24 hours. The crust will stay crisp, and the filling will firm up, making the tacos ready to serve at any time. Keep the container at a consistent temperature to avoid condensation that could soften the tortilla.
Freezer Friendly
To freeze, wrap each taco tightly in plastic wrap and place them in a freezer bag. They can be stored for up to 2 weeks. When ready to serve, thaw in the refrigerator overnight, then reheat briefly in a 300°F oven for 5 minutes to restore crispness.
Best Reheating Method
If the tacos have lost their crispness, place them in a preheated 300°F oven for 3–4 minutes. Add a tiny splash of water to the bottom of the pan to create steam, which will help the crust regain its crunch without drying out the filling. This quick step will bring the tacos back to their original glory.