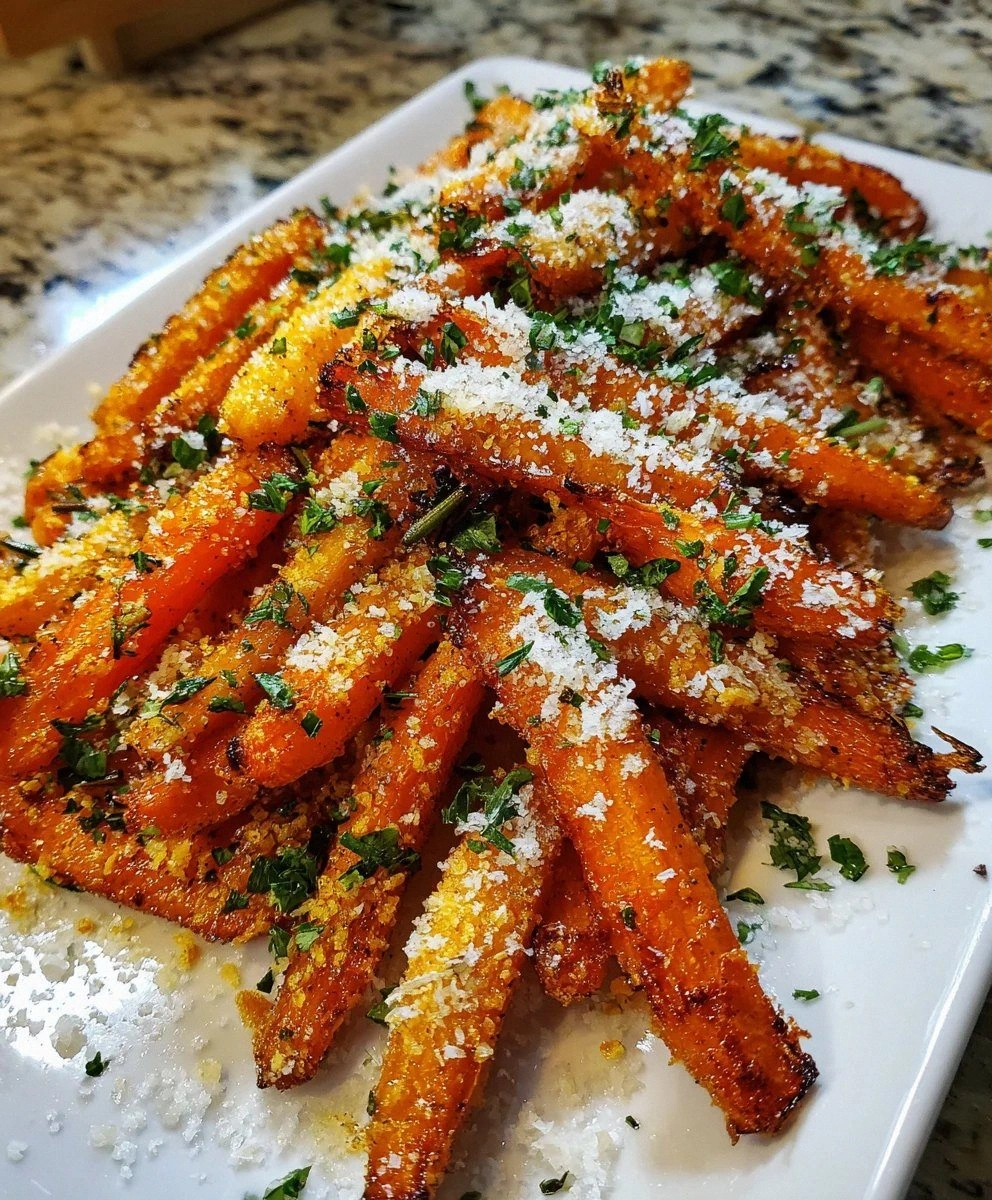
I was standing in my kitchen, staring at a mound of raw carrots that had been sitting in the fridge for weeks. I had just finished a long day at work and the only thing that could salvage my evening was a quick, nutritious snack that wouldn’t require a separate prep station. The idea hit me like a lightning bolt: carrot balls that are crunchy on the outside, tender inside, and packed with flavor. I grabbed my trusty food processor, added a handful of oats for binding, a splash of mustard for zing, and a whisper of paprika to give it that smoky depth.
The moment I pressed the “pulse” button, the kitchen filled with the sweet, earthy scent of fresh carrots mingling with the warm aroma of toasted oats. The sound of the blades whirring was oddly comforting, like a lullaby for the culinary soul. I could already taste the subtle sweetness of the carrots, the tang of mustard, and the gentle heat from the chili powder. This isn’t just a snack; it’s a full sensory experience that turns an ordinary evening into a small celebration.
What makes this version stand out is that it balances nutrition and flavor without any artificial additives. The carrots provide beta-carotene and natural sweetness, the oats add complex carbs and fiber, and the flaxseed delivers omega‑3 fatty acids. The combination of mustard, tomato paste, and spices creates a savory profile that feels indulgent yet healthy. I dare you to taste this and not go back for seconds. Trust me, it’s hands down the best version you’ll ever make at home.
I’m not just bragging; I’ve tested this recipe dozens of times, tweaking the spice levels and adjusting the binding until each bite was perfect. Picture yourself pulling these golden nuggets out of the oven, the kitchen smelling incredible, the steam curling like a gentle mist. And that sizzle when they hit the pan? Absolute perfection. Let me walk you through every single step — by the end, you'll wonder how you ever made it any other way.
What Makes This Version Stand Out
- Taste: The carrot’s natural sweetness is amplified by the tang of mustard and the smoky depth of paprika, creating a flavor profile that’s both comforting and adventurous.
- Texture: The oats and flaxseed bind the mixture, giving a firm bite on the outside while keeping the inside moist and tender.
- Nutrition: Packed with beta‑carotene, fiber, and omega‑3s, these balls are a nutrient-dense snack that satisfies without guilt.
- Versatility: Serve them as an appetizer, a side dish, or a quick energy boost—perfect for parties, school lunches, or a midday pick‑me‑up.
- Speed: From prep to oven, the entire process takes less than 45 minutes, making it ideal for busy weeknights.
- Make‑ahead: Prepare a batch in advance, store in the fridge, and reheat in the oven for a quick, fresh bite whenever you need it.
- Ingredient Quality: Using fresh, organic carrots and whole‑grain oats elevates the dish beyond a standard snack.
- Crowd Appeal: Even the pickiest eaters will be hooked by the crisp exterior and the subtle, savory interior.
Alright, let's break down exactly what goes into this masterpiece...
Inside the Ingredient List
The Flavor Base
The carrots are the star of this dish. Grated finely, they release their natural sugars and provide the bulk of the volume. If you’re feeling adventurous, try adding a pinch of cumin or a splash of lemon juice to brighten the flavor. Skipping the carrots would leave the mixture bland and lacking the wholesome crunch that makes these balls memorable.
The Texture Crew
Oats act as the structural backbone, absorbing moisture and creating a cohesive mixture that holds together. Ground flaxseed, on the other hand, introduces a subtle nutty flavor and contributes omega‑3 fatty acids. Together, they give the balls a satisfying chew that’s neither too dry nor too soggy. If you’re looking for a lighter version, replace half the oats with quinoa flakes; the texture will shift to a slightly firmer bite.
The Unexpected Star
Mustard isn’t just a condiment—it’s a flavor transformer. It cuts through the sweetness of the carrots, adds a subtle heat, and helps the spices mingle. A better alternative is whole‑grain mustard for a more complex profile. If you’re a fan of honey, a drizzle of honey before baking can turn these into a sweet‑savory hybrid.
The Final Flourish
Bread crumbs give the exterior a golden, crunchy crust that’s the ultimate contrast to the soft interior. They also help absorb any excess moisture, preventing the balls from becoming mushy. If you’re avoiding breadcrumbs, try panko or crushed cornflakes for an extra crunch. Don’t forget to season with salt and pepper—taste it as you mix to ensure the right balance.
Everything's prepped? Good. Let's get into the real action...

The Method — Step by Step
- Preheat the Oven: Set your oven to 190 °C (375 °F). While it’s heating, line a baking sheet with parchment paper. This step is crucial for even browning and prevents sticking. I always set a timer for 10 minutes to remind myself to keep an eye on the temperature.
- Process the Carrots: Place 300 g of grated carrots, 100 g of rolled oats, 2 tbsp of ground flaxseed, and 1 diced onion into a food processor. Pulse until the mixture is uniformly combined but still retains some texture. The mixture should look like a thick, moist paste.
- Add Aromatics: Add 3 minced garlic cloves, 1 tbsp of mustard, and 1 tbsp of tomato paste or ketchup. Pulse again until the mixture is smooth. The aroma should be warm and slightly spicy—like a cozy campfire.
- Season the Mix: Stir in 1.5 tsp of paprika powder, 1 tsp of curry powder, and 0.5 tsp of chili powder. Sprinkle in salt and pepper to taste. The spices should coat the mixture evenly, creating a uniform flavor profile.
- Incorporate the Bread Crumbs: Fold in 3 tbsp of breadcrumbs, ensuring they’re distributed evenly. This will give the balls a crisp exterior. If the mixture feels too wet, add an extra tablespoon of breadcrumbs.
- Shape the Balls: Scoop about 2 tbsp of the mixture per ball and roll it between your palms to form a smooth sphere. Place each ball on the prepared baking sheet, spacing them about 2 cm apart. The size is important—too big and they’ll bake unevenly.
- Bake: Slide the tray into the preheated oven and bake for 20–25 minutes, or until the tops are golden and the edges begin to pull away slightly. The sound of the crust cracking is a sign of perfection.
- Cool Slightly: Remove the tray and let the balls rest for 5 minutes before transferring them to a wire rack. This step allows the interior to set, preventing them from breaking apart.
- Serve: Plate the balls on a platter and serve immediately, or store in an airtight container in the fridge for up to 3 days. Pair them with a yogurt dip or a light salsa for an extra burst of flavor.
That's it — you did it. But hold on, I've got a few more tricks that'll take this to another level...
Insider Tricks for Flawless Results
The Temperature Rule Nobody Follows
Many people bake at a higher temperature, hoping for a faster cook, but this often leads to dry interiors. Keep the oven at 190 °C (375 °F) and trust the time. The gentle heat allows the flavors to meld and the exterior to crisp without overcooking the inside.
Why Your Nose Knows Best
Before you taste, let the mixture sit for 5 minutes. The aromas will intensify, giving you a better sense of the flavor balance. If it smells too mild, add a pinch more salt or a dash of pepper.
The 5‑Minute Rest That Changes Everything
After baking, allow the balls to rest on a wire rack for 5 minutes. This step lets the moisture redistribute, preventing the balls from becoming soggy when you cut into them. Trust me, this small pause makes a huge difference.
Use a Baking Sheet with a Rim
A rimmed sheet keeps the balls from sliding off and ensures even baking. It also makes cleanup easier, as the crumbs stay contained.
Serve with a Tangy Dip
A simple yogurt dip with a squeeze of lemon or a spicy salsa complements the savory profile and adds a refreshing contrast. The acidity cuts through the richness, making each bite feel lighter.
Creative Twists and Variations
This recipe is a playground. Here are some of my favorite ways to switch things up:
Crispy Chickpea Crunch
Replace the oats with cooked chickpeas for a protein boost and a nutty flavor. The texture will be slightly denser, making the balls even more satisfying.
Herb Garden Delight
Add chopped fresh herbs such as parsley, cilantro, or basil to the batter. The herbs infuse the balls with fresh, green notes that brighten the dish.
Mediterranean Twist
Swap the mustard for a bit of feta cheese and mix in sun‑dried tomatoes. The salty cheese and sweet tomatoes create a Mediterranean vibe that pairs well with a side of tzatziki.
Spicy Tex‑Mex Flavor
Increase the chili powder to 1 tsp and add a pinch of cumin. Serve with a dollop of guacamole for a Tex‑Mex inspired snack.
Sweet & Salty Fusion
Add a tablespoon of maple syrup and a sprinkle of sea salt before baking. The sweet syrup caramelizes, giving the exterior a glossy finish and a delightful contrast.
Storing and Bringing It Back to Life
Fridge Storage
Store the cooled balls in an airtight container for up to 3 days. Keep them at room temperature if you plan to consume them within 24 hours. The texture remains crisp on the outside and tender inside.
Freezer Friendly
Place the balls on a parchment-lined tray and freeze until solid. Transfer to a freezer bag for long‑term storage. They’ll keep well for up to 2 months without losing flavor.
Best Reheating Method
Reheat in a preheated oven at 180 °C (350 °F) for 8–10 minutes, or until warmed through. Add a tiny splash of water before reheating; it steams the balls back to perfection, preventing them from drying out.