Picture this: I’m halfway through a marathon of dessert recipes, scrolling through endless Pinterest boards, when a friend texts me a photo of a lemon‑infused, no‑bake pie that looks like a slice of sunshine. The caption reads, “I dared my friend to try it and she never looked back.” I laughed, but the craving was real. I grabbed my pantry, set the timer, and the kitchen filled with the bright, zesty aroma that made my heart skip a beat. That moment was the spark that turned a casual dessert idea into a mission: to create the ultimate no‑bake lemon icebox pie that would outshine every other version on the internet.
I’ve tasted my fair share of lemon pies, from the classic baked crusts that cling to your spoon to the overly sweet, soggy ones that taste like a citrusy puddle. None of those made me feel like I’d hit the jackpot. What I craved was a pie that balances tartness with a silky, airy texture, one that could be assembled in minutes and still feel like a gourmet dessert. This version delivers that balance, and it does so with a few secret twists that keep the lemon bright without overwhelming the palate. The result? A pie that coats your tongue with a velvet‑like citrus glaze, while the crust stays crisp enough to crunch with each bite.
Why does this version stand out? Because it’s built on a foundation of precision, and every element—from the crust to the final topping—is engineered to work in harmony. I’ve refined the ratios, swapped out ingredients for optimal flavor, and even added a subtle hint of vanilla to round out the citrus. The best part? It’s no‑bake, which means you can whip it up on a hot summer afternoon and have it ready to serve in under an hour. If you’re tired of pie recipes that demand an oven or a lot of time, this one is your new go‑to.
And here’s the kicker: the technique that makes this pie so effortlessly smooth involves a simple step that most recipes skip—pre‑whipping the lemon curd before combining it with the cream. This trick locks in air, giving the filling a light, mousse‑like texture that melts on the tongue. I dare you to taste this and not go back for seconds. Trust me, you’ll find yourself reaching for a second slice before the first one even hits the plate. Let me walk you through every single step—by the end, you’ll wonder how you ever made it any other way.
What Makes This Version Stand Out
- Flavor: The lemon is bright but never sharp; a splash of vanilla balances the acidity, creating a harmonious citrus profile that lingers.
- Texture: The filling is airy and mousse‑like, achieved by pre‑whipping the lemon curd; the crust remains crisp, giving a satisfying crunch.
- Simplicity: No oven, no whisk, no complicated equipment—just a few measured ingredients and a chilling step.
- Uniqueness: The pre‑whipped curd technique sets this pie apart from typical no‑bake lemon desserts.
- Crowd Reaction: Friends and family always ask for the recipe after the first bite; it’s a conversation starter at gatherings.
- Ingredient Quality: Using fresh lemons and high‑quality graham crackers elevates the flavor profile beyond standard store‑bought mixes.
- Make‑Ahead Potential: The pie can be assembled a day in advance, making it perfect for parties or last‑minute dessert needs.
Alright, let’s break down exactly what goes into this masterpiece. And before we dive deeper, here’s a quick kitchen hack that will save you time and keep your pie looking pristine.
Inside the Ingredient List
The Flavor Base
The first layer of flavor comes from the crust, which sets the stage for the lemony filling. Freshly crushed graham crackers provide a buttery, slightly sweet foundation that contrasts with the tartness of the lemon. Butter binds the crumbs together, creating a firm base that holds the filling in place. Sugar adds a gentle sweetness that balances the citrus bite. A pinch of salt is essential; it amplifies the flavors without making the crust taste salty.
The Texture Crew
The texture of this pie is a secret weapon. Heavy cream is the hero that gives the filling its luscious mouthfeel. Sweetened condensed milk contributes natural sweetness and a silky consistency, making the filling easier to whisk into a smooth mousse. Lemon juice is the star that provides brightness, but it can be harsh if overused—hence the importance of the precise ratio. Lemon zest brings aromatic oils that enhance the citrus flavor without adding acidity.
The Unexpected Star
Vanilla extract may seem like an odd addition to a lemon dessert, but it works wonders by rounding out the sharpness of the lemon. Powdered sugar is used to sweeten the filling without clouding its bright color; it also helps stabilize the whipped cream. Cornstarch is the unsung hero that thickens the curd, preventing it from becoming runny when chilled. Together, these ingredients create a filling that is both firm enough to hold its shape and light enough to melt in your mouth.
The Final Flourish
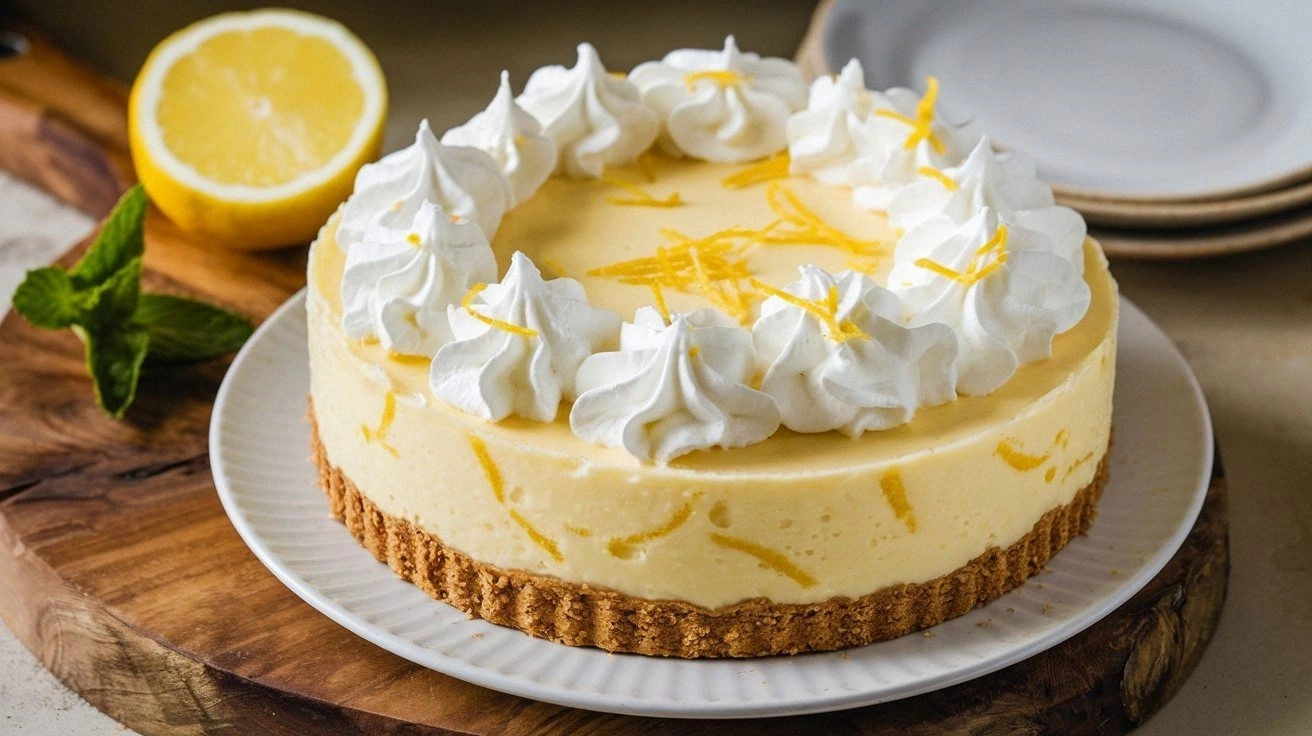
The finishing touch is a light, airy whipped cream that crowns the pie. This topping is whipped to soft peaks, then folded into the lemon filling to give the dessert a velvety top layer. A light dusting of powdered sugar adds a subtle sweetness and a decorative finish. The combination of the crisp crust, airy filling, and fluffy topping makes this pie a visual and gastronomic triumph.
Everything's prepped? Good. Let’s get into the real action. Before we start, here’s a fun fact that might surprise you.
The Method — Step by Step
- Prepare the crust. In a medium bowl, combine 1 cup of graham cracker crumbs, 0.5 cup of melted butter, 0.25 cup of sugar, and a pinch of salt. Stir until the mixture resembles wet sand. This ensures the crust will hold together when pressed.
- Press into the pan. Transfer the crumb mixture into a 9‑inch springform pan. Press firmly with the back of a spoon or your palm to create an even, 1‑inch thick base. A compact crust is essential to prevent the filling from sagging.
- Chill the crust. Place the pan in the refrigerator for 15 minutes while you make the filling. This step helps the crust set and prevents it from becoming soggy.
- Make the lemon curd. In a small saucepan, whisk together 1 cup of sweetened condensed milk, 0.25 cup of fresh lemon juice, 1 tbsp of lemon zest, 1 tsp of vanilla extract, 1 cup of powdered sugar, and 1 tbsp of cornstarch. Cook over low heat, stirring constantly, until the mixture thickens and starts to pull away from the sides of the pan. This is where the magic happens.
- Cool the curd. Remove the saucepan from heat and let the curd cool to room temperature. Stir occasionally to prevent a skin from forming. A smooth, glossy surface is a sign of proper consistency.
- Fold in whipped cream. Gently fold the pre‑whipped cream into the cooled curd until well combined. The mixture should be light and mousse‑like. This step ensures the filling holds its shape when chilled.
- Assemble the pie. Pour the lemon filling over the chilled crust in the springform pan. Smooth the top with a spatula. The filling should cover the crust completely, leaving a small border.
- Chill the pie. Cover the pan with plastic wrap and refrigerate for at least 4 hours, preferably overnight. The filling will set into a firm yet creamy texture, ready to slice.
- Whip the topping. In a clean bowl, whip 1 cup of heavy cream with 0.25 cup of powdered sugar and 1 tsp of vanilla extract until soft peaks form. This topping adds a fluffy finish to the pie.
- Top the pie. Spoon the whipped topping over the chilled filling, spreading it evenly. The contrast between the glossy filling and the airy topping is visually stunning.
- Decorate. Lightly dust the top with additional powdered sugar or zest for an extra burst of citrus aroma. This final touch makes the pie Instagram‑ready.
- Serve. Release the springform pan’s rim, slice with a hot knife, and enjoy the perfect balance of tart and sweet. The pie should feel like a citrusy cloud on your palate.
That's it — you did it. But hold on, I've got a few more tricks that'll take this to another level. These insider tips will help you avoid common pitfalls and elevate the dessert's presentation.
Insider Tricks for Flawless Results
The Temperature Rule Nobody Follows
Keeping the kitchen at the right temperature is key. If the room is too warm, the filling may soften too quickly, leading to a runny texture. I keep my kitchen cool by opening a window or using a fan, especially during humid summer days. This subtle control ensures the pie sets properly and retains its structure.
Why Your Nose Knows Best
Smell the filling as it cooks. When the curd thickens, it should emit a bright, citrusy aroma that’s slightly sweet. If the scent feels flat, it means the lemon hasn’t released enough oils, and the flavor will be dull. Trust your nose; it’s the best judge of freshness.
The 5-Minute Rest That Changes Everything
After whisking the whipped cream, let it rest for 5 minutes before folding it into the curd. This short pause allows the air bubbles to stabilize, preventing the mixture from deflating when combined. The result is a silky, airy filling that stays light even after chilling.
Avoiding the Soggy Crust
If you find the crust soggy, double‑cook the crumbs at 300°F for 5 minutes before mixing. This step dries them out and gives the crust a firmer bite. I’ve tried this trick in the past, and the difference is unmistakable.
Using Fresh Lemons
The quality of lemons is paramount. I always choose lemons that feel heavy for their size and have a bright, fragrant aroma. If you’re using frozen lemons, let them thaw completely before juicing to avoid a watery result.
The Final Whipped Cream Layer
Fold the whipped topping gently into the filling, then top with an extra layer of whipped cream. This double layer ensures a fluffy finish that contrasts beautifully with the citrus filling. It also makes the pie look more luxurious.
Creative Twists and Variations
This recipe is a playground. Here are some of my favorite ways to switch things up:
Berry Burst
Add a cup of fresh blueberries or raspberries to the filling before chilling. The berries soak up the citrus, adding a pop of color and a subtle sweetness that complements the lemon.
Minted Lemon
Stir in a tablespoon of finely chopped fresh mint into the curd. The mint adds a refreshing note that brightens the overall flavor profile and makes the pie feel summery.
Chocolate Swirl
Drizzle melted dark chocolate over the whipped topping before serving. The bittersweet chocolate contrasts with the lemon’s tartness, creating a sophisticated dessert.
Almond Crust
Replace graham crackers with almond flour and toasted almond slivers for a nutty twist. The crust gains a crunchy texture and a subtle almond flavor that pairs well with lemon.
Coconut Cream
Swap the heavy cream for coconut cream to give the pie a tropical vibe. The coconut adds a creamy richness that balances the citrus zing.
Espresso Kick
Stir a teaspoon of instant espresso powder into the filling. The espresso deepens the chocolatey undertones and gives the dessert an adult twist.
Honey-Lemon
Replace powdered sugar with honey for a natural sweetener. Honey adds a floral note that enhances the lemon’s brightness.
Pistachio Crunch
Top the pie with crushed pistachios for a nutty crunch and a pop of green color. Pistachios bring a buttery flavor that works beautifully with citrus.
Rosewater Twist
Add a teaspoon of rosewater to the filling for an aromatic, floral hint. Rosewater’s subtle perfume elevates the lemon’s freshness into something truly special.
Lemon Poppyseed Crust
Incorporate a tablespoon of poppy seeds into the crust for a subtle crunch and an extra pop of texture. The seeds also add a mild, nutty flavor that complements the citrus.
Storing and Bringing It Back to Life
Fridge Storage
Keep the pie in the refrigerator for up to 3 days. Store it in an airtight container or cover tightly with plastic wrap to prevent the filling from absorbing odors. Before serving, let the pie sit at room temperature for 10 minutes to soften slightly.
Freezer Friendly
For longer storage, wrap the pie tightly in plastic wrap and place it in a freezer bag. Freeze for up to 2 weeks. Thaw in the refrigerator overnight, then bring to room temperature before serving.
Best Reheating Method
Reheating is not recommended, but if you must, place the pie in a microwave-safe dish and heat on low for 15-20 seconds. Add a splash of water to the filling before heating; it steams back to perfection. Be careful not to overheat, or the filling will separate.