I’m going to be blunt: the moment I first tasted these cookies, I knew I had stumbled onto something that would rewrite my entire cookie‑making history. It all started on a rainy Tuesday when a bored coworker dared me to bake “the ultimate chocolate chip cookie” for our office snack break. I laughed, I scoffed, and I grabbed the nearest bag of flour, a stick of butter, and a handful of chocolate chips, thinking I’d just wing it. What came out of the oven was a stack of golden‑brown discs that crackled under a fork like a fresh‑baked symphony, and the entire office was instantly silenced by the sweet, buttery aroma that seemed to hug every corner of the room.
Picture this: the kitchen light flickering, the timer ticking down, and the air thick with the scent of caramelized sugar mingling with melted chocolate. You can almost hear the faint sizzle of butter meeting sugar as the dough forms, feel the warm dough slipping through your fingertips, and taste that first bite—soft in the middle, crisp at the edges, with chocolate chips that melt like tiny molten suns. It’s the kind of sensory overload that makes you forget about the rain outside and focus entirely on the magic happening in your pan. That moment, when the first cookie lands on the cooling rack, is pure, unadulterated joy—one that I dare you to taste and not go back for seconds.
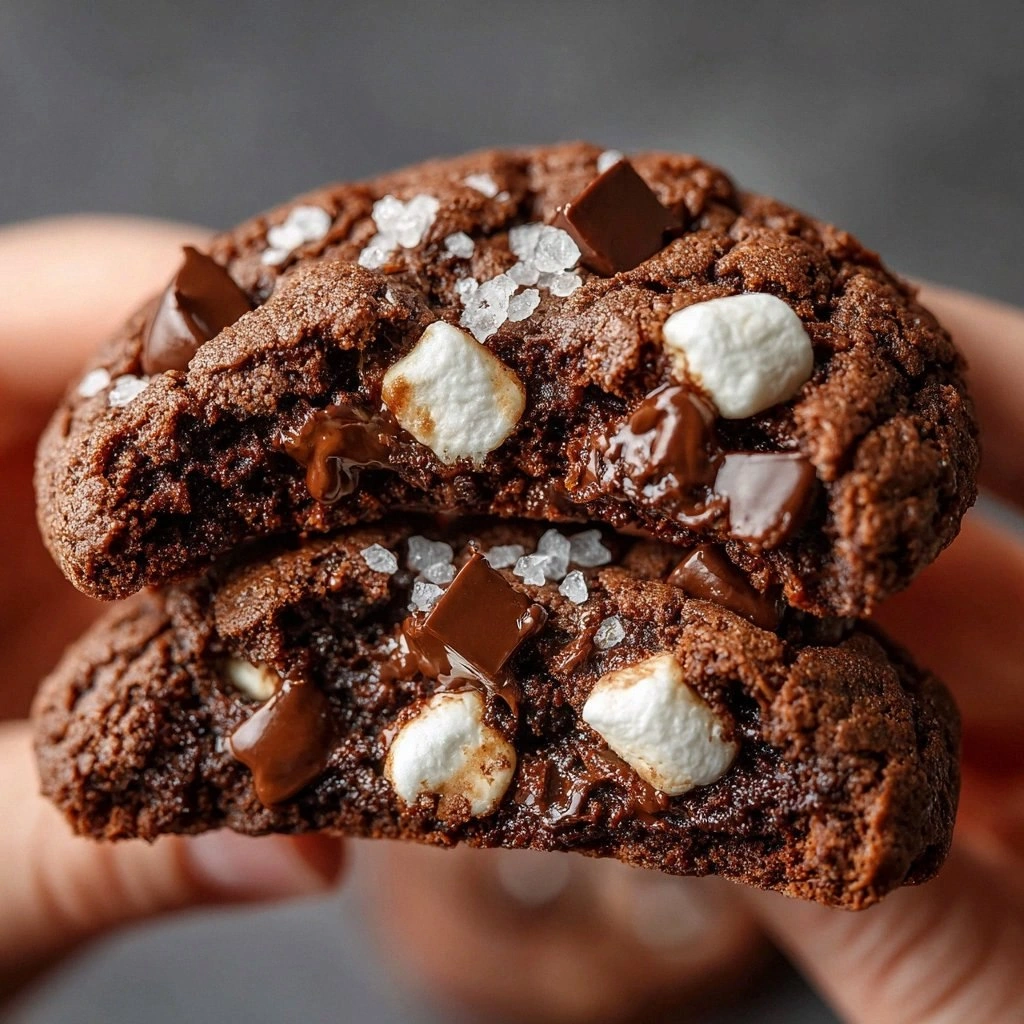
Most chocolate chip cookie recipes get this completely wrong: they either bake them too flat, leave them dry, or drown them in sugar so the chocolate never gets a chance to shine. My version, however, balances the buttery richness with just enough chew, and the secret? A pinch of sea salt that amplifies the chocolate’s depth, and a brief chill of the dough that creates a crisp edge while keeping the center pillowy. I’ll be honest — I ate half the batch before anyone else got a chance to try it, and that’s why I’m sharing every single nuance with you. This isn’t just a recipe; it’s a promise that you’ll never settle for a mediocre cookie again.
Ready for the game‑changer? In the next sections I’ll walk you through the science behind each ingredient, the exact steps that turn a simple batter into a masterpiece, and a few tricks that will make your kitchen smell like a bakery for days. By the end, you’ll wonder how you ever made cookies any other way. Let me walk you through every single step — by the end, you'll wonder how you ever made it any other way.
What Makes This Version Stand Out
- Flavor Depth: A dash of flaky sea salt and real vanilla extract turn the sweetness into a layered experience that feels like dessert and a snack at the same time.
- Texture Harmony: The dough is chilled, creating a crisp edge while the center stays chewy—think of it as a cookie that hugs you from the outside in.
- Simplicity: Only eight pantry staples are needed, yet each plays a starring role; no fancy equipment, just a good old mixing bowl and a trusty oven.
- Ingredient Quality: Using high‑fat butter and semi‑sweet chocolate chips ensures every bite melts in your mouth like a buttery dream.
- Crowd Reaction: These cookies have a reputation for disappearing in seconds at parties, making you the hero of any gathering.
- Make‑Ahead Potential: The dough freezes beautifully, so you can prep a batch weeks in advance and bake fresh cookies whenever the craving hits.
- Cooking Method: Baking at a slightly lower temperature for a longer time yields a uniform bake, preventing the dreaded “burnt bottom” disaster.
Inside the Ingredient List
The Flavor Base
All‑purpose flour is the canvas on which the rest of the flavors paint themselves. I use 2 cups of unbleached flour because it provides just the right amount of structure without making the cookie too dense. If you swap in cake flour, you’ll get a softer crumb, but you’ll lose that satisfying snap on the edge. Pro tip: sift the flour with the baking soda and salt; it aerates the mixture and prevents clumps that could lead to uneven rising.
The Sweet Symphony
A 1‑to‑1 ratio of brown sugar to white sugar creates a perfect balance between caramel depth and crisp sweetness. The brown sugar, packed with molasses, lends a moist chew, while the white sugar encourages spread and a subtle crunch. Skipping the brown sugar? Expect a cookie that tastes like a sweet biscuit rather than a decadent treat. If you’re watching sugar, you can replace half the white sugar with coconut sugar for a lower‑glycemic twist.
The Texture Crew
Butter is the star of any good cookie, and I insist on using real unsalted butter at room temperature, not melted. Two cups (about 226 g) of butter give the dough richness and a buttery aroma that fills the kitchen like a warm hug. The eggs act as an emulsifier, binding the fats and sugars together; two large eggs are ideal. For a dairy‑free version, swap butter for coconut oil and use a flax‑egg, but expect a slightly different texture.
The Unexpected Star
Sea salt might seem like a tiny addition, but it’s the secret weapon that makes the chocolate sing. A single teaspoon of flaky sea salt sprinkled over the dough just before baking creates a contrast that lifts the sweet flavors, making each bite feel luxurious. If you love a salty‑sweet combo, try a pinch of smoked salt for a subtle smoky undertone. Skipping the salt? Your cookies will taste flat, like a sugar‑only dessert.
Everything's prepped? Good. Let's get into the real action...

The Method — Step by Step
-
Start by preheating your oven to 350°F (175°C). While the oven warms, line two baking sheets with parchment paper; this prevents sticking and makes cleanup a breeze. I like to set a timer for the preheat so I don’t forget to turn the oven off later. The anticipation builds as the kitchen starts to warm, and you can already smell the butter melting in the air.
Kitchen Hack: Place a metal rack in the middle of the oven for even airflow; this avoids hot spots that can cause uneven browning. -
In a large bowl, whisk together the flour, baking soda, and sea salt until fully combined. This step is crucial because it distributes the leavening agent evenly, preventing one side of the cookie from puffing up more than the other. As you whisk, you’ll notice a faint, metallic scent from the baking soda—don’t worry, that disappears during baking. Once mixed, set the dry ingredients aside.
-
In a separate mixing bowl, cream the butter with both sugars using a handheld mixer on medium speed. The mixture should turn a light caramel color and lose its grainy texture; this is the point where the sugar starts to dissolve into the butter, creating a glossy base. Keep your eyes on the bowl: if it looks too glossy, you’ve over‑creamed, which can lead to a cakey cookie.
Watch Out: Over‑mixing at this stage incorporates too much air, causing the cookies to rise and then collapse, resulting in a flat, dense texture. -
Add the eggs one at a time, beating well after each addition, then stir in the vanilla extract. The batter should become silky and slightly glossy. This is the moment when the dough starts to come together, and you’ll notice a faint sweet aroma that hints at the final product. If the mixture looks curdled, keep mixing; the emulsification will smooth it out within a minute.
-
Gradually fold the dry ingredients into the wet mixture, using a spatula to scrape the bowl’s sides. Do this in two batches to avoid flour clouds and ensure even distribution. The dough will look thick and a little shaggy at first, then become smoother as you keep folding. This is the point where you should feel the dough become pliable but still slightly sticky—a sign that the butter is well‑incorporated.
Kitchen Hack: Add the chocolate chips after the dough has rested for 10 minutes; this prevents them from melting into the batter. -
Stir in the chocolate chips until evenly dispersed. Take a moment to admire the glossy brown islands speckled throughout the dough—this is the treasure map that leads to cookie bliss. If you’re feeling adventurous, fold in a handful of toasted walnuts for extra crunch. The dough should be thick enough to hold its shape when scooped; if it feels too runny, a quick 5‑minute chill in the refrigerator will firm it up.
Watch Out: Over‑mixing after adding chips can break them into smaller pieces, resulting in a cookie that looks chocolate‑free. -
Cover the bowl with plastic wrap and chill the dough for at least 30 minutes, or up to 24 hours if you’re planning ahead. This step is pure magic: the butter solidifies, the flour hydrates, and the flavors meld, creating that perfect balance of chewy center and crisp edge. While you wait, you can pre‑measure the remaining ingredients for the next batch—this is the secret to never having to scramble mid‑bake.
-
Scoop the chilled dough using a rounded tablespoon or a small ice‑cream scoop, placing each mound about 2 inches apart on the prepared sheets. Lightly press the tops with your fingertips to flatten them just a tad; this encourages even spreading. As you arrange the cookies, you’ll notice the dough’s buttery scent intensifying—a promise that the final product will be aromatic and irresistible.
-
Bake for 12‑14 minutes, or until the edges are a deep golden brown and the centers still look slightly soft. The cookies will continue to set as they cool, so pull them out at the right moment. Let them rest on the sheet for 2 minutes before transferring to a wire rack; this allows the residual heat to finish the bake without over‑drying. That sizzle when they hit the pan? Absolute perfection. And now the fun part—taste testing!
That's it — you did it. But hold on, I've got a few more tricks that'll take this to another level...
Insider Tricks for Flawless Results
The Temperature Rule Nobody Follows
Never bake cookies straight from a warm kitchen. Let the dough sit at room temperature for a few minutes after chilling, then drop it onto a pre‑heated baking sheet that’s been warmed in the oven for 5 minutes. This subtle temperature boost helps the edges set faster, giving you that coveted snap. A friend once tried skipping this step and ended up with flat, chewy disks that never achieved that perfect contrast.
Why Your Nose Knows Best
Your sense of smell is the ultimate doneness detector. When the butter starts to brown and you catch a faint caramel note, the cookies are nearly ready. Trust that nose cue more than the timer; ovens can vary by a few degrees. I’ve learned to pull the tray when the scent hits a sweet‑nutty threshold, and the results are consistently better.
The 5‑Minute Rest That Changes Everything
After the cookies come out of the oven, let them rest on the sheet for exactly five minutes before moving them to a rack. This short rest lets the steam finish cooking the interior, ensuring a soft, gooey middle. Skipping this rest yields a crumbly texture that falls apart too quickly. Think of it as the cookie’s “cool‑down” period, much like a marathon runner stretching after a race.
Butter Temperature is Not a Guess
Softened butter should be pliable but not greasy. If you press it with a finger, it should leave an indentation that slowly springs back. Too warm and the cookies spread like oil; too cold and they stay thick and under‑baked. The perfect butter texture is the foundation of that ideal edge‑to‑center contrast.
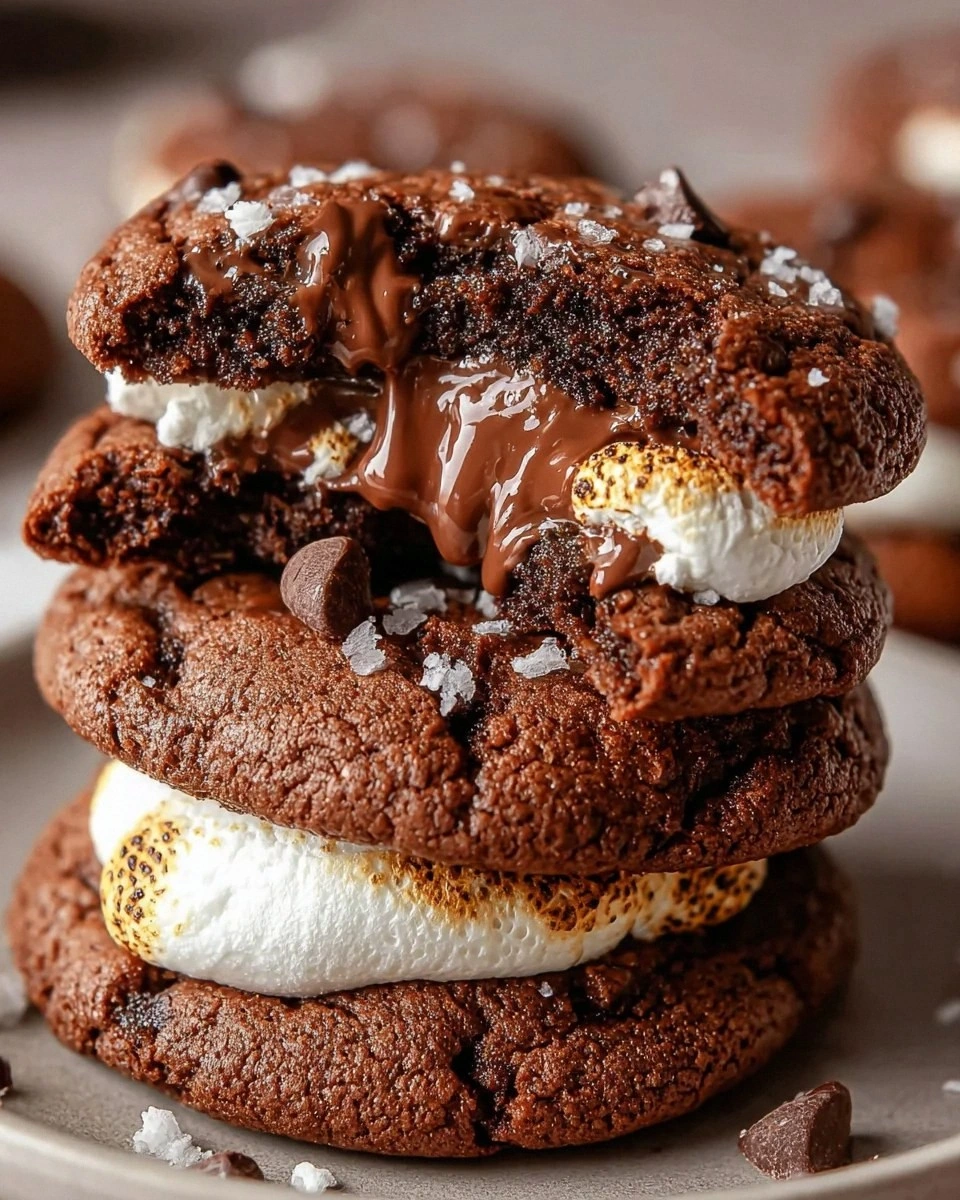
The “Double‑Bake” for Extra Crunch
If you love a crunchy cookie, let the baked cookies sit on the rack for an extra 5‑7 minutes after the initial cooling period. This second exposure to dry heat dries out the edges just enough to give you that satisfying snap without sacrificing the chewy core. It’s a tiny tweak that makes a huge difference, especially for those who love a bit of crunch.
Creative Twists and Variations
This recipe is a playground. Here are some of my favorite ways to switch things up:
Salted Caramel Swirl
Fold in ¼ cup of caramel sauce and sprinkle a pinch of flaky sea salt on top before baking. The caramel creates pockets of gooey sweetness, while the salt amplifies the flavor. Perfect for anyone who can’t get enough of that sweet‑salty combo.
Espresso‑Infused Delight
Add 1 tablespoon of finely ground espresso powder to the dry ingredients and swap half the chocolate chips for dark chocolate. The coffee deepens the chocolate flavor, turning the cookie into a sophisticated treat that pairs beautifully with milk.
Nutty Banana Boost
Mash a ripe banana and blend it into the wet mixture, then add ½ cup of chopped toasted pecans. The banana adds natural sweetness and moisture, while the nuts provide a crunchy contrast. This variation is great for a brunch spread.
Oatmeal‑Chocolate Fusion
Replace ½ cup of flour with ½ cup rolled oats and add ½ cup of raisins. The oats give a hearty texture, and the raisins add bursts of chewiness. Ideal for a cozy, rustic feel.
White Chocolate & Raspberry
Swap the semi‑sweet chips for white chocolate chips and fold in ¼ cup of freeze‑dried raspberry pieces. The tart raspberry cuts through the sweetness, creating a bright, festive flavor perfect for summer picnics.
Storing and Bringing It Back to Life
Fridge Storage
If you plan to eat the cookies within a week, store them in an airtight container lined with a paper towel to absorb excess moisture. They’ll stay soft for up to 5 days, and the paper towel prevents sogginess. Keep the container in the fridge if your kitchen is warm, as cooler temperatures preserve the buttery texture.
Freezer Friendly
For long‑term storage, freeze the baked cookies (or the dough) in a single layer on a baking sheet, then transfer them to a zip‑top bag. They’ll keep for up to three months. When you’re ready to enjoy, let them thaw at room temperature for 10 minutes, then pop them in a 300°F oven for 5 minutes to refresh the crisp edges.
Best Reheating Method
To revive a day‑old cookie, place it on a microwave‑safe plate, sprinkle a tiny splash (about a teaspoon) of water on the plate (not the cookie), and microwave for 10‑12 seconds. The steam generated brings the interior back to that fresh‑out‑of‑the‑oven softness while the exterior regains its slight crunch.