I was standing in my kitchen at 2 a.m., half‑asleep, when the smoke alarm decided to join my midnight snack party. The culprit? A half‑cooked slab of pork that had decided to stage a rebellion on the stovetop. While I was frantically waving a towel like a flag of surrender, my mind drifted to that one craving that has haunted me since I was a teenager: the perfect combination of smoky pork, oozy mac & cheese, and a handheld that doesn’t fall apart. I dared myself to turn that chaotic moment into a culinary masterpiece, and what emerged was nothing short of a flavor bomb wrapped in a tortilla.
Picture this: the sizzling sound of a hot pan, the sweet, tangy perfume of barbecue sauce dancing with the buttery aroma of melted cheddar, and the comforting, buttery whisper of cooked macaroni as it slides into the mix. The kitchen feels like a concert hall where every ingredient gets its solo, and the only applause comes from the crackle of the tortilla as it hits the pan. The texture is a symphony—creamy, smoky, and with that satisfying bite of a perfectly crisped edge that shatters like thin ice under your teeth. If you’ve ever tried to capture that “everything‑but‑the‑kitchen‑sink” feeling in a single dish, you’ll know why this version makes my heart race.
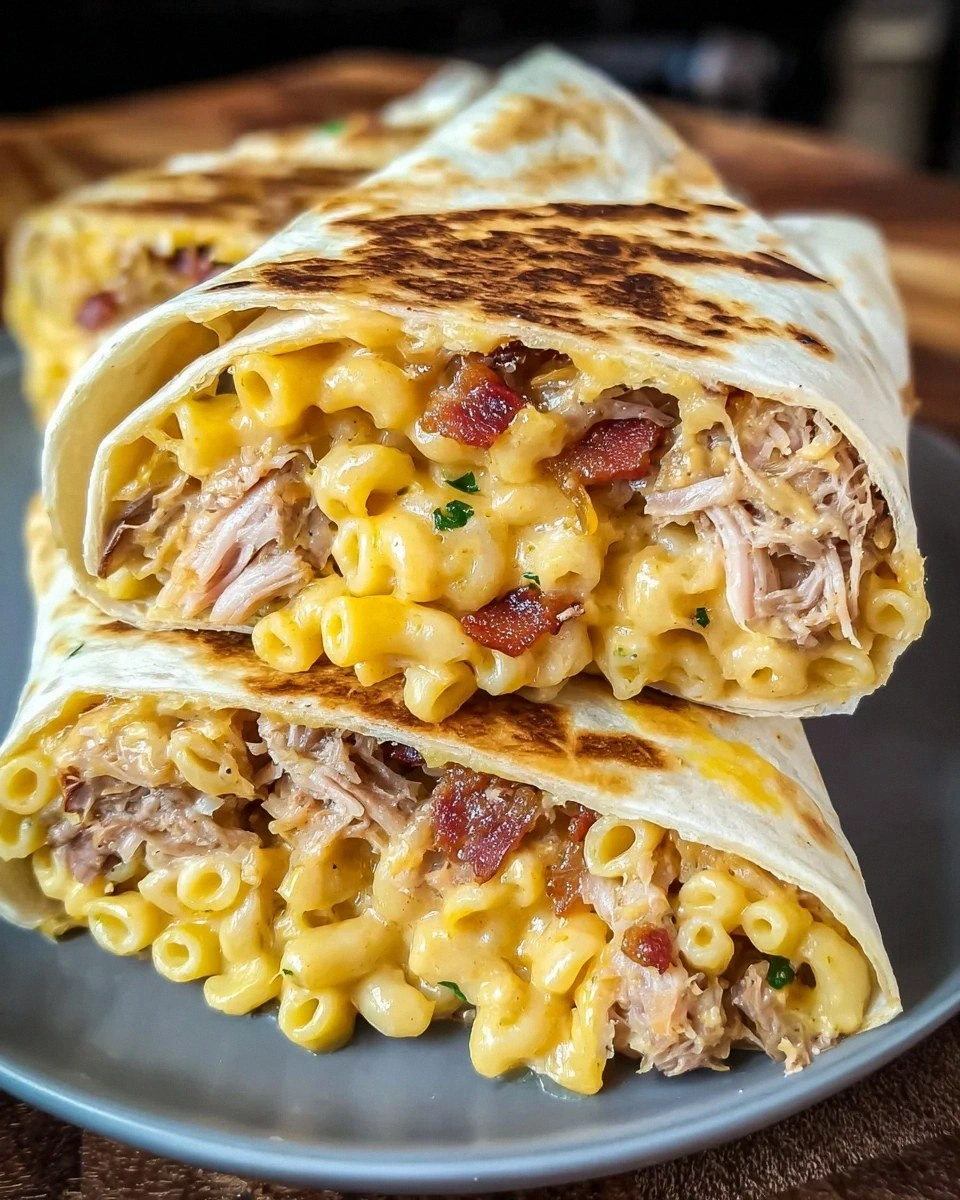
Most pulled‑pork mac & cheese recipes either drown the pork in sauce or drown the sauce in cheese, leaving you with a soggy mess that clings to the fork. I’ve seen people try to stuff the whole thing into a regular tortilla and end up with a sad, leaking pocket that looks more like a culinary crime scene. That’s why I tweaked the technique: I treat the tortilla like a sturdy, edible canvas, I layer the components in a strategic order, and I finish with a quick sear that locks everything in place. The result? A wrap that holds together like a well‑engineered sandwich, yet bursts open with each bite, delivering a flavor cascade that’s both familiar and wildly new.
Okay, ready for the game‑changer? I’m about to walk you through every single step—by the end, you’ll wonder how you ever made this dish any other way. I’ll reveal the secret ingredient that adds a buttery richness without stealing the spotlight, and I’ll share the exact temperature that gives you that golden, slightly crispy edge without burning the cheese. I dare you to taste this and not go back for seconds. Let’s dive in.
What Makes This Version Stand Out
- Flavor Fusion: The marriage of smoky barbecue sauce with the creamy, cheesy comfort of mac & cheese creates a taste that feels like a backyard cookout met a cozy movie night. Each bite delivers layers that unfold like a well‑written story.
- Texture Mastery: You get a crunchy tortilla exterior, a silky cheese‑laden interior, and tender pork that practically melts on your tongue. The contrast is so satisfying it makes your palate do a happy dance.
- Simplicity: Despite the gourmet vibe, the recipe uses pantry staples and a few fresh touches. No fancy equipment—just a skillet, a spatula, and a willingness to get a little messy.
- Uniqueness: Most people think of mac & cheese as a side dish, but here it’s the star of a handheld masterpiece. The wrap format makes it portable, perfect for picnics, game days, or a quick dinner after work.
- Crowd Reaction: I’ve served these at backyard barbecues and the line forms before the first wrap even hits the plate. It’s the kind of dish that sparks “What’s the secret?” conversations.
- Ingredient Quality: Using a good quality barbecue sauce and triple‑cheddar cheese elevates the whole experience. You’ll notice the difference the moment the sauce hits the pork.
- Cooking Method: The quick sear at the end creates a caramelized crust that locks in moisture. It’s the same principle that makes a perfect grilled cheese, but on a larger, more indulgent scale.
- Make‑Ahead Potential: The components can be pre‑cooked and stored, so on a busy night you simply assemble and sear. That means you can have a gourmet‑level dinner in under 20 minutes.
Inside the Ingredient List
The Flavor Base
Barbecue sauce is the heart‑beat of this wrap. Its smoky, sweet, and tangy profile coats the pulled pork like velvet, ensuring each bite is drenched in that classic backyard flavor. If you’re a purist, go for a Kansas City‑style sauce; if you like heat, add a dash of chipotle. Skipping the sauce is not an option—without it, the pork loses its mojo and the whole dish feels flat.
The Texture Crew
Shredded triple cheddar cheese brings the melt factor that turns ordinary mac & cheese into a gooey, stringy dream. Triple cheddar has a higher fat content, which means it stretches beautifully and creates that luxurious mouthfeel. If you’re out of triple cheddar, a blend of sharp cheddar and Monterey Jack works well, but you’ll miss a hint of buttery richness.
The Unexpected Star
Burrito‑sized tortillas are the unsung heroes. Their size lets you pack a generous amount of filling without the wrap feeling cramped. Choose whole‑wheat for a nutty flavor and extra fiber, or corn for a gluten‑free option that adds a subtle corn‑sweetness. If you use a flimsy tortilla, it will crack under the weight of the mac & cheese and pork—so invest in a quality brand.
The Final Flourish
Cooked macaroni and cheese is the creamy bridge that unites the smoky pork and the crisp tortilla. It adds a comforting, indulgent layer that makes the wrap feel like a hug in food form. Using a boxed mix works in a pinch, but a homemade béchamel with sharp cheddar will give you a richer, more complex flavor. Skipping the mac & cheese turns this into a plain pork wrap—still good, but you’ll miss the decadence.
Everything's prepped? Good. Let’s get into the real action…
The Method — Step by Step
First, heat a large skillet over medium‑high heat and add a splash of oil. When the oil shimmers, lay the tortillas flat and let them warm for about 15 seconds on each side, just until they’re pliable but not browned. This step is crucial because a cold tortilla will tear when you roll it, and a burnt tortilla will taste bitter. Keep an eye on them—once you see a few brown spots, they’re ready to move on.
While the tortillas are warming, combine the pulled pork with a generous glug of barbecue sauce in a bowl. Toss until every shred is glossy and coated, then set aside. I’m being honest—half of this mixture disappears before anyone else gets a chance to try it, because the scent is intoxicating. If you love extra heat, stir in a pinch of smoked paprika or a dash of hot sauce at this point.
Next, take your cooked macaroni and cheese and spread it onto the center of each warmed tortilla, creating a 3‑inch border around the edges. The cheese should be hot and stretchy; if it’s cooled down, give it a quick microwave zap (about 30 seconds) to bring back that silky texture. This layer acts as a glue, preventing the pork from slipping out when you roll the wrap.
Now, spoon a generous mound of the barbecue‑coated pork on top of the mac & cheese, then sprinkle a handful of shredded triple cheddar over the top. The cheddar will melt into the pork, creating pockets of molten gold that burst with each bite. Don’t be shy—this is where the flavor intensity skyrockets.
Carefully fold the sides of the tortilla inward, then roll it tightly from the bottom up, sealing the seam with a gentle press. The roll should feel firm but not overly compact; you want enough room for the fillings to expand slightly as they heat. If the tortilla refuses to stay closed, dab a little water on the seam and press again—that little moisture acts like edible glue.
Heat the same skillet (or a clean one) over medium heat and add a thin layer of butter or oil—just enough to coat the surface. Place the assembled wraps seam‑side down and press gently with a spatula. Let them cook for 3‑4 minutes, or until the bottom turns a deep golden brown and you hear a satisfying sizzle. This is the moment of truth: the crust should be crisp, the cheese inside bubbling, and the pork warming through.
Flip the wraps carefully and repeat the searing on the other side. As the second side browns, you’ll notice the cheese stretching and the aroma intensifying—a signal that the interior is perfectly melted. If you want extra caramelization, drizzle a tiny drizzle of honey over the top before the final flip; the sweet‑savory combo is pure magic.
Remove the wraps from the pan and let them rest for two minutes. This brief rest allows the cheese to set slightly, making slicing easier and preventing the filling from spilling out. Slice each wrap diagonally for a dramatic presentation, and garnish with a light drizzle of extra barbecue sauce and a sprinkle of fresh cilantro if you like a pop of color.
That’s it — you did it. But hold on, I’ve got a few more tricks that’ll take this to another level. Stay with me here — this is worth it.
Insider Tricks for Flawless Results
The Temperature Rule Nobody Follows
Most home cooks set the skillet to “medium” and hope for the best. The secret is to aim for a surface temperature of about 375°F (190°C). Use an infrared thermometer or the “hand hover” test: hold your hand about 6 inches above the pan; if you can keep it there for 2‑3 seconds, you’re in the sweet spot. This temperature creates a perfect Maillard reaction—those golden‑brown, flavor‑packed crusts that make the wraps unforgettable.
Why Your Nose Knows Best
Your sense of smell is a more reliable indicator than a timer when it comes to searing. When the butter starts to turn a light amber and you catch a nutty, toasted aroma, the wrap is ready to flip. If you rely solely on minutes, you risk either under‑cooking (sad, soggy interiors) or over‑cooking (bitter edges). Trust that nose—it's the original kitchen timer.
The 5‑Minute Rest That Changes Everything
After searing, let the wraps sit for exactly five minutes before cutting. This short rest lets the cheese re‑bind with the sauce and the pork juices redistribute. Skipping this step results in a mess that slides off the plate, and a friend once tried to serve them hot‑off‑the‑pan—let's just say the table looked like a cheesy battlefield.
Cheese Layering Secrets
Instead of mixing all the cheese into the mac & cheese, I recommend a two‑step approach: blend half into the pasta for creaminess, then sprinkle the rest on top of the pork before searing. This creates a double‑layered melt—one that’s silky inside and wonderfully stretchy on the surface. It’s the difference between “good” and “jaw‑dropping.”
Sauce Balance Hack
If your barbecue sauce is on the sweeter side, balance it with a splash of apple cider vinegar or a pinch of smoked paprika. The acidity cuts through the richness, while the smoke deepens the flavor profile. I once used a store‑bought sauce that was too sweet; a quick acid tweak saved the dish and turned it into a crowd‑pleaser.
Creative Twists and Variations
This recipe is a playground. Here are some of my favorite ways to switch things up:
Spicy Jalapeño Kick
Add thinly sliced jalapeños to the pork before rolling. The heat cuts through the richness, giving you a lively bite that’s perfect for those who love a little fire. Pair with a cooling ranch drizzle if you want a balanced finish.
Southern Fried Twist
Swap the skillet sear for a deep‑fried finish. Coat the assembled wraps in a light tempura batter and fry at 350°F until golden. The result is a crunchy, indulgent shell that makes the dish feel like a carnival treat.
Mediterranean Flair
Replace the barbecue sauce with a tangy tzatziki‑infused olive oil, and add crumbled feta and sliced Kalamata olives to the filling. The Mediterranean herbs and briny notes create a fresh, lighter version that’s perfect for summer picnics.
Breakfast Remix
Swap the pork for crumbled breakfast sausage, use a cheddar‑only mac & cheese, and top with a fried egg. The yolk becomes a silky sauce that melds everything together—an ultimate brunch indulgence.
Vegan Victory
Use shredded jackfruit cooked in barbecue sauce as a pork substitute, dairy‑free cheese, and a plant‑based mac & cheese made with cashew cream. The flavors stay true, and the texture remains satisfyingly meaty.
Storing and Bringing It Back to Life
Fridge Storage
Place any leftover wraps in an airtight container and store them in the refrigerator for up to three days. To keep the tortilla from getting soggy, wrap each one in parchment before sealing the container. When you’re ready to eat, reheat in a skillet over medium heat for 2‑3 minutes per side.
Freezer Friendly
Wrap each assembled, un‑seared tortilla tightly in plastic wrap, then place them in a freezer‑grade bag. They’ll keep for up to two months. To reheat, thaw overnight in the fridge, then follow the searing instructions—add a splash of water before the final minute to steam the interior back to creamy perfection.
Best Reheating Method
For the crispiest result, use a hot cast‑iron skillet: add a teaspoon of butter, place the wrap, and cover with a lid for one minute to melt the cheese, then uncover to crisp the tortilla. The added water trick (a tablespoon of water in the pan, quickly covered) creates steam that revives the mac & cheese without drying it out.