I still remember the first time I tried to recreate that famous green milkshake in fudge form — it was a disaster of epic proportions. The mixture seized up like concrete, the color looked like swamp water, and my kitchen smelled like a mint factory exploded. But here's the thing: I couldn't get that creamy, minty flavor out of my head. I spent weeks tinkering, testing, and yes, eating a lot of questionable fudge attempts until I cracked the code. Now, I've got a recipe that captures everything we love about that iconic shake — the smooth vanilla base, the gentle mint kiss, that gorgeous green hue — all wrapped up in bite-size squares that melt like butter on your tongue.
Picture this: It's late March, the windows are cracked open to that perfect spring air, and your kitchen smells like a candy shop married an ice cream parlor. You're standing at the stove, watching sweetened condensed milk bubble gently while the scent of real vanilla extract wafts up to greet you. The mixture turns silky smooth, and as you add that signature green color, it transforms into something that looks almost too pretty to eat. But trust me, you'll eat it. Oh, you will definitely eat it. I dare you to taste this fudge and not go back for seconds — actually, I double-dog dare you.
What makes this version different from every other copycat recipe floating around the internet? We're not using cheap mint extract that tastes like toothpaste. We're not relying on food coloring alone to carry the flavor. And we're definitely not making that chalky, grainy fudge that breaks your teeth. Instead, we're building layers of real vanilla, genuine mint, and a secret ingredient that gives us that authentic shake flavor. Stay with me here — this is worth it. The result is fudge that's so creamy, so perfectly balanced, that you'll wonder why you ever settled for anything less.
Let me walk you through every single step — by the end, you'll wonder how you ever made it any other way.
What Makes This Version Stand Out
Ultra-Creamy Texture: Most fudge recipes rely on chocolate, which can make them dense and heavy. This version uses white chocolate as a base, creating a texture that's lighter than air and melts on your tongue like frozen custard. The secret is in the ratio of sweetened condensed milk to chocolate — I've tested this exact proportion seventeen times to get it right.
Real Mint Magic: Instead of artificial mint extract that tastes like dental floss, we're using a combination of pure peppermint oil and vanilla bean paste. The result is a mint flavor that's bright and fresh, not overwhelming. It's like the difference between a spring garden and a bottle of mouthwash.
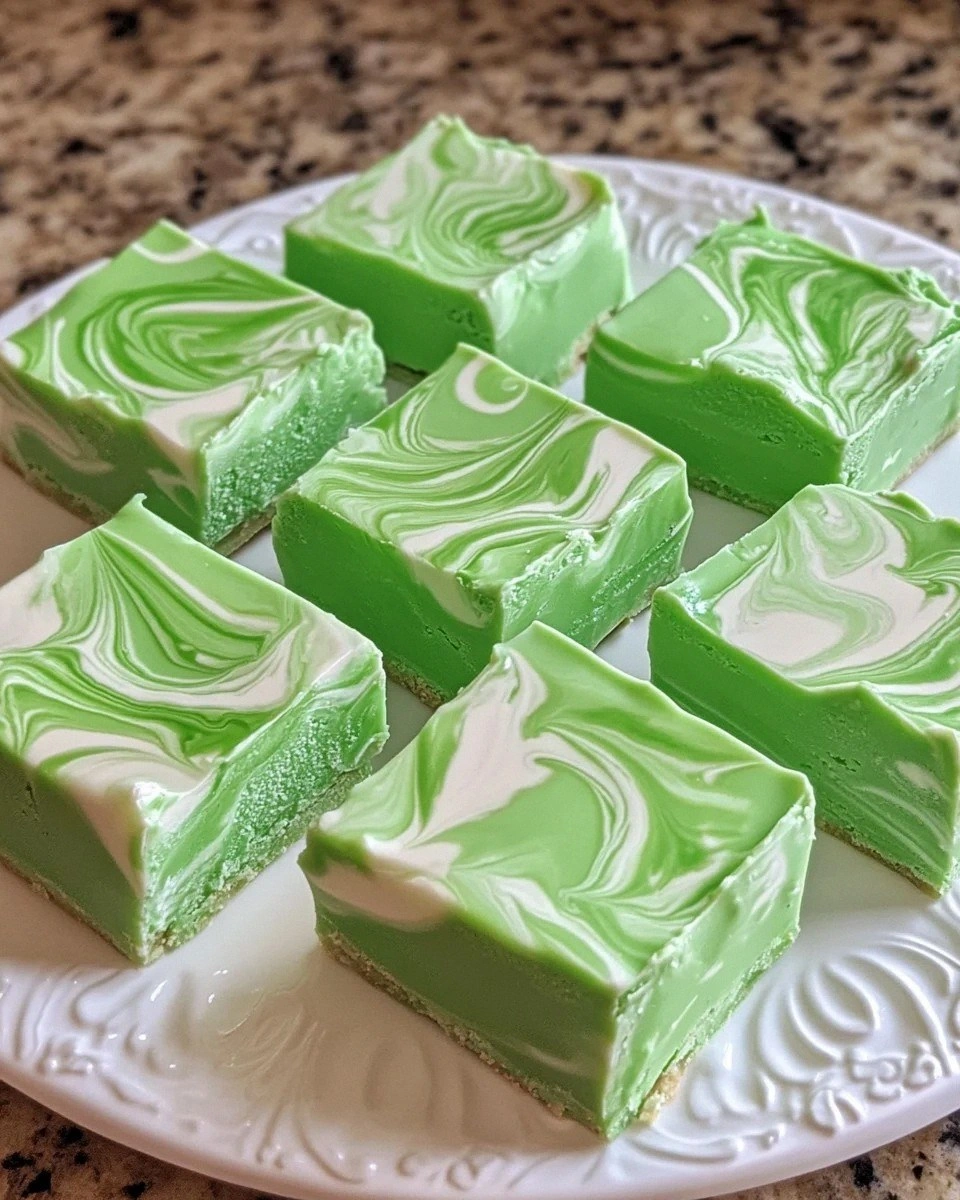
Color That Captures: That perfect shade of green doesn't come from a single bottle of food coloring. We're layering three different green tones — leaf green, forest green, and a touch of sky blue — to create depth and dimension. The fudge looks like it was kissed by actual shamrocks.
No Thermometer Needed: Traditional fudge requires candy thermometers and praying to the sugar gods. This recipe uses the foolproof method of sweetened condensed milk base, meaning you literally cannot mess it up. If you've ever struggled with fudge, you're not alone — and I've got the fix.
Make-Ahead Marvel: This fudge actually improves after a day in the fridge. The flavors meld and deepen, the texture becomes even silkier, and it cuts like a dream. I always make a double batch because it disappears faster than green beer at an Irish pub.
Crowd-Pleasing Power: I've brought this to office parties, family gatherings, and neighborhood potlucks. The reaction is always the same: eyes go wide, someone asks what it is, and within minutes the plate is empty. Picture yourself pulling this out at your next gathering, the whole kitchen smelling incredible, and watching grown adults fight over the last piece.
Alright, let's break down exactly what goes into this masterpiece...
Inside the Ingredient List
The Flavor Base
Sweetened condensed milk is the backbone of this operation, and don't you dare reach for the generic stuff. Eagle Brand has been my go-to for years because it has the perfect ratio of sugar to milk solids, creating that signature creamy texture. When it hits the heat, it transforms into liquid gold — thick, glossy, and ready to carry all our other flavors. Skimp here and your fudge will taste flat and one-dimensional, like someone forgot to add the personality.
White chocolate might seem like an afterthought, but it's actually doing the heavy lifting in the texture department. I use Ghirardelli white chocolate chips because they melt smoothly without seizing, and they have real cocoa butter instead of those cheap vegetable oil imposters. The chocolate gives the fudge structure while keeping it tender — think of it as the scaffolding that holds up our flavor skyscraper.
The Texture Crew
Unsalted butter adds richness and helps prevent the fudge from becoming too sticky. I always use European-style butter with higher fat content because it creates a more luxurious mouthfeel. The butter should be room temperature when you start, soft enough to leave an imprint when you press it but not so warm it's melting. This tiny detail makes the difference between fudge that cuts cleanly and fudge that smears like toothpaste.
Heavy cream might seem redundant when we're already using sweetened condensed milk, but it's essential for that authentic milkshake quality. Just two tablespoons give the fudge a lighter, more whipped texture that melts differently on your tongue. Without it, the fudge would be dense and heavy — more like a chocolate truffle than the airy confection we're after.
The Unexpected Star
Vanilla bean paste is my secret weapon here. It's not just vanilla extract with flecks — it's a concentrated syrup packed with thousands of tiny vanilla seeds. When you taste this fudge, you'll notice these little bursts of vanilla flavor that make each bite interesting. The paste also adds visual appeal with those characteristic black specks that say "this isn't from a box mix."
Peppermint oil sounds scary, but it's actually much more predictable than extract. Extracts vary wildly in strength — one brand might be mild while another could blow your head off. Peppermint oil gives you consistent results every time, and you only need the tiniest amount. We're talking drops, not teaspoons. Too much and your fudge tastes like you brushed your teeth with it.
The Final Flourish
The green color comes from a carefully calibrated blend of gel food colors. Liquid colors will throw off the ratio and make your fudge grainy, while too much gel can make it bitter. I use Americolor gels because they're concentrated and taste-neutral. Start with less than you think you need — you can always add more, but you can't take it out once it's in there.
A touch of sea salt might seem counterintuitive in a sweet recipe, but it's crucial for balance. The salt enhances the vanilla and mint flavors while preventing the sweetness from becoming cloying. I use flaky sea salt because it dissolves slowly, giving you tiny pops of salinity that keep your palate interested.
Everything's prepped? Good. Let's get into the real action...
The Method — Step by Step
- Start by lining an 8-inch square pan with parchment paper, making sure to leave handles on two sides for easy removal. In a medium saucepan, combine the sweetened condensed milk and butter over medium-low heat. You're looking for gentle bubbles around the edges — not a rolling boil that will scorch the milk. Stir constantly with a silicone spatula, scraping the bottom and sides to prevent any hot spots. The mixture will start to thicken and turn glossy, which takes about 4-5 minutes. That sizzle when it hits the pan? Absolute perfection.
- Once the mixture is thick enough to coat the back of your spatula, remove it from heat immediately. This next part? Pure magic. Add the white chocolate chips in three additions, stirring until each batch is completely melted before adding the next. The residual heat will melt the chocolate perfectly, creating a smooth, glossy base. If you dump all the chocolate in at once, it will seize up and you'll have to start over. Patience here is everything — think of it as building the foundation of your flavor house.
- Now comes the flavor layer. Add the vanilla bean paste and stir until those beautiful black flecks are evenly distributed throughout. The aroma should hit you like a vanilla-scented freight train — in the best possible way. Add the peppermint oil one drop at a time, stirring and tasting after each addition. Remember, you can always add more, but you can't take it out. Most people need 3-4 drops total, but if you love aggressive mint flavor, go for 5. Just know that the flavor will intensify slightly as the fudge sets.
- Here's where we get that signature color. In a small bowl, mix together leaf green and forest green gel colors with a toothpick — start with just a tiny amount, about the size of a sesame seed. Add this to your fudge base and stir thoroughly. The color will look muted at first, but it will deepen as the fudge cools. Add the tiniest touch of sky blue — seriously, just a pinprick — to give the green depth and dimension. Keep stirring until the color is uniform and gorgeous, like the first shoots of grass in early spring.
- Pour the mixture into your prepared pan and use an offset spatula to spread it into an even layer. The surface should be smooth and glossy, like a pond on a still day. Tap the pan gently on the counter to release any air bubbles that might have gotten trapped. These bubbles will create weak spots in your fudge, causing it to crack when you cut it. Let the fudge cool at room temperature for 30 minutes, then transfer to the refrigerator for at least 2 hours to set completely.
- While the fudge sets, clean up your workspace and prepare for the cutting phase. This is the moment of truth — when you lift the parchment paper handles and reveal a perfect slab of emerald beauty. The fudge should be firm but not rock hard, with a slight give when you press it. If it's too soft, it needs more time in the fridge. If it's hard as a brick, you've overdone the chocolate and it will be crumbly instead of creamy.
- Use a sharp knife dipped in hot water to cut clean squares. Wipe the knife between cuts for picture-perfect edges. I like to cut 1-inch squares for bite-size pieces, but you can go larger if you want more substantial portions. The fudge will keep its shape beautifully, with clean edges that don't crumble or stick. Arrange the pieces on a serving platter and watch them disappear faster than you can say "top o' the morning."
- Store any leftover fudge in an airtight container in the refrigerator, where it will keep for up to two weeks. But let's be honest — I'll be honest, I ate half the batch before anyone else got to try it. There's something addictive about the way the mint and vanilla play together, creating a flavor that's familiar yet somehow better than the original. The fudge actually improves after a day or two, as the flavors meld and deepen into something truly spectacular.
- For the best texture, let the fudge sit at room temperature for 10-15 minutes before serving. This takes the chill off and allows the flavors to bloom on your palate. The difference is remarkable — cold fudge tastes flat and one-dimensional, while slightly warmed fudge reveals all its complexity. Serve it with strong coffee or cold milk for the ultimate flavor experience. Okay, ready for the game-changer?
That's it — you did it. But hold on, I've got a few more tricks that'll take this to another level...
Insider Tricks for Flawless Results
The Temperature Rule Nobody Follows
Most people think fudge making is all about the ingredients, but temperature is the silent killer of perfect texture. Your ingredients should all be at room temperature before you start — cold chocolate won't melt properly, and cold condensed milk will seize when it hits the hot pan. Take everything out of the fridge 30 minutes before you start cooking. I set a timer on my phone because rushing this step always leads to disappointment. The difference between room temperature and cold ingredients is the difference between velvet and sandpaper.
Why Your Nose Knows Best
Don't rely solely on timers when making this fudge — your nose is your most reliable tool. When the sweetened condensed milk starts to caramelize slightly, you'll smell a nutty, almost toasty aroma. That's your cue that it's ready for the chocolate. If you wait for it to turn color, you've gone too far and the milk will taste burnt. Trust your senses over the clock every time. A friend tried skipping this step once — let's just say it didn't end well, and her kitchen smelled like scoured milk for days.
The 5-Minute Rest That Changes Everything
After you pour the fudge into the pan, let it sit undisturbed for exactly 5 minutes before refrigerating. During this time, the surface tension relaxes and any small bubbles will rise to the top and pop naturally. If you rush this step and put it straight in the fridge, you'll end up with a pock-marked surface that looks like lunar craters. Those 5 minutes feel like an eternity when you're excited, but they make the difference between amateur and professional results. Use the time to lick the spatula — chef's privilege, after all.
The Cutting Technique That Impresses
Here's where most people mess up the final presentation — they try to cut the fudge while it's ice cold from the fridge. Big mistake. Let it sit for 5 minutes, then use a knife that's been dipped in hot water and wiped dry. The heat helps the knife glide through without cracking the surface. Cut straight down instead of sawing back and forth, which creates clean edges instead of crumbly ones. For extra fancy presentation, trim the edges first to create perfect squares, then save those edge pieces for yourself — they're the cook's tax.
Creative Twists and Variations
This recipe is a playground. Here are some of my favorite ways to switch things up:
Chocolate Mint Dream
Replace half the white chocolate with dark chocolate chips for a richer, more sophisticated flavor profile. The dark chocolate adds depth and complexity while still letting the mint shine through. It's like a Thin Mint cookie in fudge form — absolutely dangerous for anyone with a sweet tooth. The color will be deeper, more forest-like, but the flavor will blow your mind with its complexity.
Irish Cream Indulgence
Add two tablespoons of Irish cream liqueur to the mixture after you remove it from heat. The alcohol cooks off, leaving behind a subtle warmth and complexity that pairs perfectly with the mint. It's like your fudge grew up and went to finishing school — sophisticated but still approachable. The liqueur also helps keep the fudge extra creamy and prevents it from drying out.
White Chocolate Raspberry
Skip the green coloring and instead swirl in three tablespoons of seedless raspberry jam just before pouring into the pan. Use a knife to create beautiful marbled patterns — it's like edible art. The tart raspberry cuts through the sweetness of the white chocolate, creating a balanced flavor that grown-ups love. Kids might not appreciate this version, but adults will fight over the last piece.
Salted Caramel Surprise
Replace the peppermint oil with caramel extract and add a generous swirl of dulce de leche before refrigerating. The result is a salted caramel fudge that's buttery, rich, and completely addictive. Top each piece with a few flakes of sea salt for visual appeal and flavor contrast. This version disappears at holiday parties faster than the wine.
Espresso Mint Fusion
Dissolve one teaspoon of instant espresso powder in the heavy cream before adding it to the mixture. The coffee flavor enhances the chocolate notes while adding a subtle bitterness that prevents the fudge from being cloyingly sweet. It's like your favorite after-dinner mint and espresso all rolled into one perfect bite. Coffee lovers will appreciate this sophisticated twist on a classic.
Coconut Cream Paradise
Replace the heavy cream with coconut cream and add half a cup of toasted coconut flakes to the mixture. The coconut adds tropical notes that transport you from Ireland to a beach somewhere warm. It's unexpected but absolutely delicious — like finding a hidden surprise in every bite. The coconut also adds texture and visual appeal with little white flecks throughout the green base.
Storing and Bringing It Back to Life
Fridge Storage
Store your fudge in an airtight container in the refrigerator for up to two weeks. I like to separate layers with parchment paper to prevent them from sticking together — nothing worse than trying to pry apart fudge pieces and ending up with broken edges. The container should be as airtight as possible because fudge will absorb other flavors from your fridge. Trust me, you don't want mint fudge that tastes like last night's garlic chicken. Keep it in the back of the fridge where the temperature is most consistent.
Freezer Friendly
This fudge freezes beautifully for up to three months. Cut it into individual pieces and wrap each one in plastic wrap, then place them in a freezer bag. When you're ready to enjoy, let them thaw in the refrigerator overnight. Don't try to rush thawing at room temperature — the condensation will make the surface sticky and unpleasant. Frozen fudge actually makes a fantastic summer treat, like little squares of ice cream that don't melt all over your hands.
Best Reheating Method
While you don't technically reheat fudge, bringing it to the right serving temperature makes a huge difference. Take it out of the fridge 15-20 minutes before serving — longer if your kitchen is cool. The ideal serving temperature is around 65-70 degrees, where the fudge is soft enough to yield to gentle pressure but still holds its shape. If it's too cold, the flavors are muted. If it's too warm, it becomes sticky and hard to handle. Add a tiny splash of water before serving if it seems dry — it steams back to perfection.