I was halfway through a chaotic Sunday brunch, juggling a simmering pot of scrambled eggs, a pot of over‑seasoned sautéed greens, and a stack of toast that was turning brown faster than my patience. In the middle of that culinary chaos, a friend texted, “Dude, I just made the most insane lemon tarts—tiny, bright, and the meringue was so light it almost melted in your mouth. You have to try it.” I laughed, but the craving was real. I was already craving something bright, zesty, and utterly indulgent. The moment I pulled the recipe from a random blog, I thought, “Why would I ever make lemon tarts the old way again?”
Picture this: you’re in a kitchen that smells like freshly baked dough, the bright citrus aroma cutting through the buttery scent of a shortcrust crust. You see the golden edges of the tart shells just starting to brown, hear the gentle hiss of meringue as it rises, feel the smooth, silky lemon curd sliding off a spoon, and taste that perfect balance of tartness and sweetness that lingers on your tongue. That is the sensory symphony this recipe delivers, and it’s not just about the ingredients—it's about the technique that turns each bite into a moment of pure joy.
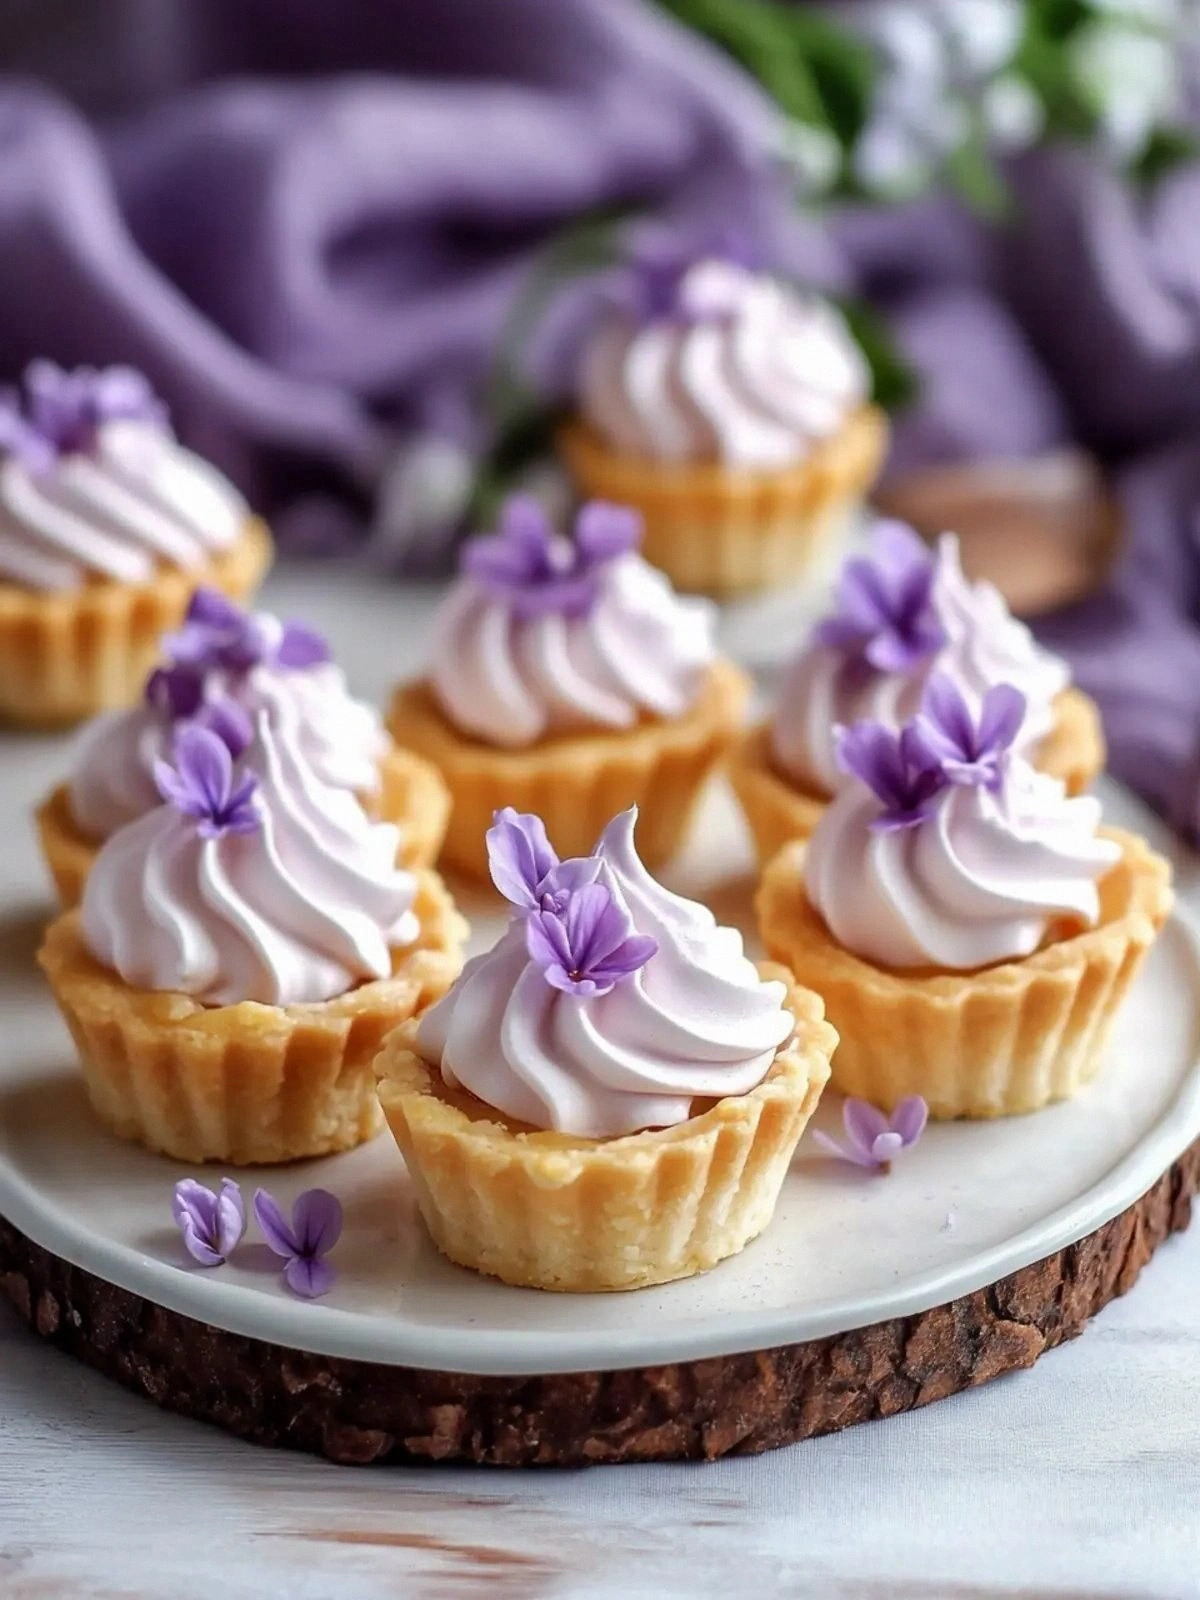
What makes this version stand out is not just the lilac‑colored meringue, but the way the crust is baked to a crisp, the curd is silky without being overly sweet, and the mint garnish adds a fresh contrast that elevates the entire experience. I dare you to taste this and not go back for seconds. This is hands down the best version you'll ever make at home. I’ll be honest—after I finished the first batch, I ate half of it before anyone else even got a chance to try it. The rest of the kitchen smelled like citrus, vanilla, and a hint of floral sweetness that made everyone’s mouths water.
Most recipes get this completely wrong. They either bake the crust too soft, overcook the meringue, or leave the lemon curd too watery. Here’s what actually works. Picture yourself pulling this out of the oven, the whole kitchen smelling incredible, the meringue a pale, glossy dome that looks like a cloud. That’s the moment you’ll be proud of. Okay, ready for the game‑changer? Let me walk you through every single step—by the end, you'll wonder how you ever made it any other way.
What Makes This Version Stand Out
- Crust: A buttery shortcrust that turns golden and crisp in the first 10 minutes, giving a satisfying crunch that contrasts the silky filling.
- Curd: The lemon curd is thickened with egg yolks and a touch of vanilla, creating a velvety texture that coats the tongue without being cloyingly sweet.
- Meringue: Light as air, the meringue is folded with a few drops of lilac food coloring, giving a playful pop of color that makes each tart look like a tiny edible flower.
- Mint Garnish: Fresh mint leaves add a crisp, herbal finish that balances the citrusy sweetness, making the overall flavor profile complex and refreshing.
- Make‑ahead Potential: The tarts can be assembled up to the meringue stage and stored in the fridge, then baked just before serving, saving you time on busy evenings.
- Visual Appeal: The lilac hue and delicate meringue dome create a dessert that is as stunning to look at as it is to eat—perfect for impressing guests or for a quiet indulgence.
- Ingredient Quality: Using fresh lemons, high‑quality butter, and real vanilla extract elevates the flavor profile beyond a typical store‑bought pastry.
- Flavor Balance: The subtle sweetness of the meringue, the bright tartness of the lemon, and the herbal mint create a harmonious trio that satisfies without overwhelming.
Alright, let's break down exactly what goes into this masterpiece...
Inside the Ingredient List
The Flavor Base
All‑purpose flour (1 cup) is the backbone of our crust, providing structure. It’s not just a filler; the gluten it forms gives the crust a tender yet sturdy bite. Skipping it would result in a crumbly, doughy texture that won’t hold the filling. If you’re looking for a lighter crust, try substituting half the flour with almond flour for a subtle nutty note.
The Texture Crew
Unsalted butter (½ cup) melts into the flour to create a flaky, buttery base. Butter’s high fat content is essential for that melt‑in‑your‑mouth feel. If you’re vegan, coconut oil can mimic the buttery flavor, but be aware it will slightly alter the texture. A pinch of salt (¼ tsp) balances the sweetness and enhances the buttery flavor.
The Unexpected Star
Fresh lemon juice (½ cup) is the star that gives the tarts their zesty punch. It’s the real reason these tarts sing. Use freshly squeezed juice for the best flavor; bottled juice can taste flat. If you’re out of lemons, a splash of lemon‑infused vinegar can act as a substitute, but it won’t have the same bright aroma.
The Final Flourish
Fresh mint leaves (12 leaves) add a subtle herbal note that cuts through the sweetness. They also provide a visual pop of green that balances the lilac meringue. If you’re not a fan of mint, a few basil leaves can work as an alternative, but the flavor profile will shift slightly.
Everything’s prepped? Good. Let’s get into the real action...
The Method — Step by Step
- Preheat the oven to 375°F (190°C). While the oven warms, line a mini tart pan with parchment paper. The parchment ensures the shells lift easily after baking. This is the moment you’ll hear the first crackle of butter as it melts into the flour—an audible cue that the base is forming.
- Combine flour, powdered sugar, and salt. In a large mixing bowl, sift the flour with powdered sugar and salt. Sifting eliminates lumps, giving the crust a fine texture. Use a whisk to ensure even distribution—think of it as preparing a fine, silky base.
- Cut in the cold butter. Using a pastry cutter or your fingers, cut the cold butter into small cubes and rub it into the dry ingredients until the mixture resembles coarse crumbs. The butter’s coldness preserves the flaky layers. If the mixture looks too dry, add a teaspoon of cold water to bring it together.
- Press the dough into the tart cups. Gently press the dough into each cup, ensuring the crust reaches the edges and is about 1/2 inch thick. Use the back of a spoon to smooth the surface. Don’t overwork the dough—overworking can make the crust tough.
- Bake the crusts. Place the pan in the oven and bake for 10 minutes, or until the edges are lightly golden. Remove from the oven and let cool on a wire rack. The crust should feel firm yet still slightly springy.
- Make the lemon curd. In a saucepan, whisk together 1 egg yolk, ½ cup granulated sugar, ½ cup lemon juice, 1 tbsp lemon zest, and 1 tsp vanilla extract. Cook over medium heat, stirring constantly, until the mixture thickens and coats the back of a spoon. This should take about 5-7 minutes. Keep the heat low to avoid scrambling the egg. The curd should be thick enough to hold its shape but still silky.
- Cool the curd. Remove the saucepan from heat and pour the curd into a bowl. Let it cool for a few minutes, then stir in the 2 large eggs, one at a time, whisking vigorously after each addition. The eggs will act as a stabilizer, ensuring the curd holds its texture.
- Fill the crusts. Spoon the cooled curd into each mini tart shell, filling them almost to the top. The curd should be glossy and slightly runny—just enough to slide off a spoon. This step is where the flavor truly comes alive; the citrus aroma will fill the kitchen.
- Make the lilac meringue. In a clean, dry bowl, whisk the 2 egg whites until frothy. Gradually add ½ cup granulated sugar, whisking until stiff peaks form. The meringue should be glossy and hold its shape. Add a few drops of lilac food coloring and fold gently—be careful not to deflate the meringue.
- Top the tarts. Spoon the lilac meringue over the curd, creating a dome. Use a spoon or a piping bag with a small tip for a neat finish. The meringue should sit on top like a delicate cloud. This is the moment of truth—watch the meringue rise slightly as it cools.
- Bake the tarts. Return the pan to the oven and bake for an additional 10-12 minutes, or until the meringue is golden brown on the edges. The oven should be at 375°F (190°C). The meringue’s color will be a subtle pinkish hue from the lilac, giving the tarts a whimsical look.
- Cool and garnish. Remove from oven and let the tarts cool completely on a rack. Once cool, gently press a fresh mint leaf into each tart for a fragrant garnish. The mint will release a burst of aroma as you bite into the tart, adding a refreshing contrast to the citrus.
That’s it—you did it. But hold on, I’ve got a few more tricks that will take this to another level.
Insider Tricks for Flawless Results
The Temperature Rule Nobody Follows
Many bakers think baking at a lower temperature will keep the meringue from browning. In reality, a steady 375°F (190°C) gives the meringue enough heat to set without over‑browning. If you’re worried about burning, you can tent the tops with foil after the first 5 minutes.
Why Your Nose Knows Best
Before you even taste the curd, sniff it. A bright citrus aroma signals that the lemon juice is fresh and the curd has the right balance. If it smells dull, the lemon might be old or the curd might be overcooked.
The 5‑Minute Rest That Changes Everything
After the tarts are baked, let them rest for 5 minutes before removing them from the pan. This short rest allows the meringue to set properly, preventing it from sliding off the tart when you lift it.
Use a Piping Bag for Precision
If you have a piping bag, use a small star tip to pipe the meringue. It gives a professional look and ensures an even dome. If you don’t have a bag, a spoon will do, but the shape might be less uniform.
Mint Leaves: Fresh vs. Dried
Fresh mint leaves are ideal because they release their oils when pressed into the tart. Dried mint can be used in a pinch, but it won’t give the same aromatic burst.
Creative Twists and Variations
This recipe is a playground. Here are some of my favorite ways to switch things up:
Orange‑Lemon Fusion
Swap half the lemon juice for fresh orange juice. The sweet, slightly bitter orange notes add a new layer of complexity that pairs beautifully with the lilac meringue.
Chocolate Lilac Meringue
Add a tablespoon of cocoa powder to the meringue mixture for a subtle chocolate undertone. The chocolate will deepen the lilac hue and give a richer flavor profile.
Herb‑Infused Curds
Stir in a teaspoon of chopped fresh basil or rosemary into the curd for an aromatic twist. The herbs will complement the mint garnish and create a sophisticated palate.
Almond Crunch
Sprinkle toasted almond slivers over the meringue before baking for a nutty crunch that contrasts the smoothness of the curd.
Ginger‑Spiced Tarts
Add a pinch of ground ginger to the curd for a warm, spicy kick. The ginger pairs surprisingly well with citrus, adding depth and warmth.
Gluten‑Free Version
Replace all-purpose flour with a gluten‑free blend that includes tapioca starch and xanthan gum. The crust will be slightly more delicate but still hold up well.
Storing and Bringing It Back to Life
Fridge Storage
Store the assembled tarts (without the meringue) in an airtight container in the fridge for up to 3 days. When ready to serve, re‑bake the meringue at 375°F (190°C) for 5 minutes to restore its crispness.
Freezer Friendly
Freeze the tarts (without the meringue) for up to 2 weeks. Thaw in the fridge overnight, then bake the meringue as described above. The texture remains crisp.
Best Reheating Method
To revive frozen or refrigerated tarts, preheat the oven to 350°F (175°C). Bake for 8–10 minutes, or until the meringue is golden. Add a splash of water to the base before reheating to keep the curd moist and prevent it from drying out.