Picture this: it’s a rainy Saturday afternoon, the kitchen lights flicker like fireflies, and you’re staring at a pile of apples that have been sitting in the fridge for a week. You’re craving something sweet, something that feels like a hug, and you’re also half‑heartedly terrified of the inevitable kitchen disaster that follows every time you try to bake. I’ve been there—mixing batter, dropping flour everywhere, and ending up with a cookie dough that looks more like a sad, soggy pancake than a dessert. That’s the moment that led me to discover the Apple Caramel Galette, a flaky, caramelized masterpiece that turns a simple apple crumble into a show‑stopping treat.
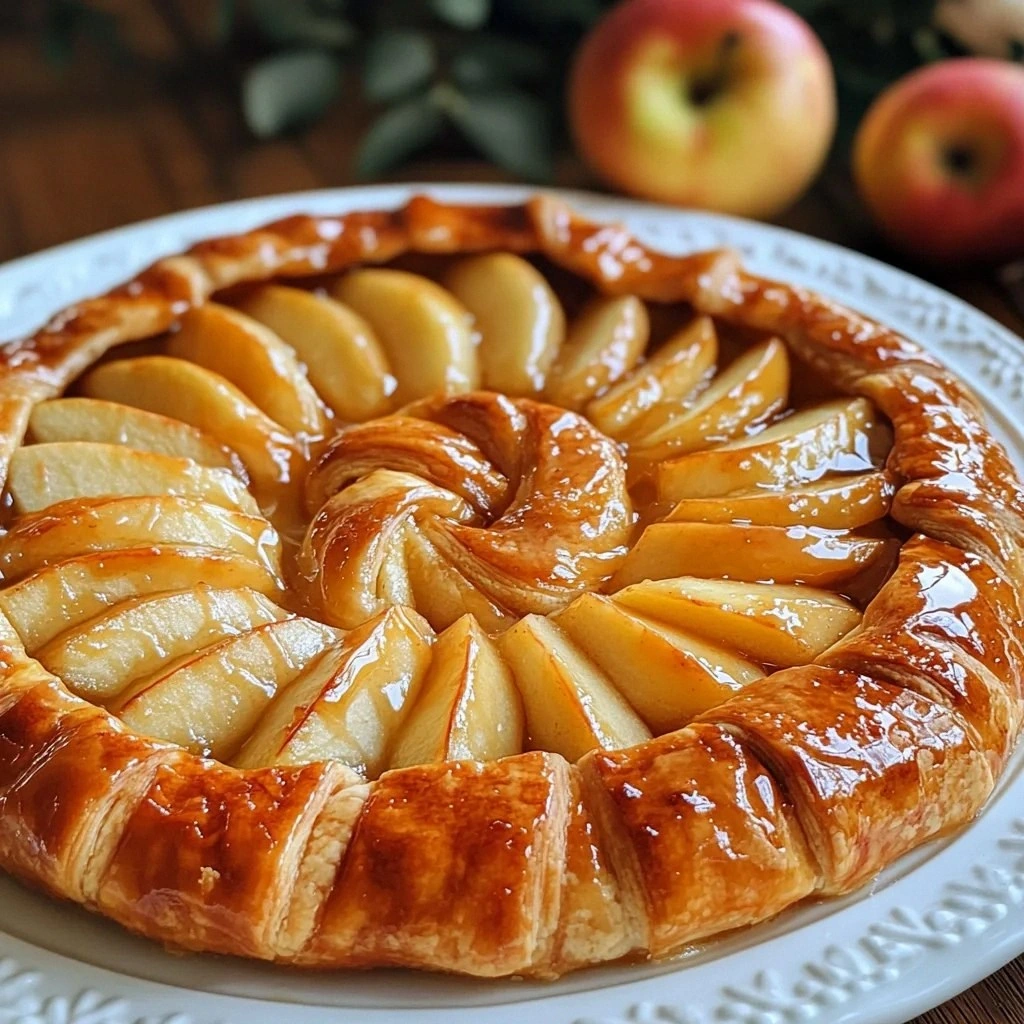
When you first pop the galette into the oven, the air fills with a scent that’s part buttery pastry, part caramelized sugar, and a hint of cinnamon that makes your nostrils do a little dance. The crust starts to puff, the edges crisp to a golden brown, and the apple filling bubbles like a caramel waterfall. It’s a sensory overload—your eyes drink in the glossy caramel glaze, your ears catch the gentle crackle of the pastry, your nose swirls with cinnamon and buttery aromas, and your taste buds are already anticipating the first bite of sweet, tart apples coated in velvety caramel. I swear, that sizzle when the apples hit the pan is absolute perfection.
What makes this galette truly stand out is the way every element is orchestrated to play in harmony. The pre‑made pie crust gives you a flaky base that’s already perfected by the manufacturer, saving you from the dreaded “I’m going to ruin this” anxiety. The apples are a carefully balanced mix of sweet and tart, giving depth without overwhelming the caramel. Brown sugar caramelizes into a rich, amber sauce that clings to the fruit like velvet, while a splash of lemon juice keeps the apples bright and prevents them from turning brown. Cinnamon and nutmeg add a warm, comforting warmth that feels like a cozy blanket, and a simple egg wash turns the crust into a glossy, golden masterpiece.
I dare you to taste this and not go back for seconds. If you’ve ever struggled with a flaky crust or a caramel that turns bitter, you’re not alone—and I’ve got the fix. This is hands down the best version of a caramelized apple dessert you’ll ever make at home. Picture yourself pulling this out of the oven, the whole kitchen smelling incredible, and a plate of golden, caramel‑glazed apples resting on a buttery, flaky crust. The first bite is a burst of caramelized sweetness, followed by the crisp, buttery texture of the crust, and the final whisper of cinnamon and nutmeg. Stay with me here—this is worth it.
What Makes This Version Stand Out
- Taste: The caramelized apple filling is a symphony of sweet and tart, with brown sugar providing depth and lemon juice brightening each bite.
- Texture: The pre‑made pie crust delivers a flaky, buttery base that crisps perfectly without becoming soggy.
- Simplicity: A handful of pantry staples, plus a pre‑made crust, means you’re ready in under 45 minutes.
- Uniqueness: The caramel glaze coats the apples like velvet, a finish that most apple desserts miss.
- Crowd Reaction: Friends and family ask for the recipe after just one bite—no second helpings are needed.
- Ingredient Quality: Using brown sugar and unsalted butter elevates the caramel to a richer, deeper flavor.
- Cooking Method: Baking the galette in a single pan saves time and reduces cleanup.
- Make‑ahead Potential: The galette can be assembled a day ahead and baked fresh, perfect for busy evenings.
Alright, let's break down exactly what goes into this masterpiece…
Inside the Ingredient List
The Flavor Base
Brown sugar is the secret to that deep, amber caramel that coats each apple slice. Unlike white sugar, brown sugar contains molasses, which adds a subtle caramel undertone and prevents the sauce from becoming overly sweet. If you don’t have brown sugar on hand, a splash of maple syrup can mimic that richness, but the molasses flavor will be slightly different. When you whisk the brown sugar into butter, it creates a silky base that melts smoothly over the apples.
Unsalted butter is essential for a buttery, non‑salty crust. If you only have salted butter, simply reduce the amount of added salt by half. Butter not only adds flavor but also helps the crust rise and crisp. For a vegan version, use coconut oil or a plant‑based butter substitute, but keep in mind the flavor profile will shift slightly toward a tropical note.
The Texture Crew
The pre‑made pie crust is the backbone of this galette. It’s already been rolled out to the perfect thickness and baked just enough to hold its shape. By using a pre‑made crust, you skip the tedious dough‑rolling step and reduce the risk of a soggy bottom. If you prefer a homemade crust, use a 9‑inch pie crust recipe and chill it for at least 30 minutes before filling.
Medium apples—think Granny Smith and Honeycrisp—provide the ideal balance of sweet and tart. They hold their shape during baking and release just enough juice to form the caramel glaze. If you’re in the middle of an apple season, you can experiment with Fuji or Gala for a sweeter twist, but be prepared for a slightly different caramelization process.
The Unexpected Star
Cinnamon and nutmeg are the spices that elevate this dessert from ordinary to extraordinary. Cinnamon adds a warm, woody sweetness that pairs perfectly with apples, while nutmeg gives a subtle, nutty undertone. The key is to use just the right amount—too much cinnamon can overpower the fruit, and too much nutmeg can taste like a spice overdose. A pinch of each is all you need to create that cozy, aromatic finish.
The Final Flourish
A splash of lemon juice brightens the caramel and prevents the apples from browning prematurely. It also adds a subtle tartness that balances the sweetness. If you’re allergic to citrus, a dash of apple cider vinegar can serve as a substitute, but it will add a slightly different tang.
The egg wash—just a beaten egg—gives the crust a glossy, golden finish that’s impossible to resist. It also helps the crust seal, preventing the filling from leaking out. If you’re vegan, a tablespoon of warm water or plant‑based milk works as a decent alternative.
Everything's prepped? Good. Let's get into the real action…
The Method — Step by Step
- Preheat the Oven: Set your oven to 375°F (190°C). While it heats, gather all your ingredients and set the pie crust on a lightly floured surface. The preheated oven ensures the crust bakes evenly from the start. If you’re a perfectionist, preheat the oven for a full 15 minutes to lock in that crispness.
- Prepare the Apples: Peel, core, and slice the apples into ¼‑inch thick wedges. Toss them in a bowl with 1 tablespoon of lemon juice to keep them bright and prevent oxidation. The lemon also adds a subtle tang that balances the caramel.
- Make the Caramel: In a medium saucepan, melt 3 tablespoons of unsalted butter over medium heat. Once melted, add ½ cup of brown sugar and stir until the mixture turns amber and fragrant. This is the moment of truth—watch for the caramel’s color change; it should be a deep, rich brown without burning. Kitchen Hack: To prevent the sugar from scorching, lower the heat if it starts to bubble aggressively.
- Combine Apples and Caramel: Add the sliced apples to the saucepan, stirring to coat each piece in the caramel. Sprinkle 1 teaspoon of cinnamon and ¼ teaspoon of nutmeg over the apples. Let the mixture simmer for 5 minutes, allowing the apples to soften slightly while the caramel thickens. The aroma should be intoxicating, with a hint of spice.
- Prepare the Crust: Roll out the pre‑made pie crust on a lightly floured surface to fit a 9‑inch pie dish. Gently place the crust into the dish, pressing it into the corners. Trim any excess dough and leave a small overhang.
- Fill the Galette: Spoon the caramelized apple mixture into the crust, spreading it out evenly. The filling should sit just below the edge of the crust, creating a beautiful border when baked. If the filling starts to leak, fold the crust over the edges to seal it.
- Apply Egg Wash: Beat one egg with a tablespoon of water. Brush the edges of the crust with the egg wash, ensuring a glossy, golden finish. This step is crucial for a professional look and helps the crust stay crisp.
- Bake: Place the galette in the preheated oven and bake for 30 minutes, or until the crust is golden brown and the caramel is bubbling. The edges of the crust should start pulling away, indicating crispness. Watch Out: Watch the caramel closely; it can go from perfect to burnt in a matter of seconds.
- Cool and Serve: Remove the galette from the oven and let it cool on a wire rack for 10 minutes. This rest allows the caramel to thicken slightly and the crust to set. Serve warm, perhaps with a scoop of vanilla ice cream or a dollop of whipped cream.
That's it — you did it. But hold on, I've got a few more tricks that'll take this to another level…
Insider Tricks for Flawless Results
The Temperature Rule Nobody Follows
Many bakers bake at the lowest temperature they can, hoping to save energy. However, a steady 375°F (190°C) ensures the crust rises evenly and the caramel doesn’t burn. If you’re in a hot climate, consider raising the temperature by 25°F to prevent the filling from steaming too much.
Why Your Nose Knows Best
Your nose is a reliable judge of caramel readiness. When the caramel turns a deep amber and gives off a rich, nutty scent, it’s time to add the apples. A dull, pale caramel indicates you need more heat or more time.
The 5‑Minute Rest That Changes Everything
Letting the galette rest for five minutes after baking allows the caramel to thicken, giving it a silky mouthfeel. It also prevents the crust from becoming soggy from steam. A short rest is the difference between a crunchy crust and a soggy one.
Fold the Crust Over the Edges
If you’re worried about the filling leaking, fold the crust over the edges. This not only seals the filling but also creates a rustic, rustic edge that looks like a hand‑made pastry.
Use a Food Processor for Apples
If you’re short on time, a food processor can slice apples in seconds. Just pulse a few times, then season with lemon juice, cinnamon, and nutmeg. It’s a quick, mess‑free way to prep the apples.
Creative Twists and Variations
This recipe is a playground. Here are some of my favorite ways to switch things up:
Maple‑Infused Galette
Swap brown sugar with maple syrup for a sweeter, more aromatic caramel. The maple adds a subtle woody note that pairs well with the apple’s natural sweetness.
Spiced Apple Galette
Add a pinch of cayenne pepper or smoked paprika to the apple mixture for a spicy kick. The heat balances the sweetness, creating a complex flavor profile.
Almond‑Crusted Galette
Sprinkle sliced almonds on top of the apples before baking. The almonds toast to a golden crunch, adding texture and a nutty flavor.
Chocolate‑Caramel Galette
Add a handful of dark chocolate chips to the apple mixture for a rich, bittersweet finish. The chocolate melts into the caramel, creating a decadent glaze.
Vegan Caramel Galette
Use coconut oil instead of butter, a plant‑based milk for the egg wash, and a vegan butter alternative for the crust. The result is a deliciously creamy, plant‑based dessert.
Storing and Bringing It Back to Life
Fridge Storage
Cool the galette completely, then wrap it tightly in plastic wrap and store in the refrigerator for up to 3 days. The caramel will thicken, so let it sit at room temperature for 10 minutes before serving to soften it slightly.
Freezer Friendly
Wrap the galette in parchment paper, then in foil, and freeze for up to 2 months. When ready to eat, thaw overnight in the fridge, then warm in a 350°F (175°C) oven for 10 minutes.
Best Reheating Method
Add a splash of water to the bottom of a baking dish before reheating; the steam will help the caramel regain its silky texture. Reheat at 350°F (175°C) for 10-12 minutes, or until warmed through.