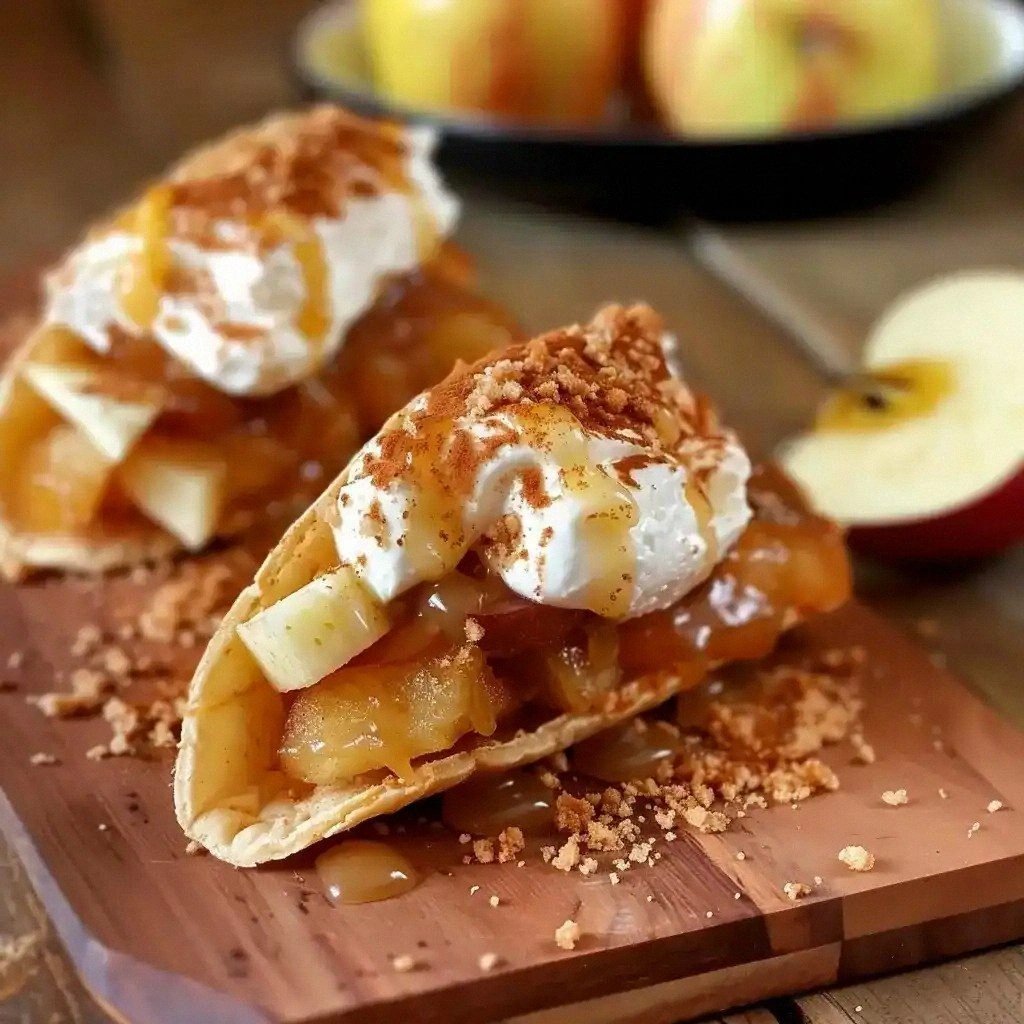
Picture this: a Saturday morning, the kitchen light flickering, a stack of flour tortillas on the counter, and the scent of cinnamon swirling through the air. I was in the middle of a frantic scramble to impress a group of friends with a dessert that could double as a snack, when I realized the classic apple pie was too heavy and the chocolate trifle too sweet. I pulled the tortillas from the fridge, tossed diced apples into a skillet, and the rest was pure, delicious alchemy. The moment the first crispy taco shell popped with a satisfying crack, I knew I had stumbled on a culinary revelation that would become the talk of every gathering.
I dare you to taste this and not go back for seconds. The first bite hits with a crunch that shatters like thin ice, followed by a creamy, velvety cheesecake layer that coats the palate like a soft blanket. The apples sing with a caramelized sweetness, while the cinnamon and nutmeg whisper a nostalgic warmth. The lemon juice adds a subtle brightness that cuts through the richness, creating a harmonious balance that feels both indulgent and surprisingly light. If you've ever struggled with desserts that feel too heavy for a brunch or too sweet for a main course, you're not alone—and I've got the fix.
What makes this version stand out is that it marries two worlds—taco and cheesecake—into a single bite that feels like a party in your mouth. The tortillas are not merely a vessel; they are the first flavor experience, offering a buttery, slightly charred edge that elevates the entire dish. The apples are not just sweet; they are caramelized to a depth that rivals a classic caramel sauce. The cheesecake filling is airy, thanks to the whipping cream, yet rich enough to satisfy the sweet tooth. The glaze—made from a simple sugar and cinnamon combo—adds a glossy finish that is both decorative and delectable. I’ve been told this is hands down the best version you'll ever make at home.
Most recipes get this completely wrong, either by overcooking the apples, under-seasoning the tortilla, or using a heavy, dense cheesecake that clogs the taco shell. Here’s what actually works: a quick sear of the tortilla for crispness, a slow caramelization of the apples, and a light, airy cheesecake that doesn’t overwhelm the shell. The result is a dish that feels like dessert, snack, and comfort food all at once. And if you’re wondering whether you can make this ahead, the answer is yes—just assemble and bake right before serving.
Stay with me here—this is worth it. Let me walk you through every single step—by the end, you'll wonder how you ever made it any other way. The process is simple, yet each step is a carefully orchestrated dance that brings out the best in every component. From the first sizzle on the skillet to the final drizzle of glaze, each moment is a chance to elevate the dish. If you’re ready to turn an ordinary kitchen into a stage for culinary theater, let’s dive in.
What Makes This Version Stand Out
- Crunch: The tortilla is toasted to a golden crisp, providing a satisfying bite that contrasts the creamy filling. The texture is essential; a soggy shell ruins the experience.
- Flavor Balance: Sweet, spicy, and tangy notes coexist without clashing. The lemon juice cuts through the richness, while cinnamon and nutmeg add depth.
- Lightness: The cheesecake uses whipping cream, keeping it airy and preventing it from overpowering the shell.
- Visual Appeal: The glossy glaze gives the tacos a polished look that’s Instagram‑ready, while the apple slices peek through like hidden gems.
- Make‑Ahead Friendly: Assemble the tacos and refrigerate; bake just before serving for a fresh, hot finish.
- Versatility: Works as a brunch dish, a sweet snack, or a crowd‑pleasing appetizer for parties.
- Ingredient Quality: Using fresh, high‑quality apples and cream cheese makes the difference between good and unforgettable.
- Time Efficiency: Prep takes 15 minutes, and the entire dish is ready in 45 minutes—perfect for a busy weekday.
Inside the Ingredient List
The Flavor Base
Granulated sugar, ground cinnamon, and lemon juice form the backbone of this dish. Sugar caramelizes the apples, cinnamon brings a warm aroma, and lemon juice adds a bright counterpoint to the sweetness. If you skip the lemon, the filling becomes cloying; the acidity is what keeps the flavors from becoming one-dimensional.
The Texture Crew
Flour tortillas, unsalted butter, and cornstarch work together to create the perfect shell. Butter melts into the tortilla, giving it a buttery crunch, while cornstarch thickens the apple sauce, ensuring it clings to the shell without dripping. A small pinch of salt is optional but enhances the overall taste profile.
The Unexpected Star
Cream cheese and heavy whipping cream are the secret to an airy cheesecake layer. Cream cheese provides richness, while whipping cream lightens the texture, preventing the filling from becoming too dense. This combination turns a classic cheesecake into a cloud‑like filling that melts in your mouth.
The Final Flourish
Brown sugar, ground nutmeg, and a splash of water are the finishing touches that elevate the dish. Brown sugar adds depth and a slight molasses note, nutmeg offers a subtle warmth, and water helps dissolve the sugar for a glossy glaze. Together, they create a glaze that coats the tacos like a fine, sweet varnish.
Everything's prepped? Good. Let's get into the real action...
The Method — Step by Step
- Preheat your oven to 375°F (190°C). While the oven warms, slice 4 cups of apples into thin wedges, removing any core. Toss the apple slices with ¼ cup granulated sugar, ¼ cup brown sugar, 1 teaspoon ground cinnamon, and ¼ teaspoon nutmeg. This mixture will caramelize into a sweet, fragrant filling that clings to the tortilla. The aroma will fill the kitchen like a warm hug.
- Heat a skillet over medium heat and melt 2 tablespoons of unsalted butter. Add the apple mixture and stir frequently. Cook until the apples are soft and the sugars have dissolved into a glossy sauce, about 10 minutes. Keep an eye on the mixture; if it starts to burn, lower the heat and stir.
- In a small bowl, whisk together 2 teaspoons cornstarch and 2 tablespoons water until smooth. Stir this slurry into the apple sauce. This step thickens the sauce so it stays on the tortilla and prevents a soggy shell. Let the mixture simmer for another 2 minutes until it reaches a jam-like consistency.
- While the apple sauce thickens, prepare the cheesecake filling. In a mixing bowl, beat 8 ounces of cream cheese until silky. Add ¼ cup granulated sugar and 1 teaspoon vanilla extract, then beat until the mixture is light and fluffy. Fold in 1 cup of heavy whipping cream until fully incorporated. The result should be a mousse‑like texture that will puff up slightly when baked.
- Lay out the 6 small flour tortillas on a clean surface. Spread a thin layer of the cheesecake filling onto each tortilla, leaving a small border around the edges. The cheesecake acts as the “cheese” component of the taco, giving a creamy contrast to the crisp shell.
- Spoon the caramelized apple sauce onto each tortilla, covering the cheesecake layer. The apples should be generous but not so much that the tortilla becomes soggy. The combination of sweet apples and creamy cheese will create a flavor explosion that’s hard to resist.
- Place the tacos on a parchment‑lined baking sheet. Bake in the preheated oven for 12–15 minutes, or until the tortillas are golden brown and the cheesecake filling is set. Watch the edges; they should pull away slightly from the tortilla, indicating that the filling has cooked through. This is the moment of truth.
- While the tacos are baking, prepare the glaze. In a small saucepan, combine 1 cup granulated sugar, 1 tablespoon ground cinnamon, and 1 tablespoon lemon juice. Heat over medium heat, stirring until the sugar dissolves completely. Let the mixture simmer until it thickens to a syrupy consistency, about 5 minutes. The glaze will give the tacos a shiny, sweet finish.
- Watch Out: Be careful not to overbake the tacos. Once the tortillas are golden, the filling should be firm but still slightly soft. Overbaking will cause the cheesecake to become rubbery and the apple sauce to dry out, ruining the texture.
- Remove the tacos from the oven and immediately drizzle the glaze over each one. The glaze will set into a glossy coating as the tacos cool. Serve warm, perhaps with a dusting of powdered sugar or a dollop of whipped cream for extra indulgence.
That's it — you did it. But hold on, I've got a few more tricks that'll take this to another level. The glaze can be flavored with a pinch of cayenne for a spicy kick, or you can add a splash of bourbon for a boozy twist. Remember to keep the tacos warm; a quick reheat in a 350°F oven for 5 minutes will revive the crispness if you’re serving later.
Insider Tricks for Flawless Results
The Temperature Rule Nobody Follows
Many people bake at a high temperature, but a moderate 375°F allows the tortilla to crisp evenly without burning. If you prefer a darker crust, bump the heat to 400°F for the last 2 minutes, but keep a close eye on the bake.
Why Your Nose Knows Best
The aroma of caramelizing apples is a clear indicator that the sugars are breaking down properly. If the smell is faint, let the apples cook a bit longer; if it’s too strong, reduce the heat.
The 5-Minute Rest That Changes Everything
After baking, let the tacos rest on the baking sheet for 5 minutes. This allows the filling to set fully, preventing a runny center when you cut into it. It also lets the glaze thicken slightly for a perfect shine.
The Right Butter Ratio
Using 2 tablespoons of butter in the apple sauce and another 2 tablespoons for the tortillas ensures a buttery flavor without making the dish greasy. If you’re watching calories, swap half the butter with olive oil.
The Perfect Apple Choice
Choose apples that hold their shape, like Honeycrisp or Fuji, to avoid a mushy filling. If you prefer a tart note, add a pinch of lemon zest to the apple mixture.
The Quick Chill Trick
If you’re making the tacos ahead, assemble them, cover with plastic wrap, and refrigerate for up to 2 hours before baking. The filling will stay firm, and the tortillas will maintain their crispness when baked.
Creative Twists and Variations
This recipe is a playground. Here are some of my favorite ways to switch things up:
Maple Bourbon Surprise
Swap the lemon juice in the glaze for a splash of bourbon and add a drizzle of maple syrup. The result is a boozy, caramelized glaze that pairs beautifully with the apple filling.
Chocolate Chip Crunch
Fold in a handful of chocolate chips into the cheesecake filling. The chocolate melts slightly during baking, creating pockets of gooey chocolate that contrast with the crisp tortilla.
Spiced Chai Edition
Replace the ground cinnamon and nutmeg with chai spice mix. The warm, aromatic spices give the dish an exotic twist, perfect for a cozy winter brunch.
Berry Burst
Add a cup of fresh blueberries or sliced strawberries to the apple mixture for a burst of tartness. The berries add color and a pop of juiciness that complements the creamy filling.
Almond Crumble Topping
Top each taco with a sprinkle of toasted almond crumbs before baking. The nuts add a nutty crunch and a subtle buttery flavor that pairs with the apple and cheesecake.
Vegan Version
Use coconut cream instead of heavy whipping cream and a plant‑based cream cheese. The texture stays airy, and the coconut adds a subtle tropical note that works well with the apples.
Storing and Bringing It Back to Life
Fridge Storage
Store assembled tacos in an airtight container in the refrigerator for up to 2 days. Keep them on a paper towel to absorb excess moisture. When ready to serve, reheat in a 350°F oven for 5 minutes to restore crispness.
Freezer Friendly
Freeze assembled tacos in a freezer‑safe bag for up to 1 month. Thaw overnight in the refrigerator, then bake at 375°F for 12 minutes. The tortilla will crisp up nicely, and the filling will remain creamy.
Best Reheating Method
The oven is the best method for reheating; it preserves the crunch and prevents sogginess. If you’re in a hurry, microwave on low power for 30 seconds, then transfer to the oven for 2 minutes to reheat evenly.
Add a tiny splash of water before reheating; it steams the filling back to perfection, keeping the cheesecake airy and preventing it from drying out. This simple trick ensures every bite is as fresh as the first.