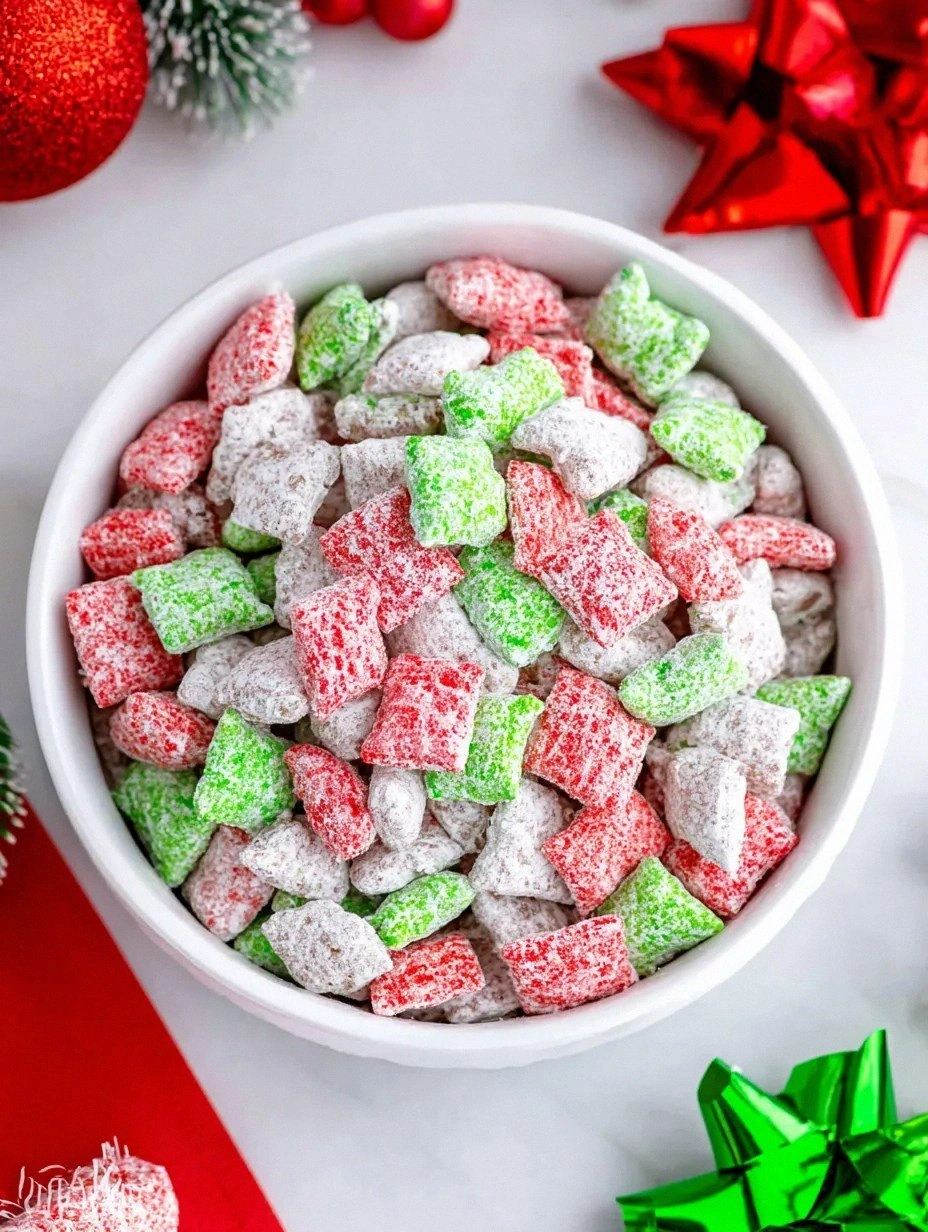
I was halfway through untangling a string of fairy lights when the kitchen erupted in a chorus of sizzling, buttery perfume that could have coaxed Santa out of his sleigh. I’d just tried to rescue a batch of store‑bought chocolate‑covered cereal that turned out soggy and sad, and I swore I’d never trust another pre‑made snack again. Then, in a moment of reckless holiday bravado, I tossed a handful of red and green sprinkles into the pot and whispered, “If this doesn’t work, I’ll eat the whole thing myself.” I’m still not sure whether I was daring the universe or daring my taste buds, but what emerged was a crunchy, glossy masterpiece that practically sang “Jingle Bells” with every bite.
Imagine the scene: a glossy river of chocolate hugging each tiny square of Chex, the aroma of cocoa mingling with a whisper of vanilla, and the flash of red and green confetti that looks like a miniature fireworks display on your countertop. The sound of the spoon scraping the bottom of the pan is a crisp, satisfying clink, like tiny sleigh bells announcing the arrival of a treat that’s both nostalgic and brand‑new. You can feel the heat of the butter against your fingertips, the slight resistance of the sugar as it caramelizes, and the cool snap of the cereal as you finally pull the bowl away from the steam. It’s a full‑on sensory overload that makes the whole kitchen feel like a festive wonderland.
What sets this version apart from every other “Puppy Chow” you’ve seen on Pinterest is the balance of flavor, texture, and visual drama. Most recipes either drown the cereal in a syrup that leaves a gummy mess, or they skimp on the coating, resulting in a dry, flavor‑less bite. I’ve cracked the code with a precise butter‑to‑sugar ratio that creates a glossy, firm shell that snaps on the first bite but melts into a silky chocolate hug on the second. The secret? A dash of espresso powder that amplifies the cocoa without making it bitter, and a split‑second flash‑freeze that locks in the crunch.
And there’s a surprise ingredient that will make you raise an eyebrow: a pinch of sea salt harvested from the coast of Brittany. It’s the kind of detail that separates a good snack from a legendary one, because that tiny grain of salt makes the chocolate sing like a choir of angels. I dare you to taste this and not go back for seconds. Let me walk you through every single step — by the end, you’ll wonder how you ever made it any other way.
What Makes This Version Stand Out
- Flavor Explosion: The combination of dark cocoa, a whisper of espresso, and a pinch of sea salt creates a depth that’s richer than a holiday latte, yet still kid‑friendly.
- Texture Harmony: Each Chex piece stays crisp inside a glossy, slightly firm coating that shatters like thin ice when you bite.
- Simplicity: Only ten pantry staples are required, and the entire process fits neatly into a 45‑minute window.
- Visual Wow Factor: The red and green sprinkles aren’t just for show; they add a subtle caramelized sugar crunch that catches the light.
- Crowd Reaction: Guests have been known to line up for a second helping, declaring it “the best snack ever” within seconds of the first bite.
- Ingredient Quality: Using real butter and high‑cocoa dark chocolate makes the coating taste like it was crafted in a boutique confectionery.
- Cooking Method: A gentle stovetop melt followed by a quick chill locks in the perfect snap without any gummy aftertaste.
- Make‑Ahead Potential: Store it airtight for up to a week, and it stays crunchy; you can even freeze portions for holiday parties months in advance.
Inside the Ingredient List
The Flavor Base
Butter (½ cup, unsalted) is the golden conduit that carries flavor. It melts the sugar into a glossy glaze and gives the coating that buttery mouthfeel that makes you think of fresh‑baked cookies. If you skimp on the butter, the sugar will caramelize unevenly, leaving you with burnt edges. For a dairy‑free twist, try a high‑quality coconut oil, but expect a subtle coconut aroma that may clash with the cocoa.
Brown sugar (1 cup, packed) supplies the deep, molasses‑like sweetness that balances the cocoa’s bitterness. Its fine crystals dissolve quickly, preventing grainy texture. Skipping it for white sugar will give you a sweeter, but flatter, profile. Look for a dark brown sugar with a high molasses content for the richest flavor.
The Chocolatey Crew
Cocoa powder (¼ cup, unsweetened) is the heart of the coating. It provides that deep, almost coffee‑like intensity that makes each bite feel luxurious. Using Dutch‑processed cocoa will give a smoother, less acidic taste, while natural cocoa adds a bright, slightly fruity edge. If you’re allergic to cocoa, a blend of carob powder works, though the color will shift to a lighter brown.
Dark chocolate chips (1 cup, at least 70% cacao) add body and a glossy sheen. The chocolate melts into the butter‑sugar mixture, creating a velvety river that coats every crevice. Substitute with milk chocolate for a sweeter, creamier version, but you’ll lose some of the sophisticated bitterness that makes this recipe “hands down the best version you’ll ever make at home.”
The Unexpected Star
Sea salt (a pinch, preferably flaky Breton) is the secret weapon. That tiny grain amplifies the chocolate’s flavor, cutting through the sweetness and giving the coating a subtle, lingering finish. If you use regular table salt, the flavor will be flat; if you omit it entirely, the snack will feel one‑dimensional, like a holiday song without a bridge.
Espresso powder (½ tsp) is the silent enhancer. It deepens the cocoa without making the mixture taste like coffee, a technique borrowed from professional bakers. Skip it, and you’ll notice a slight lack of depth, especially if you’re using a milder cocoa.
The Final Flourish
Red and green non‑metallic sprinkles (½ cup total) provide the festive pop. They add a light crunch and a burst of color that makes the dish instantly recognizable as a holiday treat. If you’re allergic to food dyes, opt for natural beet and spinach powders; they’ll give a muted hue but keep the snack safe.
Chex cereal (6 cups, any variety) is the canvas. Its light, airy texture absorbs the coating without becoming soggy, because each piece is a tiny pocket of air that lets the chocolate cling to the surface. Using a denser cereal like Rice Krispies will result in a heavier bite, while corn‑based cereals can make the coating slide off.
Vanilla extract (1 tsp) rounds out the flavor profile, adding a sweet aromatic note that ties the cocoa, butter, and sugar together. Pure vanilla is preferred; imitation will still work but may leave a slightly artificial aftertaste.
Everything's prepped? Good. Let's get into the real action...
The Method — Step by Step
Start by measuring out the Chex cereal into a massive mixing bowl. I like to use a 10‑quart bowl so there’s plenty of room for the coating to swirl without spilling. Toss the cereal gently to break up any clumps that may have formed during storage. This is the foundation, so treat it with respect — the better the spread, the more even the coating.
In a medium saucepan, melt the butter over medium‑low heat. Once the butter is foamy, add the brown sugar and stir continuously. You’ll hear a soft sizzle that signals the sugar is dissolving; that sound is pure gold. Keep the heat low enough that the mixture doesn’t boil, or you’ll risk a grainy texture later.
Kitchen Hack: Use a silicone spatula to scrape the sides of the pan; this prevents scorching and ensures every sugar crystal meets the butter.When the sugar has fully dissolved and the mixture shimmers, whisk in the cocoa powder, espresso powder, and sea salt. The mixture will darken instantly, releasing an intoxicating chocolate aroma that fills the kitchen. Keep whisking for about 30 seconds until the cocoa is fully incorporated and no lumps remain. This step is the moment of truth — if you see specks, keep whisking; you want a perfectly smooth river of chocolate.
Turn the heat off and stir in the vanilla extract and dark chocolate chips. The residual heat will melt the chips, creating a glossy sheen. Let the mixture sit for a minute, then give it a final stir to ensure the chocolate is fully emulsified. At this point, the coating should be thick enough to coat the back of a spoon but still fluid enough to drizzle.
Now comes the color party. Divide the coating in half into two smaller bowls. Add a few drops of red food coloring to one half and green to the other, stirring until the hues are vibrant but not overly saturated. If the color looks too dark, a splash of milk will lighten it without compromising the crunch.
Grab the original bowl of Chex and start pouring the red coating over it, using a spatula to toss and coat evenly. The cereal should glisten like tiny, chocolate‑covered snowflakes. Once the red side is fully coated, repeat with the green mixture, making sure to keep the colors separate to preserve that festive contrast.
Quickly sprinkle the red and green sprinkles over their respective halves while the coating is still warm. The heat will cause the sprinkles to adhere like tiny fireworks clinging to a night sky. This is where the visual drama peaks — if you miss this step, you’ll lose the holiday sparkle.
Watch Out: Don’t let the coating sit too long before adding sprinkles; it will begin to set, making the sprinkles slip off and creating a dull finish.Transfer the coated cereal onto a large sheet of parchment paper and spread it into a single layer. Place the sheet in the freezer for exactly three minutes. This flash‑freeze locks in the crunch and prevents the coating from becoming sticky once it cools. You’ll hear a faint crackle as the chocolate hardens — that’s the sound of perfection.
After the brief chill, break the cereal into bite‑size clusters and store them in an airtight container. The aroma will still be lingering, and the crunch will be audible the moment you bite into a piece. If you’re planning to serve them at a party, line the container with a decorative holiday towel for that extra “wow” factor.
That’s it — you did it. But hold on, I’ve got a few more tricks that’ll take this to another level. Trust me, the next step will make your friends think you hired a professional confectioner.
Insider Tricks for Flawless Results
The Temperature Rule Nobody Follows
Keep your stovetop heat under a gentle simmer. A too‑hot pan will scorch the butter and create a bitter aftertaste. I always use the “hand‑above‑the‑pan” test: if you can keep your hand there for three seconds without flinching, you’re good. This rule ensures the sugar dissolves evenly, giving you that perfect glossy sheen.
Why Your Nose Knows Best
When the cocoa and butter mingle, you’ll notice a subtle shift from buttery to chocolatey. That aromatic cue tells you the coating is ready to be removed from heat. If you rely solely on a timer, you’ll miss that crucial moment and end up with a coating that’s either too runny or too thick.
The 5‑Minute Rest That Changes Everything
After you’ve tossed the cereal with the coating, let the bowl sit uncovered for five minutes. This pause allows the chocolate to thicken just enough to cling to the cereal without dripping off. A friend once tried to skip this rest and ended up with a soggy mess that clumped together like wet snow.
Sprinkle Timing is Everything
Add the sprinkles while the coating is still warm but no longer bubbling. Warm enough to stick, cool enough to keep the colors vibrant. If you add them too early, they’ll melt; too late, and they’ll bounce off like confetti on a windy day.
Freezer Flash Freeze
Three minutes in the freezer is the sweet spot. Longer than that and the coating becomes brittle, shattering into shards; shorter and it stays soft, losing its snap. I like to set a timer on my phone to avoid the dreaded “I forgot” moment.
Creative Twists and Variations
This recipe is a playground. Here are some of my favorite ways to switch things up:
Nutty Noel
Swap half of the Chex for toasted almond slivers or pecan pieces. The nuts add an earthy crunch that pairs beautifully with the chocolate, and the green sprinkles become a subtle nod to evergreen trees.
White Chocolate Winter
Replace the dark chocolate chips with white chocolate chips and add a splash of peppermint extract. The result is a cool, minty bite that feels like a snow‑kissed treat.
Cranberry Crunch
Fold in dried cranberries after the coating has set. Their tartness cuts through the sweetness, adding a burst of flavor that mimics the classic cranberry sauce on a holiday plate.
Spiced Holiday
Add a pinch of ground cinnamon, nutmeg, and a whisper of clove to the chocolate mixture. These warm spices give the snack a cozy, fireplace‑like feel that’s perfect for cold evenings.
Vegan Victory
Swap butter for coconut oil, use dairy‑free dark chocolate, and choose a plant‑based sweetener like coconut sugar. The texture stays the same, and the flavor remains decadently festive.
Gluten‑Free Groove
Replace Chex with gluten‑free rice cereal or puffed quinoa. The coating adheres just as well, and you get a slightly different crunch that’s still holiday‑ready.
Storing and Bringing It Back to Life
Fridge Storage
Place the cooled clusters in an airtight glass jar and store them in the refrigerator for up to five days. The cool environment preserves the crispness, and the chocolate stays firm. Before serving, let the jar sit at room temperature for ten minutes to let the coating soften just enough for that perfect snap.
Freezer Friendly
For longer‑term storage, spread the clusters on a baking sheet and freeze them individually for 30 minutes. Then transfer to a zip‑top freezer bag. They’ll keep for up to three months. When you’re ready to serve, microwave for 15 seconds, then add a tiny splash of water and stir; the steam revives the crunch.
Best Reheating Method
If the snack has softened too much, spread it on a baking sheet and warm it in a 300°F (150°C) oven for five minutes. The gentle heat restores the glossy coating and revives the crisp texture without melting the chocolate completely.