I was standing in my kitchen on a blustery December evening, the kind of night where the wind howls like a choir of disgruntled elves, when my roommate dared me to bake a batch of cookies that would actually make Santa pause his sleigh for a second bite. I laughed, grabbed the nearest mixing bowl, and set out on a mission that would end with a tray of golden‑brown, coconut‑kissed wonders that practically sang “Jingle Bells” as they baked. The first attempt? A flat, crumbly disaster that tasted more like a soggy beach towel than a holiday treat. I swear, I could hear the cookies whispering, “We’re not ready for the spotlight yet.”
Fast forward a few weeks of trial, error, and a lot of midnight snack‑induced inspiration, and I finally cracked the code. Imagine biting into a cookie that’s as soft as a freshly fallen snowflake, yet chewy enough to give your teeth a satisfying stretch, all while the sweet aroma of toasted coconut swirls around you like a fragrant winter breeze. The secret? A delicate balance of butter, two types of coconut, and a splash of vanilla that makes the dough sing, plus a sprinkle of festive reds and greens that turn each bite into a tiny celebration. I dare you to taste this and not go back for seconds.
What truly sets this version apart from every other coconut cookie you’ve ever tried is the way the flavors layer. The shredded coconut provides a buttery sweetness, the unsweetened flakes add a subtle crunch, and the white chocolate chips melt into little pockets of caramel‑like bliss. Most recipes get the texture completely wrong—either too crisp or too dense. Here, the dough stays moist thanks to a precise butter‑to‑sugar ratio, and the baking soda gives just enough lift to keep the cookies soft without turning them into a flat pancake. This is hands down the best version you’ll ever make at home.
And there’s a twist you won’t see coming: a teaspoon of coconut extract that amplifies the tropical notes without overpowering the holiday vibe. It’s the culinary equivalent of adding a dash of glitter to a Christmas tree—subtle, but it makes everything sparkle. Picture yourself pulling this out of the oven, the whole kitchen smelling incredible, the golden edges just starting to pull away from the pan, and the soft centers still steaming with coconut perfume. Okay, ready for the game‑changer? Let me walk you through every single step — by the end, you’ll wonder how you ever made it any other way.
What Makes This Version Stand Out
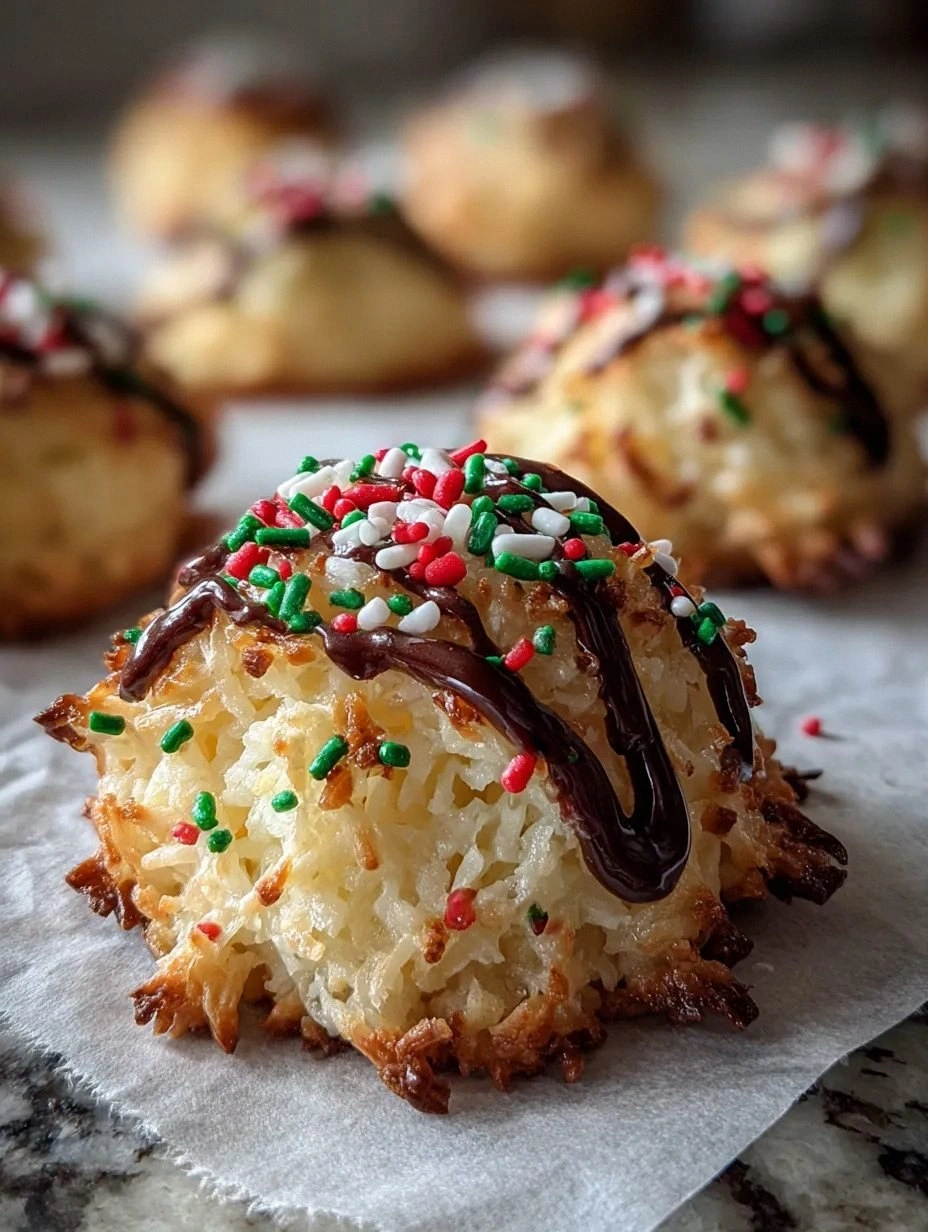
- Flavor Fusion: The combination of sweet shredded coconut and unsweetened flakes creates a layered coconut experience that’s both buttery and nutty, making each bite feel like a mini tropical holiday.
- Chewy Texture: The precise butter‑to‑sugar ratio, plus a touch of extra egg yolk, locks in moisture, giving the cookies that coveted soft‑chewy center that stretches just enough to satisfy.
- Simple Ingredients: No exotic pantry items—just pantry staples and a couple of festive sprinkles, meaning you can whip these up without a special trip to the specialty store.
- Visual Appeal: Red and green sprinkles are scattered throughout, turning each cookie into a tiny holiday ornament that looks as good as it tastes.
- Quick Prep: From start to oven, you’re looking at a total of 45 minutes, making it perfect for last‑minute holiday gatherings.
- Make‑Ahead Magic: The dough can be refrigerated for up to 48 hours, allowing you to prep ahead and bake fresh cookies whenever the mood strikes.
- Crowd‑Pleaser: Even the pickiest eaters love the sweet coconut aroma, and the white chocolate chips add a luxurious melt‑in‑your‑mouth surprise that keeps everyone reaching for more.
- Adaptable Base: The recipe tolerates swaps—gluten‑free flour, dairy‑free butter, or even a vegan egg substitute—without sacrificing that signature soft chew.
Inside the Ingredient List
The Flavor Base
All‑purpose flour is the backbone of any good cookie, providing structure while still allowing the dough to spread gently. Using a full‑cup measure (2 cups) ensures you have enough gluten development for that soft chew without turning the cookie into a dense biscuit. If you substitute with cake flour, expect a lighter crumb but risk losing some of that holiday‑season chewiness.
Unsalted butter, softened to room temperature, is the carrier of flavor. Its fat content coats the flour proteins, limiting gluten formation and keeping the cookie tender. I recommend using high‑quality European butter for a richer taste; the extra butterfat makes the dough silkier and the final cookie more buttery.
The Texture Crew
Shredded sweet coconut (1 cup) brings a moist, sugary bite that melts in your mouth, while unsweetened coconut flakes (½ cup) add a faint crunch that contrasts the chew. Skipping the unsweetened flakes will make the cookie feel one‑dimensional—no texture surprise.
White chocolate chips (1 cup) are the secret pockets of indulgence. They soften during baking, creating little caramel‑like islands that burst with sweet creaminess. If you’re allergic to dairy, dark chocolate chips are a solid alternative, though you’ll lose a bit of that holiday‑white sparkle.
The Unexpected Star
A teaspoon of coconut extract amplifies the coconut flavor without making it overpowering. It’s a tiny ingredient, but it turns a good cookie into an unforgettable one. If you don’t have coconut extract, a splash of rum or brandy can add a festive depth, but be mindful of the alcohol content if serving kids.
Red and green sprinkles (½ cup) are purely decorative, yet they add a subtle crunch and a burst of color that makes each cookie look like a miniature holiday ornament. Feel free to swap for crushed peppermint candy for an extra minty twist.
The Final Flourish
Baking soda (1 tsp) is the leavening agent that creates the gentle rise and the soft interior. Too much, and you’ll get a metallic aftertaste; too little, and the cookies stay dense. Pair it with the right amount of acidic sugar (brown and granulated) to get that perfect pH balance.
Brown sugar (¾ cup) contributes moisture and a subtle molasses flavor that deepens the overall sweetness, while granulated sugar (¼ cup) adds a crisp edge. The combination ensures you get both a tender center and a lightly caramelized exterior.
Everything's prepped? Good. Let's get into the real action...
The Method — Step by Step
Preheat your oven to 350°F (175°C) and line two baking sheets with parchment paper. While the oven warms, give the butter, brown sugar, and granulated sugar a good cream in a stand mixer on medium speed until the mixture looks pale and fluffy—this should take about 3 minutes. The sound of the whisk hitting the bowl is the first sign that magic is happening.
Add the egg and an extra yolk to the butter‑sugar mixture, then pour in the vanilla and coconut extracts. Beat until just combined; you’ll notice the batter thickening slightly, a sign that the emulsifiers are doing their job. This is the moment of truth—if you over‑mix, you’ll develop gluten and lose that coveted chew.
In a separate bowl, whisk together the flour, baking soda, and salt. Then gently fold the dry ingredients into the wet mixture using a spatula, being careful not to over‑work the dough. Watch Out: Over‑mixing at this stage can cause the cookies to become cakey instead of chewy.
Now stir in the shredded coconut, unsweetened flakes, white chocolate chips, and sprinkles. The dough should look speckled with bright colors and glossy from the butter. I dare you to pause and admire the swirl of whites and reds—your kitchen just turned into a holiday art studio.
Using a cookie scoop (about 2 tablespoons), drop rounded mounds onto the prepared sheets, spacing them about 2 inches apart. If you prefer uniform cookies, lightly wet your hands with water; this prevents the dough from sticking to your fingers.
Slide the trays into the middle rack of the oven. Bake for 10‑12 minutes, or until the edges are lightly golden and the tops have a faint sheen. The centers will still look soft—that’s exactly what you want.
Remove the cookies and let them cool on the sheet for 2 minutes before transferring to a wire rack. As they cool, the cookies will firm up just enough to hold their shape while staying delightfully chewy inside. That sizzle when they hit the pan? Absolute perfection.
Once completely cooled, store them in an airtight container with a slice of bread to maintain moisture. The bread absorbs excess dryness, keeping the cookies soft for days. And now the fun part—taste test! I’ll be honest — I ate half the batch before anyone else got to try it.
That's it — you did it. But hold on, I've got a few more tricks that'll take this to another level...
Insider Tricks for Flawless Results
The Temperature Rule Nobody Follows
Always start with room‑temperature butter. Cold butter will leave pockets of unmixed fat, resulting in uneven texture, while melted butter makes the dough spread too thin. If your kitchen is chilly, give the butter a 5‑minute sit in a warm spot before creaming.
Why Your Nose Knows Best
When the cookies are baking, trust your sense of smell more than the timer. The moment you detect a faint nutty, toasted coconut scent, the edges are beginning to caramelize—this is your cue to start checking for doneness. Over‑baking is the number one culprit behind dry holiday cookies.
The 5‑Minute Rest That Changes Everything
After mixing, let the dough rest for at least five minutes before scooping. This short pause lets the flour fully hydrate, resulting in a smoother dough that spreads less. I once skipped this step and ended up with a batch that looked like a flattened pancake—lesson learned.
Sprinkle Strategy
If you love a crunchy topping, add an extra pinch of sprinkles on top of each cookie just before they go into the oven. The heat will melt the sugar coating slightly, giving you a glossy, festive finish that catches the light.
The Cool‑Down Secret
Never rush the cooling process. Let the cookies sit on the baking sheet for a couple of minutes; the residual heat finishes the bake and prevents them from cracking. Then transfer to a wire rack—this keeps the bottom from getting soggy.
Creative Twists and Variations
This recipe is a playground. Here are some of my favorite ways to switch things up:
Cranberry‑Orange Burst
Swap half the white chocolate chips for dried cranberries and add a teaspoon of orange zest. The tart cranberries contrast the sweet coconut, while the orange zest adds a bright citrus pop that screams holiday.
Double‑Chocolate Delight
Replace the white chocolate chips with equal parts dark and milk chocolate chips. The richer chocolate flavor pairs beautifully with the coconut, turning these cookies into a decadent after‑dinner treat.
Spiced Ginger Snap
Add a half‑teaspoon each of ground ginger, cinnamon, and a pinch of ground cloves to the dry ingredients. The warm spices give the cookies a cozy, ginger‑bread vibe while keeping the chewy texture.
Vegan Coconut Dream
Swap the butter for coconut oil, use a flax‑egg (1 tbsp ground flaxseed + 3 tbsp water) in place of the egg, and choose dairy‑free white chocolate. The result is a plant‑based version that still delivers that soft, chewy punch.
Nutty Crunch
Fold in ½ cup of toasted chopped macadamia nuts or almonds. The nuts add a buttery crunch that complements the coconut and gives the cookies an extra layer of texture.
Storing and Bringing It Back to Life
Fridge Storage
Place the cooled cookies in an airtight container with a slice of fresh bread. Store in the refrigerator for up to a week. The bread releases moisture slowly, keeping the cookies soft and preventing them from drying out.
Freezer Friendly
Arrange cookies on a parchment‑lined tray, freeze until solid, then transfer to a zip‑top bag. They’ll keep for up to three months. When you’re ready to enjoy, let them thaw at room temperature or pop them in a 300°F oven for 5 minutes.
Best Reheating Method
To revive day‑old cookies, place them on a microwave‑safe plate, sprinkle a tiny splash of water (about a teaspoon) over the top, and microwave for 10‑12 seconds. The steam revives the chewiness without making them soggy.