Picture this: you’re in the middle of a bustling dinner party, the guests are laughing, the music is thumping, and you’re scrambling to keep the appetizers flowing. I had just pulled a fresh batch of salsa from the fridge, only to discover that the jar of refried beans had gone missing from the pantry. I stared at the empty shelf, then at the pile of ingredients that seemed to promise a disaster of epic proportions. The clock was ticking, the guests were hungry, and I was determined not to let a pantry mishap derail the night. I pulled out a can of refried beans, a jar of guac, a block of cheese, and a handful of olives, and I whispered to myself, “This is going to be legendary.”
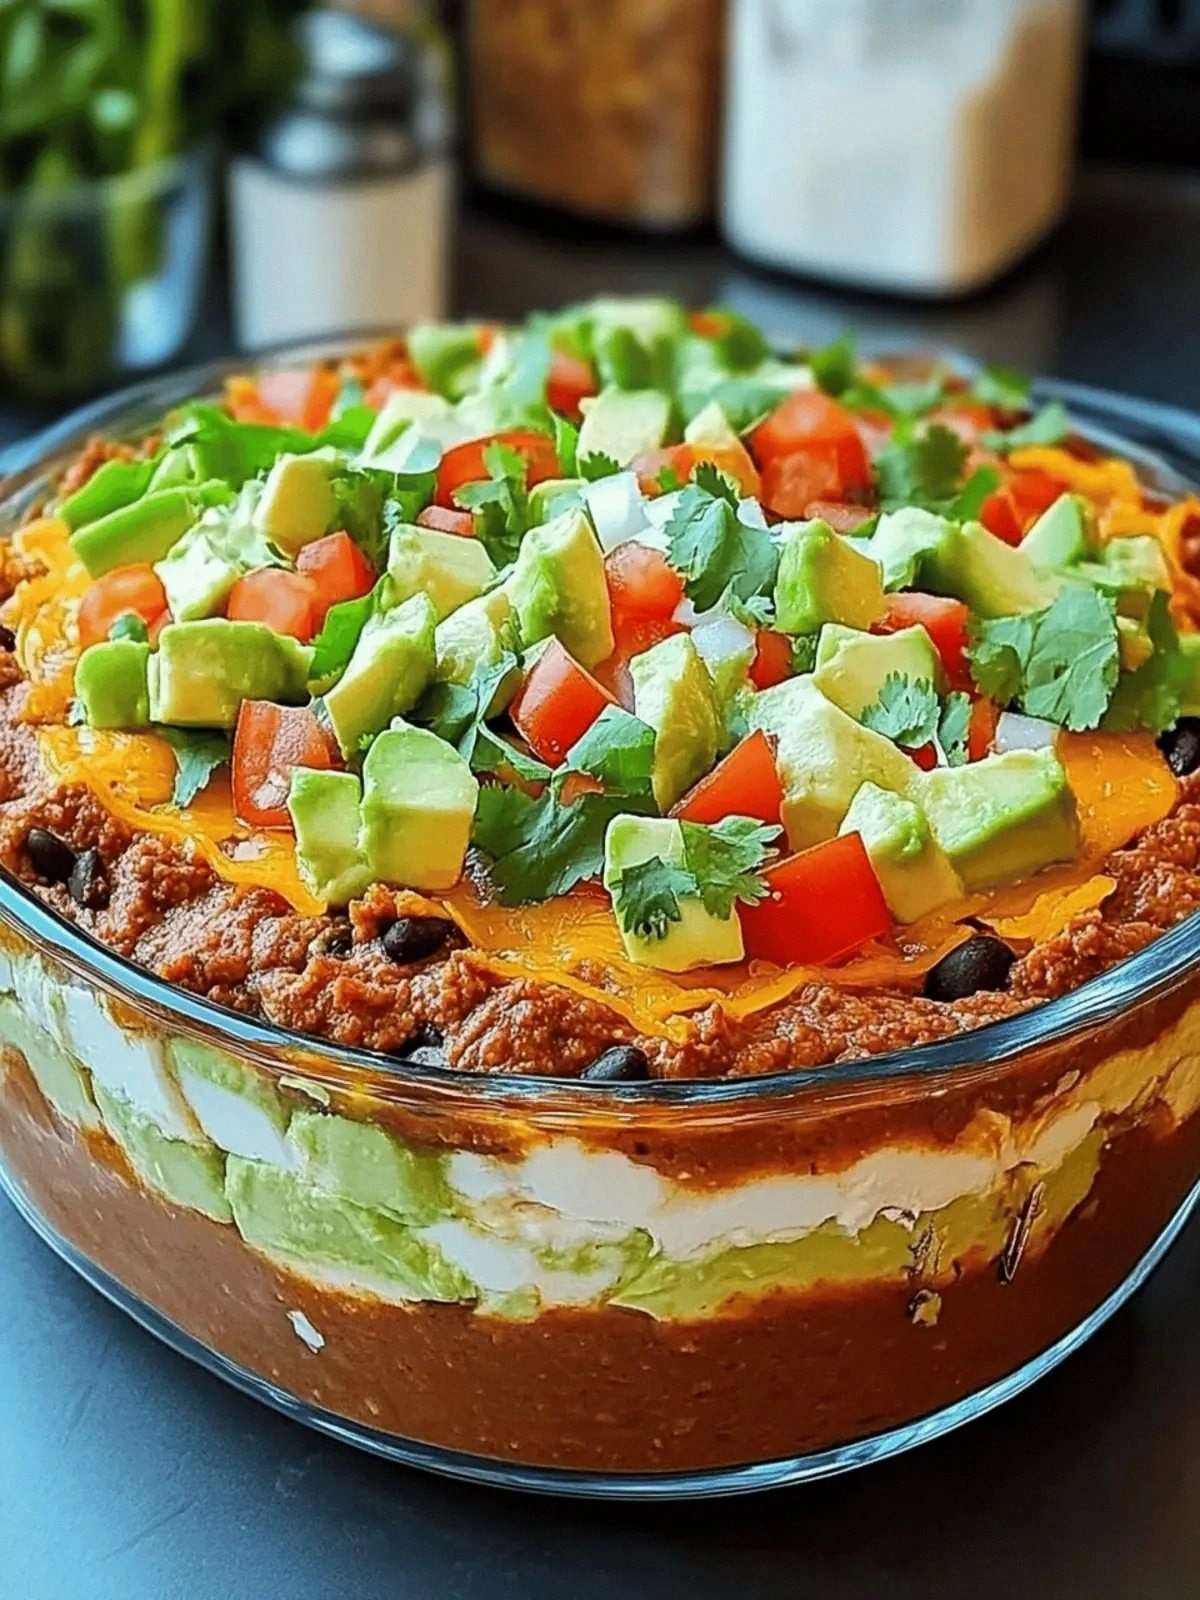
I’ve tried countless dips over the years—some that tasted like a culinary triumph, others that were more “what did I just make?” moments. What sets this seven‑layer marvel apart is the way each component sings in harmony, creating a crescendo of creamy, tangy, and savory flavors that dance on the tongue. The first layer of refried beans is a velvety base that holds the dip together, while the second layer—sour cream seasoned with taco spices—adds a zesty kick that wakes the senses. The guacamole provides a buttery freshness that cuts through the richness, and the melted cheese crowns the creation with a gooey, golden finish. Finally, the olives and tomatoes bring a briny, acidic bite that balances the dish like a well‑tuned instrument.
I dare you to taste this and not go back for seconds; the moment you bite into that first layer, the flavors will explode like fireworks in a midnight sky. Picture yourself pulling this out of the oven, the whole kitchen smelling incredible, the guests leaning in with anticipation. The texture is a beautiful contrast: the smooth beans, the creamy medley, the crunchy olives, and the juicy tomatoes all mingle in a single bite. Most recipes get this completely wrong, layering too many ingredients at once or using the wrong order, but I’ve cracked the secret to a dip that holds its structure while still bursting with flavor.
If you’ve ever struggled with a dip that falls apart or tastes flat, you’re not alone—and I’ve got the fix. I’ll be honest—I ate half the batch before anyone else got to try it, and the guests begged for the recipe. The key is in the layering technique and the precise seasoning of each component. The result is a dip that’s not only delicious but also visually stunning, with each layer clearly defined and inviting. I promise you, by the end of this article, you’ll wonder how you ever made it any other way.
Let me walk you through every single step—by the end, you’ll wonder how you ever made it any other way. The next few sections will reveal the ingredients, the method, and insider tips that transform a simple dip into an unforgettable centerpiece. I’ll sprinkle in some kitchen hacks, watch‑out warnings, and fun facts to keep you entertained and informed. I’ll also share variations that let you tailor the dip to any taste or occasion. So grab your apron, and let’s get started on this culinary adventure.
What Makes This Version Stand Out
- Flavor: The combination of seasoned sour cream and fresh guacamole delivers a complex profile that is both bold and balanced, ensuring every bite is a revelation.
- Texture: The creamy layers contrast with the crunchy olives and juicy tomatoes, creating a multi‑sensory experience that keeps guests coming back.
- Simplicity: With only seven ingredients, this dip requires minimal prep but offers maximum impact, making it a go‑to for both novice cooks and seasoned chefs.
- Visual Appeal: Each layer is distinct, giving the dip a vibrant, almost art‑like appearance that will impress even the most discerning eyes.
- Crowd Reaction: Friends rave about how the dip feels like a party in a bowl, and it’s a guaranteed hit at any gathering.
- Ingredient Quality: Using fresh, high‑quality items—especially ripe tomatoes and premium cheese—elevates the dish from ordinary to extraordinary.
- Make‑Ahead Potential: This dip can be assembled ahead of time and baked just before serving, allowing you to focus on entertaining.
Alright, let's break down exactly what goes into this masterpiece. The layers are not just for show; each one serves a purpose, from flavor to structure.
Inside the Ingredient List
The Flavor Base
The refried beans are the backbone of this dip, providing a smooth, hearty foundation that absorbs the seasoning and supports the layers above. When you choose a bean variety with a slightly nutty undertone—such as pinto or black beans—you’ll notice an added layer of complexity that elevates the dish. If you’re in a hurry, canned beans work perfectly, but for an extra kick, sauté a pinch of smoked paprika in the beans before layering. Skipping the beans would leave the dip too airy and fragile, so don’t be tempted to cut corners. The beans also keep the dip from becoming too greasy by balancing the richness of the cheese and sour cream.
The Texture Crew
Sour cream, when seasoned with taco seasoning, creates a silky, tangy layer that acts like a flavor bridge between the beans and the guacamole. The taco seasoning infuses the dip with a subtle heat that’s not overpowering but still memorable. If you prefer a dairy‑free version, substitute Greek yogurt or a plant‑based sour cream; the texture will be similar, though the flavor profile may shift slightly. Avoid using too much sour cream, or the dip will become runny and lose its structure. The key is to blend the sour cream until it's completely smooth before layering.
The Unexpected Star
Guacamole is more than just a garnish; it brings a creamy, buttery note that balances the acidity of the tomatoes and the saltiness of the olives. The freshness of ripe avocados is essential—don’t use pre‑made guac, as it often contains preservatives that alter the flavor. If you’re short on time, mash the avocado with a splash of lime juice to prevent browning and add a bright citrus kick. Skipping guac would result in a dip that feels flat, missing the luscious mouthfeel that keeps guests reaching for more. The guac also helps bind the layers together, preventing separation during baking.
The Final Flourish
Cheese, olives, and tomatoes are the crowning jewels that provide contrast and a burst of flavor. Choose a melty cheese like Monterey Jack or cheddar for a gooey finish; a sharper cheese can add depth. The olives contribute a briny punch that cuts through the richness, while the tomatoes bring acidity and a pop of color. If you’re vegan, a plant‑based cheese and fresh tomato slices will still deliver a satisfying bite. These top layers also create a visual appeal that makes the dip Instagram‑worthy, so don’t skimp on the presentation.
Everything’s prepped? Good. Let’s get into the real action and start building the layers that will wow your guests. Remember, the order matters—each layer builds on the one below it.
The Method — Step by Step
- Preheat your oven to 375°F (190°C) and line a 9‑inch square baking dish with parchment paper; this ensures even baking and easy cleanup. While the oven warms, gather all your ingredients so you’re not scrambling at the last minute. The aroma of the hot oven will begin to mingle with the savory spices, setting the mood for a delicious evening. Once the oven is ready, set a timer for 25 minutes to keep your timing on point.
- Spread the refried beans evenly across the bottom of the dish, smoothing them into a uniform layer with a spatula; this will be the base that holds everything together. The beans should be spread just thin enough to allow the next layer to sit on top without sinking. A well‑spread base prevents the dip from becoming too dense in the center. As you spread, you’ll hear a satisfying “crack” as the beans settle into place.
- In a small bowl, whisk the sour cream with the taco seasoning until fully incorporated; the mixture should be silky and fragrant. Pour this seasoned cream over the beans, smoothing it into a second layer that will serve as a flavorful bridge. The heat from the oven will slightly melt the sour cream, creating a glossy, almost translucent sheen. Watch for the edges to lift slightly—this indicates the layer is set.
- Fold the guacamole into the second layer, creating a smooth, buttery middle that will keep the dip moist. Use a spoon or spatula to gently swirl the guac into the cream, ensuring even distribution. The guac should not be too thick; a light hand keeps the dip airy. If the guac feels too thick, add a splash of lime juice to thin it slightly.
- Sprinkle the shredded cheese evenly over the guac, ensuring each bite will have a generous amount of melted, gooey goodness. The cheese will start to melt in the oven, forming a golden crust that’s both savory and slightly crunchy. The heat will also help bind the layers together, creating a cohesive structure. Keep an eye on the cheese; if it browns too quickly, cover the dish loosely with foil.
- Add the sliced olives in a single layer over the cheese; the olives will impart a briny contrast that cuts through the richness. The olives should be evenly spaced, creating a pattern that’s both aesthetic and functional. This layer also adds a subtle crunch that keeps the dip from feeling too soft. The olives will slightly melt into the cheese, creating a beautiful marbled effect.
- Top the dish with fresh tomato slices, arranging them in a fan‑like pattern that showcases their bright color. The tomatoes add acidity that brightens the entire dip and helps balance the salty elements. They also provide a juicy burst that contrasts the creamy layers below. Ensure the tomatoes are sliced thin so they cook gently without releasing too much water.
- Place the dish in the preheated oven and bake for 25 minutes, or until the cheese is melted and lightly browned, and the edges of the dip begin to pull away from the sides of the pan. The aroma will intensify, filling the kitchen with a savory, almost buttery scent that will have your guests gathering around the table. The dip should feel firm yet slightly springy when you gently press the center with a spoon. If the top browns too quickly, tent the dish with foil to prevent burning.
- Remove the dip from the oven and let it rest for 5 minutes; this resting period allows the flavors to meld and the dip to set, making it easier to slice. The heat will continue to cook the layers slightly, creating a perfect texture. While it rests, you can prepare your dipping vessels or garnish the plate with a sprinkle of cilantro for an extra pop of color. The dip should emit a warm, inviting aroma that makes the kitchen feel like a celebration.
That's it— you did it. But hold on, I've got a few more tricks that'll take this to another level. The dip is now ready to be served, but the final touches can elevate it from good to unforgettable. Keep reading to discover how to plate it, what accompaniments to offer, and how to keep the dip at peak flavor during the party.
Insider Tricks for Flawless Results
The Temperature Rule Nobody Follows
Many cooks bake this dip at a lower temperature, resulting in a soggy center; I’ve found that a steady 375°F gives the perfect balance of melt and structure. The key is to keep the oven door closed for most of the baking time to maintain consistent heat. If you’re using a convection oven, reduce the temperature by 25°F to avoid over‑browning. This trick ensures the cheese melts evenly without the beans becoming too dense.
Why Your Nose Knows Best
The moment the dip starts to bubble and the cheese reaches a golden hue, the scent alone tells you it’s ready; don’t rely solely on the timer. A subtle aroma of toasted cumin and fresh tomato will indicate that the flavors have fully developed. If the dip smells like burnt cheese, it’s probably over‑baked, so pull it out immediately. Trust your senses—they’re the best judge of doneness.
The 5-Minute Rest That Changes Everything
Letting the dip rest for 5 minutes before serving allows the flavors to settle and the texture to firm up, making it easier to scoop. During this brief pause, the cheese will set into a perfect, slice‑ready consistency, preventing it from sliding off the spoon. I’ve seen guests struggle to scoop a hot, runny dip, but a short rest solves that problem. This step also gives the tomatoes a chance to release their juices, creating a subtle glaze that enhances every bite.
Don’t Skip the Parchment Paper
Lining the dish with parchment paper ensures easy removal and keeps the dip from sticking, which can ruin the layers. The parchment also creates a barrier that prevents the cheese from scorching at the edges. When you lift the dip, the paper will glide smoothly, revealing the colorful layers. If you’re using a cast‑iron skillet, a parchment sheet works just as well and adds a touch of elegance.
Use Fresh, High-Quality Ingredients
The quality of each component—especially the cheese and tomatoes—directly influences the final taste. Choose a sharp cheddar for a bold finish or a Monterey Jack for a milder, melty experience. Fresh tomatoes should be firm yet slightly soft, so they release juices without becoming mushy. If you can, source your ingredients from a local farmer’s market; the freshness will be palpable in every bite.
Serve Immediately for Peak Flavor
The dip is at its best right after baking; the cheese is still warm and gooey, and the beans are creamy. If you let it sit too long, the layers will begin to separate and the texture will change. For parties that start later in the evening, consider baking the dip just before guests arrive. If you must store it, reheat gently in the oven to restore the melt without drying out the layers.
Creative Twists and Variations
This recipe is a playground. Here are some of my favorite ways to switch things up:
Smoky Chipotle Kick
Add a tablespoon of chipotle powder to the sour cream for a smoky heat that pairs wonderfully with the guacamole. The chipotle also deepens the color of the dip, making it even more visually striking. Use this version for a chili‑con‑carne or taco night, and watch the flavors mingle like a dance floor. The smoky undertones will linger on the palate, leaving guests craving more.
Vegan Version
Swap the dairy products for plant‑based alternatives: use coconut yogurt instead of sour cream, a vegan cheese blend for the melt, and a tomato sauce instead of fresh slices. The texture will be creamy, and the flavors will still pop, albeit with a slightly different profile. This variation is perfect for guests who prefer or require plant‑based meals. The dip will still hold together, thanks to the beans and the careful layering.
Mediterranean Twist
Replace the taco seasoning with a blend of oregano, thyme, and a dash of lemon zest to give the dip a Mediterranean flair. Swap the olives for kalamata olives and add a handful of chopped spinach for extra color and nutrition. The fresh tomatoes become more pronounced, and the dip takes on a bright, herbaceous character. This version works beautifully with pita chips or warm flatbread.
Breakfast Bites
Serve the dip as a brunch staple by adding diced ham or bacon and topping it with a fried egg. The savory protein pairs well with the creamy layers, creating a hearty, satisfying breakfast. The eggs add a silky texture, while the bacon provides a smoky crunch. Guests will be amazed at how versatile this dip can be.
Party-Size Upgrade
Scale the recipe up by doubling or tripling the ingredients for a large crowd. Use a larger baking dish or multiple smaller ones to maintain even heat distribution. Keep the layering technique consistent, and the dip will still hold its structure. This variation is ideal for holiday gatherings or potlucks.
Dessert Dip?
For a sweet twist, replace the sour cream with a dollop of coconut cream, add a handful of diced strawberries, and top with a drizzle of honey. The creamy base becomes a luscious dessert dip that pairs perfectly with graham crackers or banana slices. This unexpected spin will surprise your guests and satisfy their sweet tooth. The result is a creamy, fruity treat that’s both refreshing and indulgent.
Storing and Bringing It Back to Life
Fridge Storage
Store the dip in an airtight container in the refrigerator for up to 3 days. The layers will maintain their integrity, but the cheese may firm up slightly. When ready to serve, let it sit at room temperature for 10–15 minutes to soften the cheese, or reheat briefly in the oven. Avoid microwaving, as it can make the dip unevenly hot. A gentle oven bake at 350°F for 10 minutes will restore the melt without drying it out.
Freezer Friendly
For longer storage, freeze the dip in a freezer‑safe container for up to 2 weeks. Thaw in the refrigerator overnight before reheating. When reheating, cover the dish with foil to prevent the cheese from browning too quickly. A slow, low‑heat approach preserves the texture and flavor better than quick microwaving. The dip will come back to life, almost as fresh as the first time.
Best Reheating Method
The best way to reheat this dip is in a preheated oven at 350°F, covering it with foil for the first 10 minutes and then uncovering for the last 5 to achieve a golden crust. If you’re in a hurry, a microwave can work, but stir halfway through to ensure even heating. A tiny splash of water or a splash of milk before reheating can help maintain moisture and prevent the dip from drying out. Once reheated, serve immediately for optimal flavor.