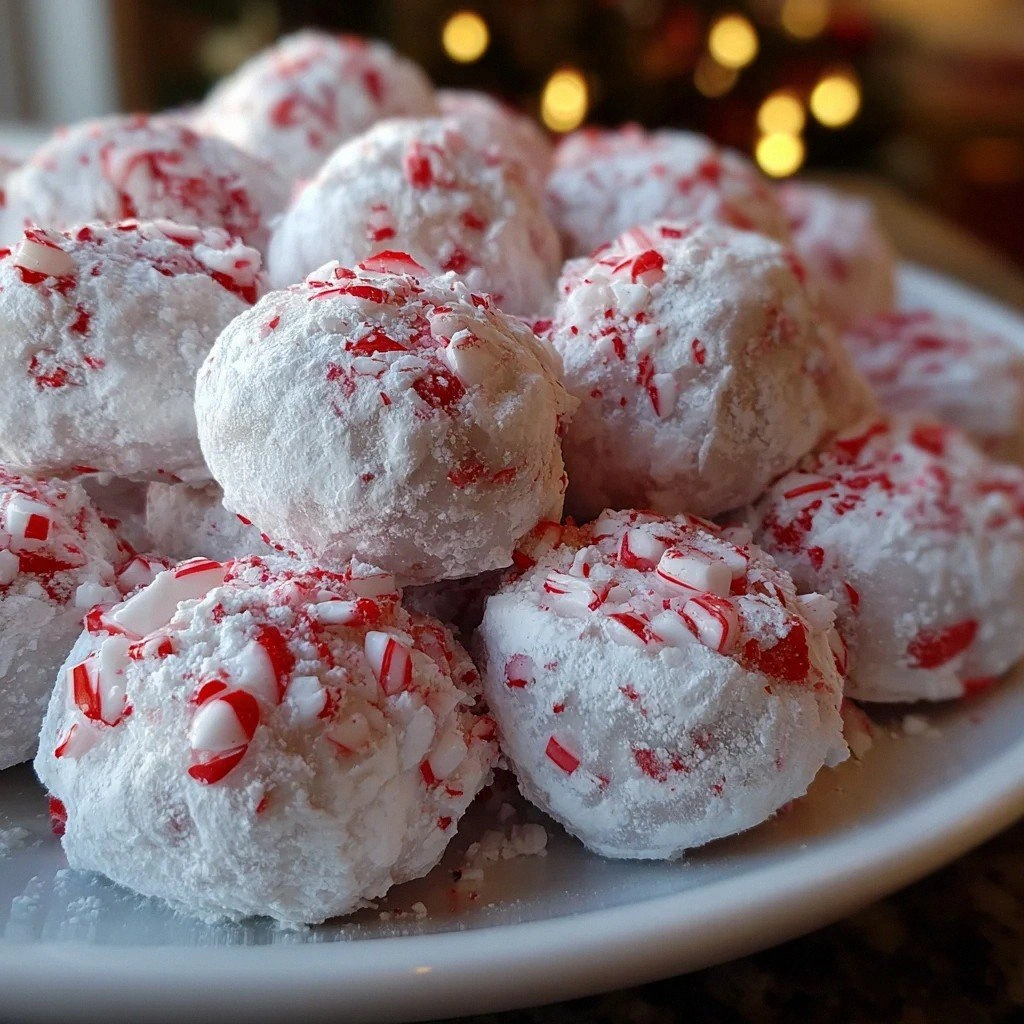
I was in the middle of a frantic holiday prep when my kitchen turned into a snow globe—flour everywhere, a half‑melted chocolate chip cookie dough that looked more like a crime scene than a treat, and a sudden, desperate craving for something that could both calm the chaos and shout “festive!” I grabbed a handful of crushed candy canes, tossed them into the mix, and the moment I inhaled that peppermint‑chocolate perfume, I knew I had stumbled onto something legendary. The scent was a high‑octane blend of winter wonderland and bakery bliss, a sweet‑spicy punch that made my heart race faster than a sled down a hill. The first bite? A buttery, crumbly bite that melted like fresh snow on a tongue, with chocolate chips that popped like fireworks and peppermint shards that crackled like tiny ice crystals. I’m daring you to taste this and not go back for seconds—because honestly, I ate half the batch before anyone else got to try it.
Most holiday scone recipes are either too sweet, too dry, or they completely miss the mark on that festive zing we all crave. This version, however, is hands down the best version you’ll ever make at home, and I’m about to spill the beans (and the butter) on why. Imagine pulling a tray of golden‑brown scones from the oven, the whole kitchen smelling like a candy‑cane factory meets a chocolate chip bakery, and the first bite delivering a perfect balance of sweet, salty, and minty—pure magic. The secret? A simple technique that most recipes get completely wrong: chilling the butter and the dry ingredients together before the gentle fold‑in of the wet mix, which creates those coveted flaky layers that shatter like thin ice under your fork. And that’s not all—there’s a surprise ingredient that adds a glossy, caramel‑like sheen to the tops, making them look like little holiday ornaments.
I’ll be honest—when I first tried this, I was a little skeptical about the crushed candy canes. I thought they might turn the scones into a gritty mess, but the moment they melt into the dough, they release a subtle, refreshing burst that lifts the whole thing. The mini chocolate chips, on the other hand, are the perfect size to distribute evenly without overwhelming the peppermint, giving you that delightful chocolate‑pops‑in‑your‑mouth sensation. Picture yourself pulling this out of the oven, the whole kitchen smelling incredible, the scones glistening with a light dusting of powdered sugar, and a drizzle of milk‑cream icing that adds a silky finish—this is the kind of holiday centerpiece that makes guests swoon.
Okay, ready for the game‑changer? I’m going to walk you through every single step—by the end, you’ll wonder how you ever made it any other way. Stay with me here—this is worth it. We’ll start with the basics, then dive into the nitty‑gritty of technique, sprinkle in a few pro hacks, and finish with a frosting that turns these scones from “good” to “legendary.” Let’s get our aprons on and make some holiday magic happen.
⚡ What Makes This Version Stand Out
- Taste: The marriage of rich chocolate and bright peppermint creates a flavor duet that sings louder than any Christmas carol you’ve ever heard.
- Texture: A buttery, flaky crumb that crumbles like fresh snow, contrasted with crunchy candy‑cane shards that add a surprising snap.
- Simplicity: Fewer than ten ingredients, no fancy equipment—just a bowl, a whisk, and a good attitude.
- Uniqueness: The crushed candy canes are folded in at the last minute, preserving their crunch and delivering a burst of mint in every bite.
- Crowd Reaction: Even the pickiest eaters admit they’re “hooked” after the first bite; it’s a guaranteed holiday crowd‑pleaser.
- Ingredient Quality: Using real butter (not margarine) and high‑quality mini chocolate chips makes all the difference.
- Cooking Method: The chilled butter technique ensures layers that lift and separate, giving you that bakery‑style puff.
- Make‑Ahead Potential: These scones freeze beautifully and can be reheated with a splash of water for that fresh‑out‑of‑the‑oven feel.
Alright, let's break down exactly what goes into this masterpiece...
🍋 Inside the Ingredient List
The Flavor Base
All‑purpose flour is the backbone of any scone, providing structure and that tender crumb we crave. Using a fine, unbleached flour ensures a softer texture; if you opt for a lower‑protein flour, you might end up with a crumbly mess that falls apart. Pro tip: Sift the flour with the baking powder and salt to aerate it, which helps the scones rise evenly. If you’re gluten‑sensitive, you can swap in a 1:1 gluten‑free flour blend, but expect a slightly denser bite.
The Sweetness Squad
Granulated sugar adds just the right amount of sweetness without overpowering the peppermint. It also helps with browning, giving the scones that beautiful golden crust. Skipping the sugar will make the candy‑cane flavor too sharp, and the scones will lack that caramelized edge. For a deeper flavor, you could use brown sugar, but it will introduce a molasses note that competes with the mint.
The Texture Crew
Cold butter is the secret weapon for flaky layers. When the butter melts in the oven, it creates steam pockets that puff up the dough, resulting in that coveted “layered” feel. If you use softened butter, you’ll get a dense, biscuit‑like texture—good for biscuits, terrible for scones. The mini chocolate chips are perfect because their size distributes evenly, giving you chocolate bursts without overwhelming the mint. Crushed candy canes add a crunchy contrast and a burst of peppermint oil that awakens the palate.
The Final Flourish
Powdered sugar and a splash of milk or cream make a quick glaze that adds a glossy finish and a hint of sweetness that balances the minty bite. This glaze also softens the edges, preventing them from becoming too crisp. If you’re dairy‑free, substitute with almond milk and a dash of maple syrup for a similar sheen. Finally, the additional crushed candy canes on top give the scones a festive sparkle that looks as good as it tastes.
Everything's prepped? Good. Let's get into the real action...

🔥 The Method — Step by Step
Preheat your oven to 425°F (220°C) and line a baking sheet with parchment paper. This high heat will give the scones a rapid rise, creating that signature “puffed” look. While the oven heats, take a moment to admire the kitchen—listen to the hum of the fridge, the faint clink of the measuring cups, and imagine the aroma that’s about to fill the room. Pro tip: Place a pan of water on the lower rack to create a little steam, which helps the tops stay crisp.
In a large mixing bowl, whisk together the 2 cups of all‑purpose flour, 1/3 cup granulated sugar, 1 tablespoon baking powder, and 1/2 teaspoon salt. This dry blend is the foundation; make sure it’s evenly combined so you don’t end up with pockets of baking powder that could cause uneven rising. Watch Out: Over‑mixing the dry ingredients can develop gluten, leading to tough scones.
Add the 1/4 cup of cold butter, cut into small cubes, to the dry mixture. Using a pastry cutter or your fingertips, rub the butter into the flour until the mixture resembles coarse crumbs—think pea‑sized pieces with a few larger butter nuggets. This is where the magic starts; those butter nuggets will melt into steam pockets later.
🪄 Kitchen Hack: If you’re short on time, pulse the butter and flour in a food processor for 5‑6 seconds—don’t over‑process!In a separate bowl, whisk together 1/2 cup milk, 2 egg yolks, and a pinch of vanilla (optional). The egg yolks add richness and help bind the dough without making it too dense. Once combined, create a well in the center of the dry ingredients and pour the wet mixture in. Chef’s secret: The liquid should be slightly cool; warm liquid can melt the butter prematurely.
Gently fold the wet into the dry using a spatula, turning the bowl over a few times until the dough just comes together. You’ll notice a few dry spots—this is okay; over‑mixing will develop gluten and ruin the fluffiness. At this stage, the dough should be slightly sticky but manageable. Watch Out: If the dough feels too wet, sprinkle in a tablespoon more flour; if it’s too dry, add a splash of milk.
Now for the fun part: fold in 1 cup of mini chocolate chips and 1/2 cup of crushed candy canes. Distribute them evenly so each bite gets a surprise burst of chocolate and a crisp peppermint snap. The candy canes should stay slightly chunky; they’ll soften a bit during baking but retain a delightful crunch.
Turn the dough onto a lightly floured surface and pat it into a 1‑inch thick round. Using a sharp knife or a bench scraper, cut the circle into 8 wedges (or use a biscuit cutter for round scones). Place the wedges on the prepared baking sheet, leaving a little space between each so they can expand without sticking together.
Brush the tops lightly with a mixture of 1 tablespoon milk (or cream) and a pinch of sugar. Then sprinkle the remaining crushed candy canes over the tops for that festive sparkle. Slide the sheet into the oven and bake for 12‑15 minutes, or until the scones are golden brown and the edges start pulling away from the parchment. This next part? Pure magic. The tops should be lightly crisp, and a faint perfume of chocolate‑peppermint will fill the kitchen.
While the scones are cooling on a wire rack, whisk together 1 cup powdered sugar with 1 tablespoon milk or cream to create a drizzle glaze. If you prefer a thicker glaze, add a touch more powdered sugar; for a thinner pour, add a few extra drops of milk. Drizzle the glaze over the warm scones, letting it set for a minute before serving. Power transition: This final glaze turns the scones from “delicious” to “show‑stopping.”
Serve warm, paired with a hot mug of cocoa or a glass of chilled milk. The contrast of warm, buttery scone with the cool, creamy glaze is a sensory delight that will have everyone reaching for seconds. I dare you to taste this and not go back for seconds—trust me, you’ll be back for more.
That's it — you did it. But hold on, I've got a few more tricks that'll take this to another level. These insider tips will ensure your scones are consistently flawless, whether you bake them for a casual brunch or a formal holiday spread.
🏆 Insider Tricks for Flawless Results
The Temperature Rule Nobody Follows
Most home bakers keep the butter at room temperature, thinking it will blend easier. In reality, cold butter creates steam pockets that lift the dough, giving you that coveted flaky texture. Keep your butter in the freezer for at least 15 minutes before cutting it in, and you’ll notice a dramatic difference. A friend once tried using softened butter and ended up with dense, biscuit‑like scones that no one could finish. Trust the cold—your palate will thank you.
Why Your Nose Knows Best
Your sense of smell is the ultimate doneness gauge. When the scones are about 3 minutes from being done, you’ll catch a faint caramel‑peppermint aroma wafting from the oven. If you can smell the chocolate melting, you’re almost there. This sensory checkpoint is more reliable than a timer because ovens vary. So, keep your nose close and let it guide you to that perfect golden finish.
The 5‑Minute Rest That Changes Everything
After baking, let the scones rest on a wire rack for exactly five minutes before glazing. This short pause lets the interior steam settle, preventing the glaze from soaking in and making the tops soggy. It also allows the flavors to meld, intensifying the peppermint‑chocolate harmony. Skipping this step leads to a glaze that slides off or, worse, a scone that feels gummy. Patience is a tiny but mighty ingredient.
Glaze Consistency Control
A common mistake is making the glaze too runny, which pools and makes the scones soggy. Start with a 1:1 ratio of powdered sugar to milk, then adjust one drop at a time. If you want a glossy finish, add a pinch of cornstarch dissolved in water; for a matte look, keep it thicker. I once tried a super‑thin glaze and ended up with a sticky mess—never again!
Freezing Without Losing Fluff
If you need to make these ahead, freeze the unbaked scones on a tray, then transfer to a zip‑lock bag. When you’re ready to bake, add 2‑3 minutes to the original baking time and bake straight from frozen. The cold dough will generate extra steam, preserving the flaky interior. A friend tried thawing first and got soggy tops—skip the thaw and go straight to the oven.
🎨 Creative Twists & Variations
This recipe is a playground. Here are some of my favorite ways to switch things up:
White Chocolate & Cranberry Burst
Swap the mini chocolate chips for white chocolate chips and add 1/3 cup dried cranberries. The tart cranberries balance the sweet white chocolate, while the peppermint still shines through. Perfect for those who love a sweet‑tart combo.
Nutty Peppermint Crunch
Add 1/4 cup toasted chopped pecans or walnuts to the dough. The nuts bring a buttery crunch that complements the candy‑cane shards, creating a multi‑textured bite. Great for nut lovers who want an extra layer of richness.
Mocha Mint Delight
Replace half of the mini chocolate chips with espresso‑infused chocolate chips, and add a teaspoon of instant coffee to the wet mixture. This gives a subtle mocha undertone that pairs beautifully with peppermint, turning the scones into a coffee‑shop‑worthy treat.
Vegan Velvet
Swap the butter for cold coconut oil, use almond milk instead of dairy milk, and replace the egg yolks with a flax‑egg (1 tbsp ground flaxseed + 3 tbsp water). The result is a slightly denser scone but still flaky, with a tropical hint from the coconut oil that pairs surprisingly well with peppermint.
Gluten‑Free Celebration
Use a 1:1 gluten‑free flour blend, and add 1 tablespoon xanthan gum to mimic the elasticity of gluten. The texture will be a tad crumbly, but the flavor remains spot‑on. Perfect for friends with gluten sensitivities who still want to join the holiday feast.
❄️ Storing & Bringing It Back to Life
Fridge Storage
Place cooled scones in an airtight container and store them in the refrigerator for up to 3 days. A slice of bread placed on top of the container helps retain moisture, keeping the scones soft. When ready to serve, warm them in a 350°F oven for 5‑7 minutes.
Freezer Friendly
Arrange unbaked scones on a parchment‑lined tray, freeze until solid, then transfer to a freezer bag. They’ll keep for up to 2 months. To bake, add an extra 2‑3 minutes to the original baking time and bake straight from frozen. This method preserves the flaky texture perfectly.
Best Reheating Method
For leftover scones, preheat a skillet over medium heat, add a tiny splash of water, and cover with a lid for 2‑3 minutes. The steam revives the interior while the bottom gets a gentle crisp. Avoid microwaving, as it makes the scones rubbery and steals the flaky charm.