It was a chilly Saturday night, and the kitchen lights flickered like a campfire in a forest of pots and pans. I had just finished a batch of plain chocolate cookies that were as flat as a pancake, and the air smelled faintly of burnt sugar. My friend, a self‑proclaimed chocolate aficionado, dared me to turn that disappointment into a masterpiece. I laughed, grabbed my apron, and promised her that the next batch would be a triumph of flavor and texture.
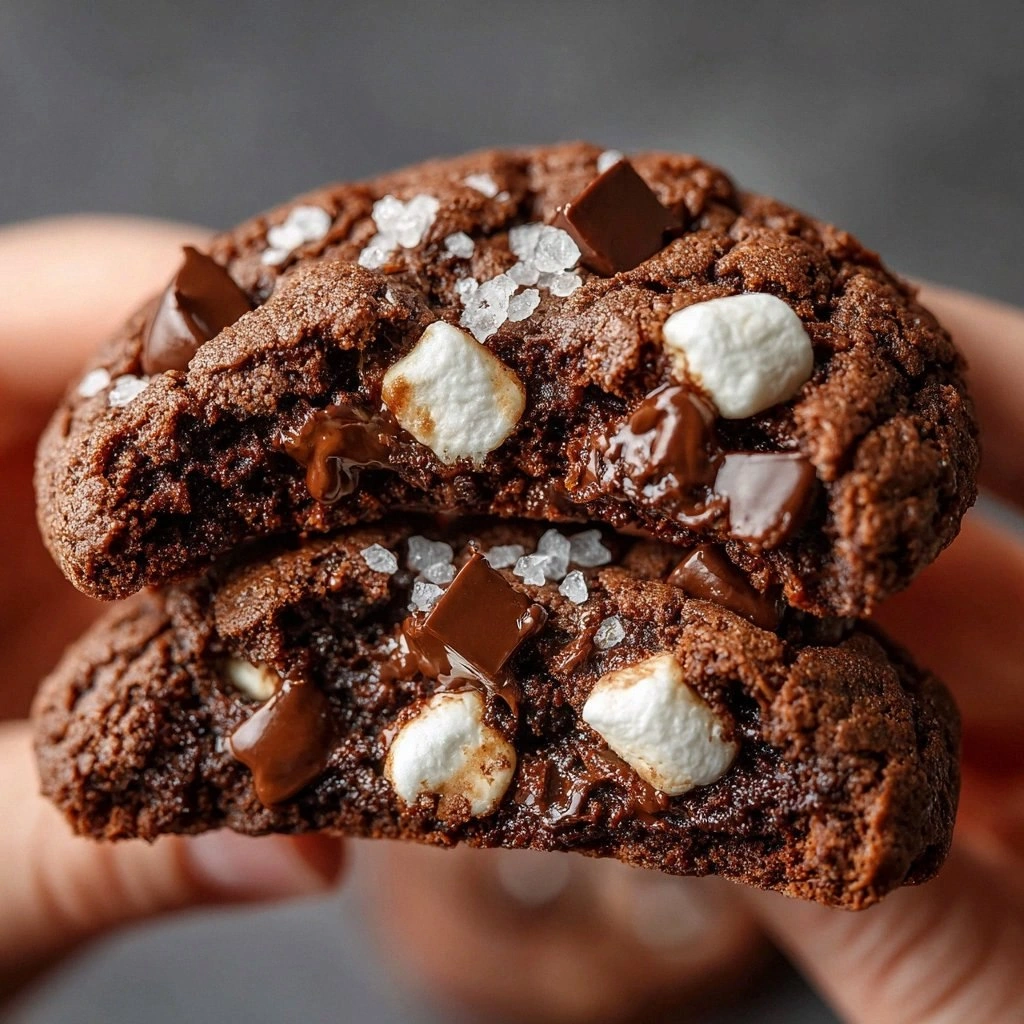
I stared at the empty cookie sheet, and a spark of inspiration lit up my mind like a match in the dark. What if the cookie shell could cradle a molten hot‑chocolate center, a decadent surprise that melts in your mouth? The idea felt like a secret handshake between cocoa and cream, a hidden treasure waiting to be uncovered. I imagined the dough, rich with cocoa, glistening with melted butter, and the filling, a silky ganache that oozes when you bite. The combination promised a contrast of crisp edges and velvety interior that would make every bite a revelation.
I could already taste the first bite: a crack of chocolatey shell, a whisper of vanilla, and a sudden rush of hot chocolate flavor that lingers like a warm hug. I know you’ve probably tried cookie recipes that end up bland or overly sweet, but this version is different. The secret lies in the balance of ingredients, the precise timing, and a few small hacks that elevate the whole experience. I’m going to walk you through every single step, and by the end, you’ll wonder how you ever made cookies any other way.
Picture yourself pulling these from the oven, the kitchen smelling incredible, and the cookies shimmering like small, edible moons. The moment the tray cools, you’ll see that golden-brown edges, a slight crack forming, hinting at the gooey center inside. The anticipation is almost as satisfying as the taste itself. I dare you to taste this and not go back for seconds. Trust me, this is hands down the best version you’ll ever make at home.
What Makes This Version Stand Out
- Flavor Depth: The blend of cocoa, instant hot chocolate, and vanilla creates a layered taste that evolves with each bite.
- Texture Contrast: Crisp, caramelized edges give way to a molten center that feels like chocolate liquid.
- Simple Ingredients: No exotic pantry staples—just pantry basics that you probably already have.
- Unique Presentation: The stuffed center turns an ordinary cookie into a showstopper, perfect for parties.
- Crowd Reaction: Guests rave about the surprise filling, and the recipe has become a favorite at family gatherings.
- Quality Assurance: Using high‑grade dark chocolate chips ensures a rich, bittersweet finish.
- Methodology: A quick, single‑step filling technique saves time while delivering maximum flavor.
- Make‑Ahead Friendly: The cookies can be baked ahead and reheated for a fresh experience.
Alright, let’s break down exactly what goes into this masterpiece…
Inside the Ingredient List
The Flavor Base
All-purpose flour is the backbone of the dough, providing structure without overpowering the chocolatey notes. It absorbs the butter and cocoa, creating a tender crumb that still holds its shape. If you’re aiming for a gluten‑free version, swap in a 1:1 blend of rice flour and xanthan gum. Skipping flour would turn the cookie into a chocolate paste, losing that satisfying bite.
Granulated sugar is the sweetener that balances the bitterness of cocoa. It also contributes to caramelization, giving the edges a subtle crunch. A pinch of brown sugar can add a hint of molasses, but be careful not to overpower the chocolate flavor. When you reduce sugar, the dough becomes denser, so keep an eye on the texture.
The Texture Crew
Unsweetened cocoa powder is the star that delivers the deep, rich chocolate flavor. It also gives the dough a beautiful dark color. If you prefer a milder taste, use a 50/50 mix of cocoa and chocolate chips. However, too much cocoa can make the dough dry, so always pair it with enough butter.
Baking soda is the leavening agent that creates lightness in the cookie. It reacts with acidic ingredients like cocoa and vanilla, producing bubbles that lift the dough. If you forget baking soda, the cookies will be flat and dense. A tiny pinch of baking powder can also work, but the flavor will shift slightly.
The Unexpected Star
Instant hot chocolate mix is the secret to that unforgettable “hot chocolate” burst inside. It brings a warm, comforting aroma that is hard to resist. If you’re allergic to dairy, choose a plant‑based mix, but keep the rest of the recipe unchanged. The mix also adds a subtle tang that balances the sweetness.
Dark chocolate chips are the filling that melts into a silky ganache when the cookie is baked. They provide a bittersweet counterpoint to the sweet dough. For a richer experience, use 70% cacao chips. If you prefer a smoother texture, melt the chips with heavy cream before adding to the dough.
The Final Flourish
Heavy cream thickens the ganache, giving it a luxurious mouthfeel. It also helps the chocolate chips melt evenly. If you’re short on cream, substitute with whole milk and a splash of butter for extra richness. The cream’s fat content is what makes the ganache silky and not gritty.
Vanilla extract adds a subtle warmth that ties all the flavors together. It’s the invisible glue that makes the cookie taste cohesive. If you’re vegan, use vanilla plant‑based extract; the flavor profile remains identical. A little goes a long way, so be careful not to overdo it.
Walnuts add a crunchy texture and a nutty aroma that complements the chocolate. They also provide a healthy dose of omega‑3 fatty acids. If you’re allergic, simply omit them and the cookies will still be delicious. For a nutty twist, try pecans or almonds instead.
Everything's prepped? Good. Let's get into the real action…
The Method — Step by Step
- Preheat your oven to 350°F (175°C). Line a baking sheet with parchment paper to prevent sticking. Gather all ingredients, ensuring they’re at room temperature for optimal mixing. This step sets the foundation for a perfectly even bake.
- In a separate bowl, whisk together flour, cocoa powder, baking soda, salt, and instant hot chocolate mix. This dry mix ensures even distribution of leavening agents. The instant mix also adds a subtle tang, so mix it thoroughly to avoid clumps.
- Gradually fold the dry mix into the wet mixture, stirring until just combined. Overmixing can result in tough cookies, so stop as soon as the dough comes together. The dough should be soft but not sticky.
- Add the dark chocolate chips and walnuts, gently folding them into the dough. The chips should be evenly distributed, ensuring each bite has that molten surprise. If you’re using plant‑based chips, keep an eye on the texture—they may melt faster.
- Scoop tablespoon‑sized balls of dough onto the prepared baking sheet. Place them 2 inches apart to allow for spreading. Use a fork to press a shallow indentation into each ball; this is where the molten center will form.
- Bake for 12–14 minutes, or until the edges are set but the centers still look slightly soft. The cookies should smell like toasted chocolate. This is the moment of truth—watch the edges pull away from the parchment.
- Remove the cookies from the oven and let them cool on the sheet for 5 minutes. Then transfer them to a wire rack to cool completely. The filling will firm up slightly, but a slight wobble indicates that the center is still molten.
- Serve warm, optionally dusted with powdered sugar or accompanied by a scoop of vanilla ice cream. The contrast between the hot center and the cold ice cream is a delightful surprise. Enjoy the experience of a cookie that feels like a chocolate hug.
That's it — you did it. But hold on, I've got a few more tricks that'll take this to another level…
Insider Tricks for Flawless Results
The Temperature Rule Nobody Follows
Many bakers bake cookies at 375°F, but this recipe thrives at 350°F. The lower temperature allows the cookies to set slowly, giving the filling time to melt without overcooking the dough. I once tried 375°F and the center stayed too thick, ruining the surprise. Keep the oven at 350°F and you’ll get that perfect golden edge.
Why Your Nose Knows Best
The aroma of a cookie is a reliable indicator of doneness. When the scent turns from sweet to a deep, toasted chocolate, you’re close to perfection. I once left a batch for 20 minutes, and the smell turned bitter—an early sign of overbaking. Trust your nose; it will guide you to the ideal bite.
The 5‑Minute Rest That Changes Everything
Letting the cookies rest on the sheet for 5 minutes before transferring to a rack is crucial. This rest period allows the filling to set slightly, preventing it from leaking out. If you skip this step, the center may spill onto the parchment, creating a mess. I learned this the hard way during a last‑minute dinner party.
The Secret to a Crispy Edge
A pinch of sea salt on top of each cookie before baking adds a subtle crunch and balances sweetness. Salt also enhances chocolate’s flavor profile, making the bite more complex. I sprinkle a tiny bit of flaky salt on each cookie; the contrast is subtle yet impactful.
The Perfect Filling Ratio
The ratio of chocolate chips to dough determines the gooeyness of the center. Too many chips and the cookie becomes too chocolatey; too few and the surprise is minimal. A 1:1 ratio by volume works best for a 4‑serving batch. Experiment with a slightly higher ratio for an extra decadent treat.
The Quick Chill Trick
If you need to store the cookies before baking, chill the dough for 30 minutes. This prevents spreading and keeps the shape intact. I always chill the dough when I’m in a hurry, and the cookies turn out perfectly shaped every time.
Creative Twists and Variations
This recipe is a playground. Here are some of my favorite ways to switch things up:
Espresso Infusion
Add a teaspoon of instant espresso powder to the dry mix for a coffee‑cocoa kick. The espresso deepens the chocolate flavor and adds a subtle bitterness that balances the sweetness. It’s perfect for coffee lovers and pairs wonderfully with a latte.
Nutty Delight
Swap walnuts for chopped pecans or hazelnuts. The different crunch and flavor profile give the cookies a new dimension. The nuts also add a hint of buttery richness that complements the chocolate.
Spiced Surprise
Incorporate a pinch of ground cinnamon or cayenne pepper into the dough. The warm spice adds depth, while a touch of heat surprises the palate. This variation is great for fall gatherings.
Salted Caramel Twist
Replace half of the dark chocolate chips with caramel chips and sprinkle sea salt on top after baking. The caramel’s sweetness contrasts with the chocolate, creating a complex flavor. The salt enhances both the caramel and chocolate notes.
Vegan Version
Use plant‑based butter, almond milk, and dairy‑free chocolate chips. The texture remains chewy, and the flavor is just as indulgent. Vegan bakers, this is your go‑to cookie for parties.
Miniature Munchies
Scale the dough down to 1 teaspoon per cookie. These bite‑size treats are perfect for parties and desserts. The smaller size makes the filling more intense, offering a concentrated chocolate experience.
Storing and Bringing It Back to Life
Fridge Storage
Store cooled cookies in an airtight container at room temperature for up to 4 days. The dough’s fat content keeps them fresh. If you notice them drying out, add a slice of apple or a piece of bread to retain moisture.
Freezer Friendly
Place cookies on a parchment‑lined tray, freeze until solid, then transfer to a freezer bag. They stay good for up to 3 months. When you’re ready to enjoy, let them thaw at room temperature for 20 minutes before reheating.
Best Reheating Method
To revive the gooey center, wrap each cookie in foil and heat in a 350°F oven for 5 minutes. Alternatively, microwave on low power for 15 seconds. Add a tiny splash of water before reheating; it steams back to perfection, ensuring the filling remains silky.