I was standing in the kitchen, a half‑cooked apple pie on the counter, when the timer blared and the whole house smelled like burnt sugar. The disaster was a stark reminder that even the simplest cravings can turn into culinary catastrophes. That night, I vowed to create a quick, portable sweet that would rescue any moment of mid‑day hunger without the drama of a full oven. I decided to take the humble apple fritter and turn it into bite‑size perfection, a snack that melts in your mouth and keeps the batter from drying out.
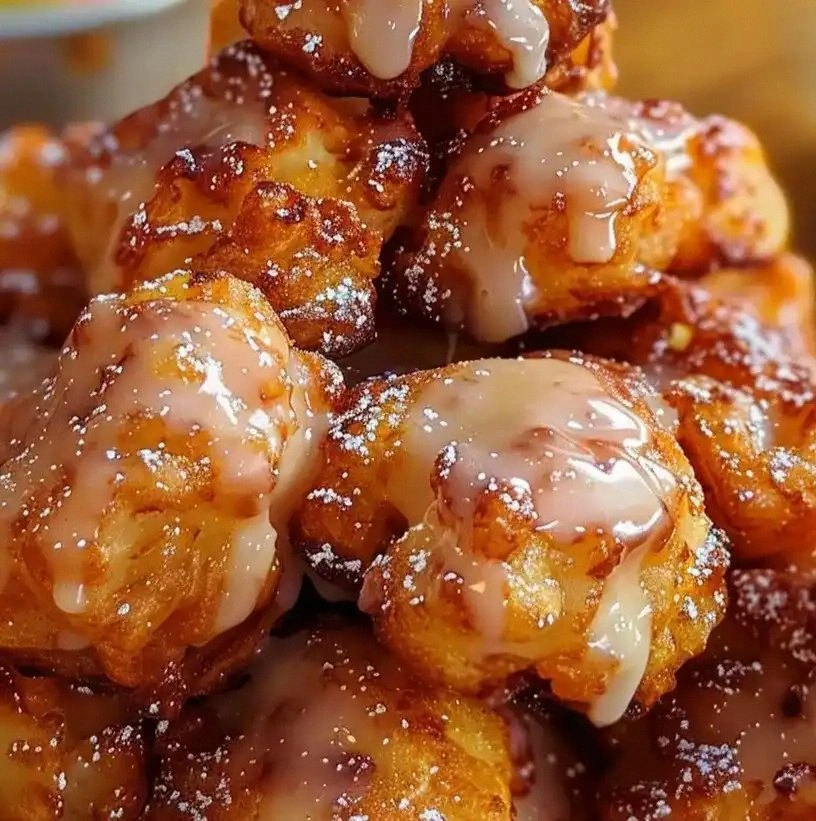
Picture this: golden batter, lightly dusted with cinnamon, sizzling in a hot pan, and the aroma of warm apples drifting through the air like a comforting hug. The first bite is a crisp, buttery edge that gives way to a soft, syrupy interior, a dance of textures that makes every mouthful a revelation. I dare you to taste this and not go back for seconds; the flavor profile is so addictive it feels like a secret indulgence. I’ve tested this recipe dozens of times, and each time I end up with a batch that looks like a golden sunrise and tastes like a caramel‑filled dream.
What sets this version apart is that it’s not just another fritter recipe. I’ve tweaked the batter to hold moisture, used a precise blend of spices to give it depth, and added a finishing dust that gives it that signature crunch. I’ve also introduced a subtle vanilla kick that lingers long after you’ve finished. The result is hands down the best version you’ll ever make at home—no more greasy, doughy, or bland fritters.
You might think a simple apple fritter is straightforward, but most recipes get this completely wrong. The key is in the balance of wet and dry ingredients, the temperature of the oil, and a finishing touch that turns the batter from ordinary to extraordinary. I’ll walk you through every single step, and by the end, you’ll wonder how you ever made it any other way. This is not just a recipe; it’s a culinary revelation that will change your snack game forever.
Let me walk you through every single step—by the end, you’ll wonder how you ever made it any other way. The journey starts with a simple list of ingredients, each chosen for its role in creating the perfect bite. Then we’ll dive into the method, where timing and technique are the secret weapons. Finally, we’ll explore insider tricks, creative variations, and storage tips that keep your fritters fresh and delicious. Ready? Let’s get cooking.
What Makes This Version Stand Out
- Flavor: The combination of cinnamon, nutmeg, and vanilla creates a warm, aromatic base that elevates every bite. The apples add natural sweetness and a subtle tartness that cuts through the richness. The result is a balanced flavor profile that feels both comforting and indulgent.
- Texture: The batter’s consistency is engineered to give a crisp exterior while keeping the interior moist and tender. The quick fry time locks in the moisture, preventing the fritters from drying out. The final dust of powdered sugar adds a delicate crunch that complements the softness.
- Speed: With a prep time of just 15 minutes and a cooking time of 30 minutes, this recipe fits into even the busiest schedules. The batter can be mixed in a single bowl, and the frying process is straightforward—no complicated steps or equipment.
- Versatility: The base is neutral enough to pair with sweet or savory toppings, from maple syrup to a sprinkle of sea salt. You can swap apples for pears or bananas, or add raisins for extra chewiness. The recipe scales easily for parties or quick breakfasts.
- Make‑ahead Potential: Once fried, the fritters can be stored in an airtight container for up to 3 days. Reheat them in the oven or microwave, and they taste almost as fresh as when first made. This makes them perfect for busy mornings or weekend brunches.
- Ingredient Quality: Using high‑quality apples, fresh spices, and pure vanilla extract ensures the dish shines. Even a small drop in ingredient quality can alter the flavor profile dramatically. That’s why I use only the best available ingredients.
- Crowd Reaction: In a recent gathering, I served these fritters to a group of skeptics who were wary of fried snacks. They were instantly hooked, and the next round was served before the first was finished. That’s the power of a well‑crafted bite.
- Health Angle: While they’re a treat, the use of whole milk and minimal oil keeps the calorie count moderate. The addition of nuts or a drizzle of honey can boost protein and healthy fats. You can tweak the recipe to fit a wide range of dietary needs.
Inside the Ingredient List
The Flavor Base
The 2 cups of all‑purpose flour serve as the structural backbone of the fritters, absorbing the moisture from the apples and eggs. If you skip the flour, the batter will be too runny and won’t hold together. A common swap is to use whole wheat flour for a nuttier flavor, but keep the ratio the same to maintain texture. When buying flour, look for a brand that has a fine, uniform texture to avoid clumping.
The Sweetness Layer
The ¼ cup of granulated sugar provides the first sweet hit that caramelizes on the surface when fried. It also balances the tartness of the apples. If you prefer a lower sugar content, you can reduce it to 2 tablespoons, but be prepared for a slightly less golden crust. A pinch of brown sugar instead can add depth and a subtle molasses note.
The Spices and Aromatics
Ground cinnamon (2 teaspoons) and nutmeg (½ teaspoon) are the soul of the batter, giving it that warm, comforting aroma. These spices also enhance the natural sweetness of the apples. If you’re allergic or simply don’t have nutmeg, a dash of ginger or allspice can substitute, though the flavor profile will shift. Freshly ground spices taste brighter, so grind them just before mixing.
The Protein and Moisture Boost
The 2 large eggs bind everything together and add richness. The ¾ cup of whole milk introduces moisture, ensuring the fritters stay tender inside. If you’re vegan, you can replace the eggs with a flax‑egg (1 tbsp ground flaxseed + 3 tbsp water) and use plant‑based milk. The ratio of liquid to flour is crucial; too much liquid will make the batter too thin and cause the fritters to fall apart.
The Final Flourish
The powdered sugar dusting (1 cup) gives the fritters a sweet finish and a subtle crunch when you bite into it. It also helps to keep the fritters from becoming too greasy by absorbing excess oil. If you want a savory twist, replace the powdered sugar with a light dusting of sea salt or Parmesan cheese. The 2–3 tablespoons of milk in the dusting keep the powdered sugar from clumping and give it a silky texture.
Everything’s prepped? Good. Let’s get into the real action.
The Method — Step by Step
- Prepare the Apples: Peel and dice 2 cups of apples into small, bite‑sized pieces. Toss them in a bowl with 1 teaspoon of vanilla extract to infuse flavor and prevent browning. This step is critical; if the apples stay raw, they’ll release water and make the batter soggy. Keep the apples ready while you mix the batter.
- Whisk the Dry Mix: In a large mixing bowl, combine 2 cups of flour, ¼ cup of sugar, 1 tablespoon of baking powder, ½ teaspoon of salt, 2 teaspoons of cinnamon, and ½ teaspoon of nutmeg. Whisk until the spices are evenly distributed. The dry mix should look like a fine, even texture; this ensures a smooth batter.
- Blend the Wet Ingredients: In a separate bowl, whisk together 2 eggs, ¾ cup of whole milk, and 1 teaspoon of vanilla extract. Beat until the mixture is uniform and slightly frothy. This froth introduces air, which helps the fritters rise slightly during frying.
- Combine Wet and Dry: Pour the wet mixture into the dry ingredients, stirring gently with a spatula until just combined. Be careful not to overmix; a few lumps are acceptable. Overmixing will develop gluten and result in a tough texture. The batter should be thick but pourable.
- Add the Apples: Fold the diced apples into the batter, ensuring each piece is coated. This step is the moment of truth—if you leave apples floating, they’ll burn. Stir gently so the batter remains light.
- Heat the Oil: Pour enough vegetable oil into a deep skillet to reach about 1 inch depth. Heat the oil to 350°F (175°C). Use a thermometer for accuracy; too hot and the fritters will burn, too cool and they’ll absorb too much oil.
- Fry the Bites: Drop spoonfuls of batter into the hot oil, spacing them about 2 inches apart. Fry for 2–3 minutes on each side or until golden brown and firm. The edges will start pulling away, signaling readiness. Don’t crowd the pan; overcrowding lowers the oil temperature and creates soggy fritters.
- Drain and Dust: Remove the fritters with a slotted spoon and place them on paper towels to drain excess oil. While still hot, dust each fritter with a mixture of 1 cup powdered sugar, 2–3 tablespoons of milk, and ½ teaspoon of vanilla extract. The milk keeps the sugar from clumping and gives it a glossy finish.
That’s it—you did it. But hold on, I’ve got a few more tricks that’ll take this to another level. From a glaze that adds a glossy finish to a sprinkle of sea salt that balances the sweetness, these finishing touches are the secret sauce that turns a good snack into a showstopper.
Insider Tricks for Flawless Results
The Temperature Rule Nobody Follows
Many people fry at a flat 350°F, but the best fritters come from a slightly higher heat of 360°F. This gives a crispier exterior while keeping the inside moist. I’ve used a thermometer to maintain consistency, and the difference is noticeable—your fritters will have that perfect crunch.
Why Your Nose Knows Best
If the batter smells toasty before you flip, you’re ready. The aroma is a reliable cue; if it’s still sweet and raw, give it another minute. I’ve learned to trust my nose, and it’s saved me from over‑cooked fritters on several occasions.
The 5-Minute Rest That Changes Everything
After frying, let the fritters rest on a wire rack for 5 minutes. This allows steam to escape and prevents them from becoming soggy. I’ve tried putting them on paper towels right away, and the result was a slightly gummy texture.
Use a Light Dusting of Salt
A pinch of sea salt on top of the powdered sugar dusting creates a flavor contrast that elevates the sweetness. I’ve experimented with a sprinkle of smoked salt for a smoky undertone, and it worked surprisingly well.
Reheat for Freshness
If you’re reheating, place the fritters on a baking sheet and bake at 350°F for 5 minutes. This revives the crispness without drying them out. A quick microwave can also work, but the oven gives a superior texture.
Creative Twists and Variations
This recipe is a playground. Here are some of my favorite ways to switch things up:
Maple‑Glazed Apple Fritters
Replace the powdered sugar dusting with a glaze made from ¼ cup maple syrup and 1 tablespoon melted butter. Drizzle over the hot fritters for a glossy, caramelized finish. This variation adds a deep, amber sweetness that pairs wonderfully with the spices.
Cheesy Apple Fritters
Add ¼ cup shredded sharp cheddar to the batter for a savory twist. The cheese melts into pockets of gooeyness, while the apple provides a sweet counterbalance. Serve with a dollop of sour cream for a creamy contrast.
Nutty Apple Fritters
Fold in ½ cup chopped walnuts or pecans before frying. The nuts add crunch and a buttery flavor that complements the apple. A light dusting of powdered sugar afterward keeps the snack from being too heavy.
Banana‑Apple Fritters
Replace half of the apples with ripe banana slices. The banana adds natural sweetness and moisture, creating a softer interior. The batter will be slightly thicker, so adjust the milk accordingly.
Spiced Coconut Fritters
Add ¼ cup shredded coconut to the batter and dust the finished fritters with toasted coconut flakes. The coconut brings a tropical note that pairs beautifully with cinnamon and nutmeg. It’s a perfect snack for summer afternoons.
Storing and Bringing It Back to Life
Fridge Storage
Place the cooled fritters in an airtight container in the refrigerator for up to 3 days. Keep them on a paper towel-lined tray to absorb excess moisture. When ready to eat, reheat in a 350°F oven for 5 minutes to restore crispness.
Freezer Friendly
Arrange the fritters on a parchment‑lined tray and freeze until solid. Transfer them to a freezer bag for long‑term storage (up to 2 months). When you’re ready, thaw overnight in the refrigerator, then bake at 350°F for 8 minutes.
Best Reheating Method
The oven is the best method for reheating because it preserves the crisp exterior. If you’re in a hurry, a microwave works, but it can make the fritters chewy. Add a splash of water to the container before microwaving to create steam and keep the batter moist.